
User's Manual


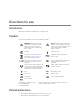
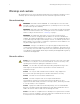
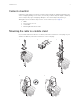


Table Of Contents

Directions for use 5
Setup
Before the radio can be used for the first time, the following tasks must be completed:
1. Set up the wireless LAN to support the radio including ESSID, authentication, and
encryption.
2. Configure the radio for the network using the ESSID, authentication, and encryption
from the previous step.
3. Configure Spot Vital Signs LXi.
To complete these tasks, follow the instructions below.
Setting up the network
To work with the radio, your network must have these features:
• A DHCP server.
• If EAP authentication is enabled: an authentication server (RADIUS).
• Welch Allyn Connex
®
software.
Ensure that your network meets these requirements.
Configuring the radio for the network
To complete this task, you need the Spot Vital Signs LXi Radio Configuration CD.
The CD installs a configuration utility and procedure on your computer.
Refer to the procedure for instructions on how to complete the configuration process.
Configuring Spot Vital Signs LXi
After configuring the radio for the network, you must configure the Spot Vital Signs LXi
device.
To complete this task, you must change a few settings in the Internal Configuration Mode
of the device. When changed, these settings become the default power-up settings.
This task also requires you to connect the radio and barcode scanner to the appropriate
serial ports on the back of the device.
To configure Spot Vital Signs LXi
1. Disconnect all devices from Port I and Port II on the back of Spot Vital Signs LXi.
2. Press to turn off Spot Vital Signs LXi.
3. Press and hold and simultaneously for 5 seconds. The Configuration Menu
screen appears.
4. Use to choose External Devices and press to access the options.
The External Devices option enables or disables available external devices.
5. Use to choose Information System and press . Use to select On and
press .