V.
Digital BOX Camera Installation Guide CAUTION RISK OF ELECTRIC SHOCK DO NOT OPEN TO REDUCE THE RISK OF ELECTRIC SHOCK, DO NOT REMOVE COVER (OR BACK), NO USER SERVICEABLE PARTS INSIDE. REFER SERVICING TO QUALIFIED SERVICE PERSONNEL. The lightning flash with an arrowhead symbol, within an equilateral triangle is intended to alert the user to the presence of uninsulated dangerous voltage within the product’s enclosure that may be of sufficient magnitude to constitute a risk of electric shock to persons.
4 Digital BOX Camera Installation Guide 2.0 Warnings The camera needs periodic inspection. Contact an authorized technician for inspection. Stop using your camera when you find a malfunction. If you use your camera around smoke or unusual heat for a long time, fire may be caused. Do not Install the camera on a surface that can not support it. Unless the surface is suitable, it could cause falling or other hazards. Do not hold plug with wet hands. It could cause an electric shock.
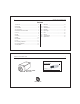
6 Digital BOX Camera Installation Guide Contents 1.0 Features ...................................................................... 3 2.0 Warnings ..................................................................... 4 3.0 Precautions ................................................................. 5 7.1 4.0 Components ................................................................ 7 5.0 Names and Functions of Parts .................................... 8 5.1 Front ....................................
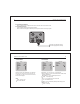
8 Digital BOX Camera Installation Guide 5.0 Names and Functions of Parts 5.1 Front Lens protection cap Please cover the lens when not using it. C-Mount lens adaptor Please attach the C-Mount lens here. CS-Mount lens adaptor Please remove the C-MOUNT lens adaptor and then attach it. Back Focus clamp screw Please loosen the clamp screw with a screwdriver before adjusting the Back Focal length. Digital BOX Camera Installation Guide 9 5.
10 Digital BOX Camera Installation Guide 5.3 Back 1 Video output terminal 2 1 Sends video signals and connects to the video input terminal of the monitor. Audio output terminal 2 Sends audio signals and connects to the audio input terminal of the monitor. 3 SET button: Used for the menu display. This button can be used to confirm settings after changing the value of the selected function or current conditions. It is Jog Controller then you move Left&Right / Up & Down.
12 Digital BOX Camera Installation Guide 6.2 Connecting to a Monitor Please connect the video output terminal located on the back of the camera to the monitor. 6.3 Connecting to Power Each model has a different power input specification. Please check the model type and standard power requirement before connecting to power. AC Power Type (AC 24V, 500mA) DC Power Type (DC 12V, 500mA) Digital BOX Camera Installation Guide 13 7.0 Setup Menu 7.2 EXPOSURE 7.
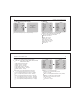
14 Digital BOX Camera Installation Guide 7.3 WHITE BALANCE SETUP LENS EXPOSURE WHITE BAL BACKLIGHT DAY&NIGHT DPC SPECIAL RESET EXIT 7.4 BACKLIGHT WB MANUAL DC ATW1 OFF AUTO COLOR TEMP BLUE RED RETURN SETUP MANUAL 111 095 RET WHITE BAL : You can select white balance mode. ATW1 / ATW2 / AWC → SET / MANUAL (INDOOR / OUTDOOR /MANUAL) ATM1 : Automatically adjusts color according to the available lighting. (2500°K → 9500°K) ATW2 : Automatically adjusts color according to the available lighting.
16 Digital BOX Camera Installation Guide 7.6 DPC (Dead Pixel Compensation) 7.7 SPECIAL SETUP LENS EXPOSURE WHITE BAL BACKLIGHT DAY&NIGHT DPC SPECIAL RESET EXIT SETUP DC ATW1 BLC AUTO COVER THE LENS THEN PRESS ENTER KEY DPC : Select dead pixel compensation processing LENS EXPOSURE WHITE BAL BACKLIGHT DAY&NIGHT DPC SPECIAL RESET EXIT SPECIAL DC ATW1 BLC AUTO CAM TITLE MOTION PRIVACY PARK.LINE IMAGE ADJ. COMM ADJ.
18 Digital BOX Camera Installation Guide 7.7 SPECIAL 7.7 SPECIAL CONTRAST : You can adjust contrast on screen. (0 ~ 255 steps) SHARPNESS : You can adjust sharpness on screen. (0 ~ 31 steps) DISPLAY : You can adjust display. (CRT / LCD / USER) CRT (Cathode Ray Tube, Braun tube) PED LEVEL : 0 ~ 63 steps COLOR GAIN : 0 ~ 255 steps LCD (Liquid Crystal Display) GAMMA : 0.05 ~ 1.00 steps PED LEVEL : 0 ~ 63 steps COLOR GAIN : 0 ~ 255 steps USER SPECIAL CAM TITLE MOTION PRIVACY PARK.LINET IMAGE ADJ. COMM ADJ.
20 Digital BOX Camera Installation Guide Problems Troubleshooting The WDR function is not working Please check if the WDR Level is too low. Please check if the AE Mode is set to MANUAL. The WDR doesn’t work in MANUAL Exposure mode. Colors are not quite right. Please check if the camera is facing directly into sunlight or fluorescent light. Please check if an auto iris lens is being used. Please check the connection of the lens connector cable.
22 Digital BOX Camera Installation Guide 9 Specification Model Cam Title Motion Privacy Park. Line Comm ADJ.