
Operation Manual


6.2 Connecting to a Monitor
Please connect the video output terminal located on the back of the camera to the monitor.
6.3 Connecting to Power
Each model has a different power input specification.
Please check the model type and standard power requirement before connecting to power.
Digital BOX Camera Installation Guide12
AC Power Type (AC 24V, 500mA)
DC Power Type (DC 12V, 500mA)
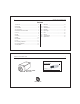
7.0 Setup Menu
7.1 MAIN MENU
Digital BOX Camera Installation Guide 13
SETUP
LENS
EXPOSURE
WHITE BAL
BACKLIGHT
DAY&NIGHT
DPC
SPECIAL
RESET
EXIT
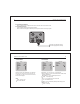
DC
ATW1
OFF
AUTO
SETUP
LENS
EXPOSURE
WHITE BAL
BACKLIGHT
DAY&NIGHT
DPC
SPECIAL
RESET
EXIT
DC
ATW1
OFF
AUTO
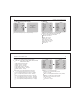
EXPOSURE
SHUTTER
BRIGHTNESS
AGC
DWDR
RETURN
AUTO
----
50
OFF
RET
The menu consists of the “Main Menu” and “Sub Menu”.
The main menu is 8 kinds of camera functons can
be selected.To the right of each main menu selection,
the sub-menu is displayed.
SHUTTER : You can set to auto or manual mode.
AUTO, 1/60(50), FLK, 1/250, 1/500, 1/1000, 1/2000, 1/4000, 1/5000,
1/10000, 1/100000sec
BRIGHTNESS : You can adjust brightness level.
0
(dark) ~ 255 (bright) steps
AGC : You can select auto gain control level
OFF / LOW / MIDDLE / HIGH
LENS
LENS : Select lens type
DC /VIDEO / MENUAL
DWDR : You can select WDR (Wide Dynamic Range) level.
DWDR : OFF / ON
LEVEL : 0~35 steps
7.2 EXPOSURE