Patio Heater Model: PH09-S/ PH09-SS Item #: 01338, 01337, 01347, 60789, 60790 WARNING: For outdoor use only. FOR YOUR SAFETY If you smell gas: 1. Shut off gas to the appliance. 2. Extinguish any open flame. 3. If odor continues, immediately call gas supplier. FOR YOUR SAFETY Do not store or use gasoline or other flammable vapors or liquids in the vicinity of this or any other appliance. PLEASE retain this manual for reference.
TOOLS AND PARTS NEEDED FOR ASSEMBLY DANGER CARBON MONOXIDE HAZARD This appliance can produce carbon monoxide which has no odor. Using it in an enclosed space can kill you. Never use this appliance in an enclosed space such as a camper, tent, car or home. WARNING: Improper installation, adjustment, alteration, service or maintenance can cause injury or property damage. Read the installation, operating and maintenance instructions thoroughly before installing or servicing this equipment.
PRECAUTIONS NOTE: PLEASE READ THE FOLLOWING SAFETY RULES WARNING: This heater must only be used outdoors. Using this product in an enclosed area may cause injury, death or property damage. Only use in a well-ventilated space. Do not use in a building, garage, or any other enclosed area. Read the instructions before use. This heater must be installed in accordance with local codes or, in the absences of local codes, with the National Fuel Code, ANSI Z223.1.
PRECAUTIONS CHECK THE HEATER IMMEDIATELY IF ANY OF THE FOLLOWING EXIST: 1. The smell of gas in conjunction with extreme yellow colored tips of the burner flames. 2. The heater does not reach temperature. 3. The burner makes a popping noise during use (a slight popping noise is normal when the burner is extinguished after using). Children and adults should be aware of the hazards of high surface temperature, and should stay away to avoid burns or clothing ignition.
ASSEMBLY PARTS LIST 1. Burner assembly 2. 4 pcs mesh guard 3. Handle with 2 pcs M6 nuts and 2 pcs flat gaskets 4. Back panel 5. 5 pcs M4x10mm bolts, 5 pcs M4 flat gaskets, and 5 pcs M4 nuts to connect the burner assembly with back panel 6. Regulator with gas hose 7. Door panel 8. 10 pcs M5x12mm bolts and 10pcs M5 nuts for connection of 5 brackets with back panel,5pcs M8x16mm bolts to connect the back panel with base 9. Wheels with 2 pcs M8x16mm bolts and 2 pcs M8 nuts 10.
ASSEMBLY WARNING: This appliance requires installation by a competent person. Proper assembly is the responsibility of the installer. Step 1 Use 6 pcs M6x12mm bolts and 6 pcs M6 nuts to connect 3 cylinder brackets on the base. The brackets will allow LPG cylinder to rest securely on base. Step 2 Attach the handle to the back panel with 2 pcs M6 nuts and 2 pcs flat gasket.
ASSEMBLY Step 3 Use 10 pcs M5x12mm bolts and 10pcs M5 nuts to connect 5 brackets with back panel, Attach the back panel on the base with 5 pcs M8x16mm bolts. Step 4 Attach the burner assembly to back panel with 5 pcs M4x10mm bolts, 5 pcs M4 flat gaskets, and 5 pcs M4 nuts.
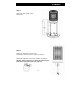
ASSEMBLY Step 5 Attach the door panel to the back panel. Step 6 Attach the regulator to the burner assembly (see picture to the right) and tighten. Attach the regulator to the LPG cylinder (see below). Warning: Always make sure to check the connection for leaks before using the heater (see page 10).
ASSEMBLY Step 7 Attach mesh guards (4 pcs) to burner assembly as shown (see picture to right).
ASSEMBLY AND OPERATION To check for leaks: Your patio heater has been checked at all factory connections for leaks, but you should always check when you attach the LPG cylinder. To check for leaks, follow these instructions: --Assemble all gas connections. --Connect regulator assembly to the propane tank. --Make sure the heater valve is turned OFF. 1) Make soapy solution by mixing 1 part liquid dish soap and 3 parts water. 2) Open the propane tank valve.
ASSEMBLY AND OPERATION NOTE: 1) The cylinder must be provided with a shut off valve terminating in a LPG supply cylinder valve outlet specified, as applicable, for connection NO 510 in the standard for compressed gas cylinder valve outlet and inlet connections, ANSI/CGA-v-1. 2) The cylinder supply system must be arranged for vapor withdrawal. 3) The cylinder used must include a collar to protect the cylinder valve. Annually check operation: A. Open the door panel. B. Open the propane tank valve. C.
OPERATION Before Lighting: Heater should be thoroughly inspected before each use. Have a qualified service person inspect the heater at least annually. If relighting a hot heater, always wait at least 5 minutes. This heater has been tested for quality assurance LIGHTING INSTRUCTIONS TO TURN ON THE HEATER. 1. Turn the control knob “OFF”. 2. Slowly open the gas cylinder valve fully. 3. Press and turn the control knob to “HI” position ( counter-clockwise 90°). 4. Check for flame at the burner.
OPERATION TO TURN OFF THE HEATER. 1. 2. - Press and turn the control knob to “OFF” position. Turn off the valve on the LPG cylinder and disconnect the cylinder from the heater.
OPERATION CAUTION: Avoid inhaling fumes emitted from the heater’s first use. Smoke and odor from the burning of oils used in manufacturing will appear. Both smoke and odor will dissipate after approximately 30 minutes. The heater should not produce thick black smoke. Note: The burner maybe be noisy when initially turned on. To eliminate excessive noise from the burner, turn the control knob to the “LOW” position, then turn the knob to the level of heat desired.
LOCATION OF HEATER WHILE IN USE CAUTION: WHEN CERTAIN MATERIALS OR ITEMS ARE LEFT UNDER THIS HEATER WHILE IN USE THEY WILL BE SUBJECT TO RADIANT HEAT AND COULD BE SERIOUSLY DAMAGED. This heater is to be used for the heating of outdoor patios, decks, spas, pool, and open working areas. This heater is for OUTDOOR USE ONLY. Always make sure that adequate fresh air ventilation is provided and follow the spacing tolerances shown in the picture below. The minimum clearances must be maintained at all times.
MAINTENANCE CLEANING AND MAINTENANCE To enjoy years of outstanding performance from your Heater, make sure you perform the following maintenance on a regular basis: WARNING FOR YOUR SAFETY: ALLOW HEATER TO COMPLETELY COOL BEFORE MOVING. 1. Keep exterior surfaces clean. Use warm soapy water for cleaning. Never use flammable or corrosive cleaning agents. While cleaning your heater, be sure to keep the area around the burner and pilot assembly dry at all times.
MAINTENANCE Carbon deposits may create a fire hazard. Clean dome and engine with warm soapy water if any carbon deposits develop. NOTE: a salt-air environment (such as near an ocean), corrosion occurs more quickly than normal.
TROUBLESHOOTING Problem Problem cause Pilot will not light Gas valve may be OFF Turn the gas valve ON Tank fuel empty Refill LPG tank Air in supply system Purge air from lines Loose connection Check all fittings Debris around pilot Clean dirty area Loose connection Tighten connection Thermocouple bad Replace thermocouple Gas leak in line Check connections Lack of fuel pressure Fuel tank is near empty Pressure is low Fuel tank is near empty Control valve not ON Turn valve to ON Ther
Distributed By: Well Traveled Living th 716 S 8 Street Amelia Island, FL 32034 Toll Free: 866‐WTL‐SUPP Web: www.wtliving.com Email: cservice@welltraveled.net 1 YEAR LIMITED WARRANTY – Customers in the Continental US All components are warranted for a period of 1 year after date of purchase by the original owner against defects in materials and workmanship under normal use. This warranty does NOT cover normal wear and weathering, assembly and/or maintenance OR use in a commercial application.