
User Manual
1
DESCRIPTION
When using digital soldering station, the calibration box WCB1 is used as the external input unit for programming the following additional functions:
Offset: Correction value for soldering tip temperature
Setback: Reduction of the set temperature after a specified period of time
Lock: Locking the set temperature
°C/°F: Switching temperature display °C/°F
Window: Setting a set value window. If the actual temperature is within the set value window, a potential-fee contact is activated.
Cal: New calibration of soldering station and reset to factory setting (FSE)
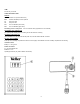
START-UP
Remove the soldering iron from the power supply unit. Insert the calibration box cable (3) into the soldering iron bushing. Pressing the ON/OFF
button (to switch calibration box ON/OFF) puts the calibration box into ready mode (blinking cursor in display (1)).
These functions, shown on the keys, are activated in connection with the shift key (to be pressed at the same time as the function key).
THE FOLLOWING ENTRIES ARE POSSIBLE
OFFSET
The actual soldering tip temperature can be changed by ±40°C (±72°F) by entering temperature correction value (offset).
The current offset value is displayed after selecting the offset function (Shift-Offset).
It is then possible to enter a new value and to confirm it by pressing the offset key (Shift-Offset) again (negative entries are possible with the ± key).
The setting is confirmed in the display with ON; if 0 was entered, this is confirmed with OFF. If no confirmation takes place, the display will
switch back to the ready mode (blinking cursor) after a short period of time, and the old value is retained.
Example: Set temperature = 350°C, measured soldering tip temperature = 352°C. This results in an offset of 2°C (± key). New soldering tip
temperature = 350°C.
SETBACK
Reduction of the set temperature to 150°C (standby). After the soldering station switches to the standby mode, the setback time can be adjusted
from 0 to 99 minutes.
After pressing the setback key the current setback time will be displayed. It is now possible to enter a new value (0-99) and to confirm this value by
pressing the setback key again. The setting is confirmed in the display with ON, and with OFF if 0 was set (setback function is deactivated). If
no confirmation takes place, the display switches back to the ready mode (blinking cursor) after a short period of time, and the old value is retained.
If the soldering tip temperature does not fall more than 5°C below the set temperature within the setback time, or if no finger-tip operating pressure
is applied (i.e. soldering tool is not used) the set temperature is reduced to a temperature which is less damaging to the soldering tip (150°C). This
operating mode is signaled by a blinking actual value display. The set temperature value is restored by pressing any key on the power supply unit or
applying fingertip pressure.
LOCK
Locking the set temperature. After locking has taken place, no other changes to the setting of the power supply unit can be made.
After selecting the lock function the current set temperature will be displayed. It is now possible to enter a new value and to lock this value by
pressing the lock key again. This setting is confirmed in the display with ON. The lock is cancelled by pressing the lock key twice (without entering
a temperature). This setting is confirmed in the display with OFF.
°C/°F
Switching temperature display from °C to °F, and vice versa.
Pressing the °C/°F key will switch the temperature display, and will be confirmed briefly (°C or °F).
WINDOW
Setting a set value window from ±0 to 99°C/178°F (possible only with power supply units with transistor outlet).
if the actual temperature is within the set value window, the potential-free transistor outlet to the power supply unit is conductive.
After selecting the window function (Shift-Window) the current set value for the temperature window is displayed. It is now possible to enter a new
value and to confirm this value by pressing the window key again. The setting is confirmed in the display with ON, or with OFF if 0 (window
function is deactivated). If no confirmation is made, the display switches back to the ready mode (blinking cursor) after a short period of time, and
the old value is retained.
CAL
New calibration of soldering station and factory setting FSE (FSE reset all set values to 0, temperature set value 350°C/660°F).
After selecting the Cal function (Shift-Cal) the numbers -1- to -2- will run in the display (soldering station is re-calibrated).
The display will then briefly show FSE (reset to factory setting has been completed).