712 BLOOMFIELD INDUSTRIES 10 Sunnen Drive St. Louis, MO 63143 telephone: 314-678-6336 fax: 314-781-2714 www.wellsbloomfield.com OWNERS MANUAL for HOT WATER DISPENSER 2 GALLON MODELS: 1222 1222CA 5 GALLON MODELS: 1225 1226 Includes: Installation Operation Use & Care Servicing Instructions Model 1222 Dispenser 2M-76580 Rev.
WARRANTY STATEMENT All electrical equipment manufactured by WELLS BLOOMFIELD, LLC is warranted against defects in materials and workmanship for a period of one year from the date of original installation or eighteen (18) months from the date of shipment from our factory, whichever comes first, and is for the benefit of the original purchaser, except that: a. airpots carry a 30 day parts warranty only. b. dispensers; i.e., tea and coffee carry a 90 days parts warranty only, excludes decanters.
TABLE OF CONTENTS WARRANTY STATEMENT xi SPECIFICATIONS 1 FEATURES & OPERATING CONTROLS 2 PRECAUTIONS & GENERAL INFORMATION 3 AGENCY LISTING INFORMATION 3 INSTALLATION INSTRUCTIONS 4 OPERATION 6 CLEANING INSTRUCTIONS 7 TROUBLESHOOTING SUGGESTIONS 8 SERVICING INSTRUCTIONS 9 Deliming Instructions 12 EXPLODED VIEW & PARTS LIST 13 WIRING DIAGRAMS 16 Thank You for purchasing this Wells Bloomfield appliance.
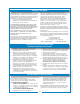
FEATURES AND OPERATING CONTROLS REAR COVER REAR VIEW FRONT VIEW THERMOSTAT ACCESS READY LITE POWER LITE HO TW FLEXIBLE DRAIN LINE AT E R WATER SUPPLY CONNECTION TANK HEATER SWITCH DRAIN LINE TUBING CLAMP POWER CORD RUBBER GRIP FEET 2 IL2081 712 p/n 2M-76580 1222_1225_1226 Owmers Manual DISPENSE FAUCET
PRECAUTIONS AND GENERAL INFORMATION WARNING: ELECTRIC SHOCK HAZARD All servicing requiring access to non-insulated components must be performed by qualified service personnel. Do not open any access panels which require the use of tools. Failure to heed this warning can result in electrical shock. WARNING: INJURY HAZARD All installation procedures must be performed by qualified personnel with full knowledge of all applicable electrical and plumbing codes.
INSTALLATION READ THIS CAREFULLY BEFORE STARTING THE INSTALLATION REFER TO EXPLODED VIEWS Page 14 for COMPONENT NAMES/NUMBERS. Unpack the unit. Inspect all components for completeness and condition. Ensure that all packing materials have been removed from the unit. LEVELING THE UNIT EQUIPMENT DAMAGE Two Gallon Dispenser is NOT provided with adjustable legs. Be sure dispenser is placed on a solid level surface with all four feet touching the surface.
INSTALLATION (continued) NSF requires that the unit be able to be moved for cleaning underneath. A flex line or loops of copper tubing will satisfy this requirement. See Figure 2 below. COPPER LOOPS OR FLEX LINES (PROVIDED BY PLUMBER) SOLENOID STRAINER WASHER SHUT-OFF VALVE (PROVIDED BY PLUMBER) CAUTION: SHOCK HAZARD WATER INLET FITTING FLOW WATER SUPPLY IL2351 Fig.
OPERATION WATER HEATER Water temperature is sensed by thermobulb inserted into the water tank. Temperature is controlled by a mechanical thermostat. The setpoint temperature is adjustable by turning the thermostat shaft. Excessive temperature will trip the hi-limit safety switch, disabling the heating element. The hi-limit will automatically reset when the dispenser cools. WATER LEVEL Water level is controlled by an electronic controller. The water level probe senses chassis ground through the water.
CLEANING INSTRUCTIONS PROCEDURE: Clean Hot Water Dispenser PRECAUTIONS: Disconnect dispenser from electric power. Allow dispenser to cool. FREQUENCY: Daily TOOLS: Mild Detergent, Clean Soft Cloth or Sponge Bristle Brush CAUTION: BURN HAZARD Dispensed water is extremely hot. Hot water will cause serious skin burns. CAUTION: SHOCK HAZARD Do not submerge or immerse dispenser in water. 1. Disconnect dispenser from electric power. Allow to cool before cleaning. 2.
TROUBLESHOOTING SUGGESTIONS Water won’t heat No flow from hot water faucet Water faucet drips POSSIBLE CAUSE SUGGESTED REMEDY Dispenser unplugged or circuit breaker tripped Check power supply cord Tank heater switch “OFF” Press switch to “ON” Temperature setpoint too low Adjust thermostat for desired temperature Hi-Limit safety switch tripped Allow to cool hi-limit will self-reset Damaged internal component or wiring Examine wiring & connectors, controller, power board and heating element.
SERVICING INSTRUCTIONS ACCESS PANELS CAUTION: REAR PANEL: Remove rear panel to access hot water tank, thermostat, heating elements, tubing, water level control and plumbing connections. Rear panel is held by four screws at the back. The flanged top portion fits over the body of the dispenser. SOLENOID DOOR: Solenoid door may be removed to aid in solenoid replacement. This access panel is not normally removed. Solenoid door is held by two screws and a retaining lip.
SERVICING INSTRUCTIONS (continued) TEMPERATURE ADJUSTMENT Check temperature at discharge of faucet. Remove thermostat access button plug to access thermostat. Turn thermostat shaft clockwise to increase temperature. IMPORTANT: The thermostat will maintain temperature within ±3ºF. For high altitude locations, thermostat should be adjusted to a maximum temperature equal to the local boiling temperature minus 5º.
SERVICING INSTRUCTIONS (continued) REPLACE HEATING ELEMENT Remove tank lid assembly as detailed on page 10. Remove two hex nuts holding element to cover. Pull element from mounting holes. IMPORTANT: When replacing heating element, also replace seal gaskets. Reassemble in reverse order. REPLACE SOLENOID Unplug power cord. Turn OFF and disconnect water supply from dispenser inlet fitting. Remove rear panel. Remove two screws holding access door in place. Remove access door and solenoid.
SERVICING INSTRUCTIONS (continued) CHEMICAL BURN HAZARD Deliming chemicals may be caustic. Wear appropriate protective gloves and goggles during this procedure. Never siphon deliming chemicals or solutions by mouth. This operation should only be performed by qualified and experienced service personnel. IMPORTANT: DO NOT spill, splash or pour water or deliming solution into or over any internal component other than the inside of the water tank.
EXPLODED VIEWS AND PARTS LISTS HO TW AT E R BONNET & PLUNGER ASSY.
EXPLODED VIEW & PARTS LIST 27 3 19 2 REQD 40 28 29 2 REQD 18 36 26 20 24 31 21 35 22 23 25 21 2 12 10 5 9 13 4 11 6 8 7 17 17c 17b 16 15 17a 14 34 34 38 39 37 1 30 HOT WATER DISPENSER NOTE: Model 1225/1226 shown. Model 1222/1222CA is similar.
EXPLODED VIEW & PARTS LIST (continued) ITEM DESCRIPTION 1222 P/N 1222CA P/N 1225 P/N WRAP, BODY C7-76579 C7-76709 2 TANK ASSY C7-76578 C7-76710 3 PANEL, TOP BACK C7-76512 4 PLUG, BUTTON 7/8" 5 SUPPORT, TANK 6 LABEL, HW DISPENSER 7 LIGHT, PILOT GREEN 2J-72671 2J-35697 8 LIGHT, PILOT AMBER 2S-41778 2J-30516 CONTROL, LOW WATER, 120V 2E-46604 9 10 11 12 13 C7-76713 2P-70714 C7-76521 C7-76712 2M-76568 CONTROL, LOW WATER, 240V 2E-306865 SPACER, NYLON 2A-43201 PANEL, REAR LOW
WIRING DIAGRAM 16 712 p/n 2M-76580 1222_1225_1226 Owmers Manual 2-GALLON MODELS 1222 and 1222CA
WIRING DIAGRAM (continued) 5-GALLON MODELS 1225 and 1226 HOT WATER READY LIGHT (AMBER) BLACK POWER LIGHT (GREEN) BLACK 7 7 THERMOSTAT 5 BLACK WATER LEVEL CONTROL BOARD COMM N.O. WATER LEVEL PROBE TANK HEATER SWITCH N.C. 3 HI-LIMIT 6 MAX RED12ga. INPUT 11 COMM ON GREEN 2 WHITE BLACK 13 712 p/n 2M-76580 1222_1225_1226 Owmers Manual 12 10 OFF BLACK WHITE HEATING ELEMENT 4000 WATTS WHITE RED 12 ga.
10 Sunnen Drive, St. Louis, MO 63143 telephone: 314-678-6336 fax: 314-781-2714 www.wellsbloomfield.