
Operating instructions


SERVICING INSTRUCTIONS (continued)
REPLACE SUPPORT ROD SPRING
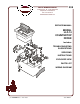
Fig. 10
Support Rod
Spring Installation
Unplug fryer and allow to cool before servicing.
A. REMOVE ELEMENT HEAD FROM FRYER
1. Remove two screws holding either element head pivot.
Remove pivot.
2. Lift element head assembly from fryer.
3. Remove bottom cover from control box.
B. REMOVE BROKEN SPRING
1. Using a flat blade screwdriver or other suitable tool, pry the
split end of the support rod to open the slot.
2. Remove and discard the broken spring parts.
C. INSTALL NEW SPRING
1. Position the support rod toward the back (power cord) side of
the control box, then slide the new spring over the split end of
the support rod.
Note orientation: Long leg of spring at the top and pointing
toward the front; short leg of spring in the slot.
2. Using pliers, squeeze the split end of the support rod to capture
the spring.
3. Tension the spring by swinging the long leg clockwise, and
allowing it to rest against the lip of the control box.
D. REINSTALL ELEMENT HEAD ON FRYER (see page 5)
Test fryer for proper operation and return to service.
CAUTION:
BURN HAZARD
Allow fryer to cool before
performing this service.
CAUTION:
SHOCK HAZARD
Unplug fryer from electric
power before servicing.
Fig. 11 Installation Sequence
7
305 504367 Service Manual - Countertop Fryer LLF-14