
Operating instructions
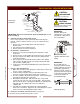

FRYER
22
SV507 SvcManual WV-FG(RW))
FRYER SECTION - SERVICE INSTRUCTIONS
Element Assembly
IMPORTANT: Disconnect from electric power and allow fryer to cool
before servicing.
A. REMOVE ELEMENT HEAD FROM FRYER
Note: Some operations can be performed without removing the
fryhead. However, doing so will ease access to components and
fasteners.
1. Remove two screws holding either element head pivot.
Remove pivot.
2. Lift element head assembly from fryer.
3. Remove bottom cover from control box.
B. DISCONNECT ELEMENT
1. Disconnect the wiring from the element terminals.
2. Note position of each thermobulb and the routing of the capillary
tubes. Remove bulbs from element by removing two bulb clips and
three capillary clips from each bulb.
3. Undo both holding nuts from terminal end of the element.
4. Withdraw the element from the control box.
C. INSTALL NEW ELEMENT
1. Wipe area around element openings in control box to remove any
grease or other cooking debris.
2. Slide one fiber washer over each end of the new element.
3. Insert element into the control box. Slide a lock washer over each
element, then thread on the holding nuts. Make sure the element
is square with the control box. Tighten holding nuts.
4. Reconnect wiring to the element terminals.
5. Reinstall the thermobulbs. Be sure a bulb clip is in place at each
end of the thermobulb.
NOTE: Control and HI-Limit thermobulbs may require different
bulb clips. Refer to parts list for proper component.
Snap a bulb clip over the element to secure the bulb. Carefully
route the capillary tube and secure with three capillary clips.
Repeat for both bulbs.
D. REINSTALL ELEMENT HEAD ON FRYER
1. For F-49, be sure the pivot washer is in place on the pivot brackets.
While holding the support rod in the forward position, slide the
element head assembly onto the fixed pivot. Reinstall the pivot
removed In step A.
Test fryer for proper operation and return to service.
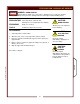
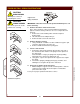
CAUTION:
BURN HAZARD
Allow fryer to cool before
performing this service.
CAUTION:
SHOCK HAZARD
Disconnect fryer from electric
power before servicing.
IMPORTANT:
DO NOT damage the
capillary tubes. If the tubes
are pinched or kinked, they
are not repairable.
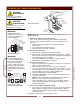
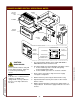
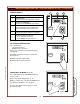
Element Attachment
IMPORTANT:
Be sure thermobulbs are
correctly seated in bulb clips.
These clips hold the bulbs
away from the element
surface. Failure to properly
position the clips will result in
the immediate failure of the
thermostat due to thermobulb
damage.
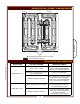
Cross-Section View of
Element and Thermobulbs
5/8-18 NUT
2 places
LOCK WASHER
FIBER WASHER
CAPILLARY CLIP
6 places
ELEMENT
BULB CLIP
4 places
HI-LIMIT
BULB (ref)
TEMP
CONTROL
BULB (ref)
5/8-18 NUT
LOCK WASHER
FIBER WASHER
ELEMENT
CONTROL BOX
CAPILLARY CLIP
BULB CLIP
BULBS (ref)
ELEMENT