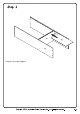
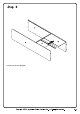
Insert wooden dowel (A) into parts (3,4,5) as per diagram.
Using cam bolt (C) secure parts (3,4) with Philips head screwdriver as per diagram.
Using cam lock (B) attach parts (3,4) to part (5) with Philips head screwdriver as per diagram.
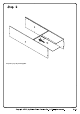
Put part (10) as per diagram.
Put part (9) as per diagram.
Put part (10) as per diagram.
Using screw (E) attach part (2) into parts (3,4) with hex key (F) as per diagram.
Using bolt (G) attach part (13) into part (2) with hex key (F) as per diagram.
Put part (8) as per diagram.
Put part (7) as per diagram.
Put part (8) as per diagram.
Using screw (E) attach part (1) into parts (3,4) with hex key (F) as per diagram.
Using screw (M) attach plastic wedge (N) into back panel with Philips head screwdriver as per diagram.
Place sticker (D) cover the holes as per diagram .
Insert shelf support pin (J) into parts (3,4),then put part (6) as per diagram.
Using screw (R) attach Euro hinge (Q) into part (14) and using handle bolt (K) secure handle (L) to part (14) with Philips head screwdriver as per diagram.
Using screw (R) attach Euro hinge (Q) into part (11) and using handle bolt (K) secure handle (L) to part (11) with Philips head screwdriver as per diagram.
Using screw (R) attach Euro hinge (Q) into part (3) with Philips head screwdriver as per diagram.
Using screw (R) attach Euro hinge (Q) into part (4) with Philips head screwdriver as per diagram.
Put part (H) as per diagram.
Put part (12) as per diagram.
Using screw (S) attach plastic strap (U) into part (1) with Philips head screwdriver as per diagram. If necessary, adjust the pre-attached Floor Levelers at the bottom of metal legs (13) to level the unit.
Using screw (T) attach plastic strap (U) into nut (V) to wall with Philips head screwdriver as per diagram.