BR6DPRIDR Assembly Instructions Please visit our website for the most current instructions, assembly tips, to report damage or request parts. www.walkeredson.com Revised 01/2021 P.
P.
The side drawer with WARNING LABEL, should be mouted in highest drawer.
A Ø8*30mm Wooden dowel 86 pcs B Ø3,5*30mm Screw 78 pcs C Ø4,0*40mm Screw 10 pcs D Ø4,0*25mm Screw 61 pcs E Washer 02 pcs F Wall anchor 01 pc G Ø8*20mm Wooden dowel 48 pc H Ø10*10 Nail 32 pcs Ø6mm 01 pc 01 pc J K Profile H Hammer recommended for assembly (not included) P.
Step 1 A G 7 6x A 2x G 5 A A G A G A 6x 17 A 2x A 9 A 6x 13 A A A 6x A 14 A Ø8*30mm G Ø8*20mm A 44 A 24 Insert Wooden dowel (A) into part (7), (9), (13) and (14). Insert Wooden dowel (G) into part (5) and (17). Step 2 A A A A D A A D 2 D D D 3 5 D D D 5 D 5 5 A A A A A A A A D A 4 D D 17 D A Ø8*30mm 18 17 A 17 D Ø4*25mm 16 D D 17 D A A Insert Wooden dowel (A) into part (2), (3) and (4).
Step 3 B B B 3 B 1 B C C 4 B C C C 2 6 C C C C C B Ø3,5*30mm C Ø4*40 mm 09 09 Secure part (1) to part (2), (3) and (4) with screw (B). Secure part (6) to part (2), (3) and (4) with screw (C). Step 4 8 2x 7 B B 8 B B Ø3,5*30mm 04 Secure part (8) to part (7) with screw (B). P.
Step 5 7 B B B 9 9 B B 7 B Ø3,5*30mm 04 Secure part (9) to part (7) with screw (B). Step 6 7 BB B B B B B 6 B B B B 7 B B B Ø3,5*30mm 12 Secure part (7) to part (6) with screw (B). P.
Step 7 C C 18 6 C Ø4*40 mm 01 Secure part (18) to part (6) with screw (C). Step 8 D D D D D D D 5 17 17 D 5 3 4 2 D Secure part (5) to part (2) and (3) with screw (D). Ø4*25mm 08 Secure part (17) to part (4) with screw (D). P.
Step 9 A 5 A 5 A A 17 A 17 5 A A A 17 17 A 5 A A 17 17 A 5 A 5 A Ø8*30mm 12 Insert Wooden dowel (A) into part (5) and (17). Step 10 ! 90° 10 H K H 10 H H H H H H H 10 H H K H H H H H H H 10 H H H H H H H H H H K Ø10*10mm 32 01 Secure back panel (10) and hardware (K) to body with nails (H) P.
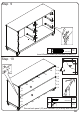
Step 11 F E D D+E F D Ø4*25mm 01 E 01 F 01 Attach hardware (F) part (1), with screw (D+E). Step 12 D D 6x D D D D 12 G G G G 11 11 D Ø4*25mm G Ø8*20mm 36 24 Insert Wooden dowel (G) into part (11). Secure part (11) to part (12) with screw (D). P.
Step 13 B 13 B 6x B 16 14 B B 12 B B 15 B B Ø3,5*30mm 48 Secure part (13) and (14) to part (12) with screw (B). Insert part (15) between parts (13) and (14) Secure part (16) with screw (B). Step 14 Drawer Stop Insert wood dowel (A) on the inside of all drawers while drawer is inside the unit. Make sure dowel is flush with panel. A Ø8*30mm 12 A A A A A A P.
Step 15 Wall anchor and hardware are included with this product. Please make sure hardware is suitable for your walls before installing, as different wall materials may require different types of anchors. Ø6mm J E B Wall Top B Ø3,5*30mm 01 E 01 J 01 P.
Step 16 150 lbs P.