
Use and Care Manual


88
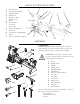
ASSEMBLY
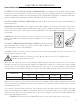
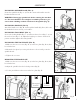
INSTALLING THE SPUR CENTER (FIG. F)
1. Make sure the surfaces of both the spur center and the
spindle are clean.
2. Drive the spur center (Fig. F - 1) into the workpiece (Fig.
F - 2) using a rubber mallet or a piece of scrap wood.
3. Push the spur center into the spindle
Note: It is not necessary to remove the face plate in order to
install the spur center.
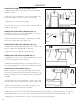
REMOVING THE SPUR CENTER (FIG. G)
1. Hold spur center to prevent it from falling. Use a rag to
protect your hand from the sharp edges.
2. Insert the knockout rod (Fig. G - 1) through the spindle
hole to tap out the spur center (Fig. G - 2).
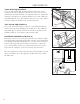
INSTALLING THE LIVE CENTER (FIG. H)
1. Rotate the tailstock handwheel (Fig. H - 3) clockwise a few
times to advance the quill (Fig. H - 2) forward.
2. Push the live center (Fig. H - 1) into the quill.
REMOVING THE LIVE CENTER (FIG. I)
1. Hold the live center to prevent it from falling. Use a rag to
protect your hand from the sharp edges.
2. Rotate the handwheel (Fig. I - 1) counterclockwise to re-
tract the quill until the live center is released from the quill.
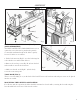
INSTALLING TOOL REST (FIG. J)
When a workpiece is larger than the swing capacity on the
bed, it can be turned by using the back face plate (Fig. J - 1)
and tool rest (Fig. J -6). To mount the tool rest to the back of
the lathe:
1. Fit the back tool rest support (Fig. J - 3) to the rear of the
lathe using three hex bolts and three flat washers (Fig. J - 2).
2. Remove the clamp (Fig. J - 4) and hex nut (Fig. J - 5) of
Fig. F
Fig. G
Fig. H
Fig. I
1 2
1
2
tool rest base from the underside of the lathe.
3. Move the tool rest base onto the back support. Replace the clamp (Fig. J - 4) and hex nut (Fig. J - 5) onto the
thread (alternatively, you can remove the stop at the end of the bed and slide the tailstock and tool rest off).
4. Adjust the hex nut until the tool rest base can be locked onto the back support.
1
2
3
1