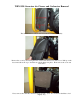
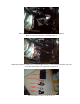
WEN 3500 Generator Air Cleaner and Carburetor Removal The Air Cleaner is located to the left of the recoil starter assembly. Remove the cover by unscrewing the knob located near the bottom of the cover. Pull up on the bottom and allow the top to clear the two tabs holding it in place. Then remove the cover and set it aside. Next, remove the foam filter element and set it aside. (Note: It is normal for the filter to feel slightly oily.
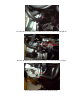
Remove the metal grate from the Air Cleaner housing. It is held in position by two plastic pins. Pull he grate straight off the pins and set it aside. Under the grate you will see a 10mm nut. Remove the nut and set it aside. On the LEFT side of the Air Cleaner housing you will see a rubber hose. Remove the clamp with pliers and slide it up the tube. Insert a flat screwdriver blade between the hose and the housing and wiggle the hose away from the plastic nipple.
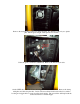
Allow the hose to dangle free next to the Air Cleaner box. Remove the 10mm nut located above the vent hose you just removed. Locate the 10mm screw on the underside of the Air Cleaner assembly. It secures a bracket that goes from the engine block to the Air Cleaner. Remove the screw and set it aside.
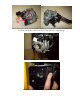
There is an air duct that goes from the Air Cleaner to the OHV cover on the engine. Remove this air duct from the Air Cleaner by pulling up on it. It is a friction fit. There are no clamps. Remove the Air Cleaner to expose the carburetor. Note there is a gasket BETWEEN the Air Cleaner and the Carburetor. Set the gasket aside for reassembly later on. If you are removing the Carburetor, disconnect the fuel hose by releasing the hose clamp and sliding it back on the hose.
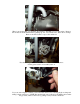
Remove the regulating spring from the Carburetor linkage and allow the spring to dangle free for later reassembly. Remove the Pulling Rod by swinging the linkage all the way to the RIGHT and pulling up on the rod. To remove the Carburetor, pull it away from the engine until it clears the stud bolts.
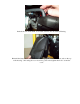
There is a Gasket BETWEEN the Carburetor and the Connecting Block. Remove it and set it aside for reassembly later on. Behind the Carburetor Gasket is a Connecting Block made of a black plastic material, followed by an Inlet Gasket that seats against the engine itself. The reinstallation order is as shown above.
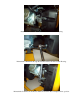
Note that the Spark Plug Wire is routed in a slot on top of the Connecting Block. Reattach the Pulling Rod and Regulating Spring on to the Carburetor Linkage. Reinstall the Fuel Hose and secure the Hose Clamp.
When attaching the Choke Lever, install it over the top of the Post molded into the Carburetor and make sure the Pin of the Choke Lever seats in the slot on the Linkage. Reinstall the Air Cleaner Gasket. Attach the Air Cleaner Housing and reinstall the 10mm Nut.
Attach the 10mm Nut to the OUTSIDE of the Air Cleaner Housing. Reinstall the 10mm Bolt through the bracket and into the Air Cleaner Housing. Reinstall the Vent Hose from the Gas Tank and slide the Hose Clamp back into position.
Push the hose from the OHV Cover back down into the Air Cleaner Housing. Reinstall the Grate…then the Foam Filter…then engage the cover with the two tabs on the top of the housing…then swing the cover down into position and tighten the knob to secure the cover.