
User Manual


Assembly and adjustments (continued)
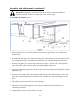
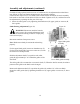
Rail Guide and Fence Installation (Figure 4 & 5)
Attach the rail guide (Fig. 4) to the front of the table.
Secure with four lock knobs.
Place fence assembly (Fig. 5) onto the table at the
miter slot.
The rear hook should engage the rear of the table. The
fence body should engage the rail guide.
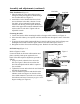
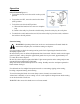
Changing Blades (Figure 6)
WARNING!Blade teeth are sharp! Use care
when handling the saw blade. Failure to
comply may cause serious injury.
1. Disconnect machine from power source.
2. Open both upper and lower doors (K&L, Figure 8).
3. Remove rail guide (Figure 4).
4. Loose the tracking knob (Figure 7).
5. Release tension on the blade by turning the blade
tension knob (Figure).
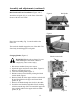
6. Remove blade (H) from upper and lower wheels (M,
R) and from between the upper and lower blade
guides (N, Q).
7. Remove the blade through the slot (P) in the table.
8. Guide the new blade through table slot (P) leading
with the smooth edge. Place it around the upper and
lower wheels and into the upper and lower blade
guides (N, Q).
Figure 6
Blade tension knob
Rail Guide
Fi
gu
r
e
5
Fi
gu
r
e
4
13