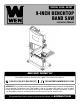
MODEL 3939, 3939T 9-INCH BENCHTOP BAND SAW Instruction Manual NEED HELP? CONTACT US! Have product questions? Need technical support? Please feel free to contact us: 1-800-232-1195 (M-F 8AM-5PM CST) TECHSUPPORT@WENPRODUCTS.COM IMPORTANT: Your new tool has been engineered and manufactured to WEN’s highest standards for dependability, ease of operation, and operator safety. When properly cared for, this product will supply you years of rugged, trouble-free performance.
CONTENTS WELCOME 3 Introduction...................................................................................................... 3 Specifications.................................................................................................... 3 SAFETY 4 General Safety Rules......................................................................................... 4 Specific Rules For Your Band Saw.................................................................... 6 Electrical Information........
INTRODUCTION Thanks for purchasing the WEN Benchtop Band Saw. We know you are excited to put your tool to work, but first, please take a moment to read through the manual. Safe operation of this tool requires that you read and understand this operator’s manual and all the labels affixed to the tool. This manual provides information regarding potential safety concerns, as well as helpful assembly and operating instructions for your tool. SAFETY ALERT SYMBOL: Indicates danger, warning, or caution.
GENERAL SAFETY RULES WARNING! Read all safety warnings and all instructions. Failure to follow the warnings and instructions may result in electric shock, fire and/or serious injury. Safety is a combination of common sense, staying alert and knowing how your item works. The term “power tool” in the warnings refers to your mains-operated (corded) power tool or battery-operated (cordless) power tool. SAVE THESE SAFETY INSTRUCTIONS. WORK AREA SAFETY 1. Keep work area clean and well lit.
GENERAL SAFETY RULES WARNING! Read all safety warnings and all instructions. Failure to follow the warnings and instructions may result in electric shock, fire and/or serious injury. Safety is a combination of common sense, staying alert and knowing how your item works. The term “power tool” in the warnings refers to your mains-operated (corded) power tool or battery-operated (cordless) power tool. SAVE THESE SAFETY INSTRUCTIONS. 7.
SPECIFIC RULES FOR YOUR BANDSAW WARNING! Do not operate the power tool until you have read and understood the following instructions and the warning labels. SAW BLADE SAFETY 6. Always turn off and unplug the band saw before making any adjustments or repair tasks. Never adjust the band saw or the workpiece while the saw is running. 2. Only use blades with correct size and type for both your band saw and your workpiece. 7. Only use the band saw to cut wood. 3. Never use damaged or deformed saw blades.
SPECIFIC RULES FOR YOUR BANDSAW WARNING! Do not operate the power tool until you have read and understood the following instructions and the warning labels. 7. Plan intricate or small work carefully to avoid pinching the blade. Avoid awkward operations and hand positions to prevent accidental contact with the blade. DURING CUTTING OPERATIONS 1. Always stand to one side when operating the saw. Never have any part of the body in line with the path of the saw.
ELECTRICAL INFORMATION GROUNDING INSTRUCTIONS In the event of a malfunction or breakdown, grounding provides the path of least resistance for an electric current and reduces the risk of electric shock. This tool is equipped with an electric cord that has an equipment grounding conductor and a grounding plug. The plug MUST be plugged into a matching outlet that is properly installed and grounded in accordance with ALL local codes and ordinances. 1. Do not modify the plug provided.
UNPACKING & PACKING LIST UNPACKING With the help of a friend or trustworthy foe, such as one of your in-laws, carefully remove the band saw from the packaging and place it on a sturdy, flat surface. Make sure to take out all contents and accessories. Do not discard the packaging until everything is removed. Check the packing list below to make sure you have all of the parts and accessories.
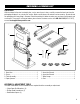
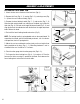
ASSEMBLY & ADJUSTMENTS ASSEMBLING YOUR BAND SAW Fig. 2 1. Attach the four feet to the base of the band saw (Fig. 2). 2. Remove the D-nut (Fig. 3 - 1), washer (Fig. 3 - 2), and wing screw (Fig. 3 - 3) from the saw’s table assembly (Fig. 3). 3. Remove the bevel locking handle (Fig. 5 - 1) and washer (Fig. 5 - 2) Slide the table onto the band saw, making sure the blade stays within the table slot (Fig. 4). Pull back on the angle adjustment knob (Fig.
ASSEMBLY & ADJUSTMENTS BEVELING THE TABLE Fig. 7 1. Loosen the locking handle (Fig. 7 – 1). Adjust the table to the desired position using the table bevel knob (Fig. 7 – 2). 2. Use the angle indicator to confirm the desired angle, then tighten the locking handle. NOTE: The locking handle is spring-loaded and can be re-positioned. To re-position the handle, pull the handle body outwards, turn it to the desired position, then let it spring back in.
ASSEMBLY & ADJUSTMENTS ADJUSTING BLADE TENSION Fig. 8 WARNING! If the blade tension is too high, the blade may break. If the tension is too low, the blade may slip, stall, or wander during a cut. WARNING! Blade teeth are sharp! Use care, ANSI Z87.1approved eye protection, long sleeves, and protective gloves when handling the saw blade. Failure to comply may cause serious injury. 1. Raise the upper blade guide (see “RAISING AND LOWERING THE UPPER BLADE GUIDE”). 2. Open the upper door. 3.
ASSEMBLY & ADJUSTMENTS ADJUSTING THE UPPER GUIDE BEARINGS Fig. 11 Proper adjustment of the guide bearings is one of the best things you can do for your saw – it will prolong blade life, prolong bearing life, and help prevent blade “drift”. Turn off and unplug the band saw before beginning. Open the upper door. WARNING! The upper blade guide bearings must be adjusted after every blade change and tracking adjustment. 1. Use a hex wrench to loosen the lower set screw (Fig.
ASSEMBLY & ADJUSTMENTS 2. Use a hex wrench to loosen the lower socket-head cap screw (Fig. 13 – 2). Position the thrust bearing so that it is as close to the spine of the blade as possible, without touching it. Fig. 13 3. Rotate the blade a few times to ensure that the spine of the blade does not touch the bearing at all while the blade is rotating. Once the bearing has been properly positioned, tighten the screw. 1 4.
OPERATION SWITCH BOX Fig. 14 Use the power switch (Fig. 14 – 1) to turn the saw ON or OFF. Remove the yellow safety key when the saw is OFF to prevent unauthorized use. Store the safety key in a safe place out of the reach of children. GENERAL CUTTING GUIDELINES WARNING! Operating a band saw involves a certain amount of risk. Read the instructions and plan your work before cutting a workpiece. 1 1. Make a test cut on scrap wood to test the settings and get the hang of operating the band saw. Fig.
OPERATION USING THE MITER GAUGE 1. Place the miter gauge into the slot on the table. Fig. 16 2. Loosen the knob on the gauge and set a new miter angle (between 0° and 60°). 3. Tighten the knob. CHANGING BLADES WARNING! Always be sure that the band saw is turned OFF and unplugged before making any adjustments. WARNING! Blade teeth are sharp! Use care, ANSI Z87.1-approved eye protection, long sleeves, and protective gloves when handling the saw blade. Failure to comply may cause serious injury. 1.
MAINTENANCE WARNING! Always turn OFF and unplug the band saw before performing any maintenance. 1. Always use a dust collection system. This will help prevent sawdust from building up inside the band saw. 2. Wipe off the table after every use. Remove any pitch, sap, or resin that has accumulated on the table, blade guide, bearings, etc. using a damp cloth. 3. At least once a month, open the doors and vacuum out any accumulated dust, shavings, etc.
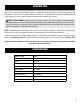
TROUBLESHOOTING GUIDE WARNING! Stop using the generator immediately if any of the following problems occur or risk serious personal injury. If you have any questions, please contact customer service at 1-800-232-1195 (M-F 8-5 CST), or email techsupport@wenproducts.com. Problem Band saw will not start (no sound whatsoever). Band saw will not start (humming sound). Possible Cause Saw not plugged in. Power switch turned OFF, or safety key not inserted. Improper size/length of extension cord.
EXPLODED VIEW & PARTS LIST 19
EXPLODED VIEW & PARTS LIST 20 No. Part Description Qty. No. Part Description Qty.
EXPLODED VIEW & PARTS LIST No. Part Description Qty. No. Part Description Qty.
WARRANTY STATEMENT WEN Products is committed to building tools that are dependable for years. Our warranties are consistent with this commitment and our dedication to quality. LIMITED WARRANTY OF WEN PRODUCTS FOR HOME USE GREAT LAKES TECHNOLOGIES, LLC (“Seller”) warrants to the original purchaser only, that all WEN consumer power tools will be free from defects in material or workmanship during personal use for a period of two (2) years used for professional or commercial use.
NOTES 23
THANKS FOR REMEMBERING V. 2019.08.