
Use and Care Manual


13
MAINTENANCE
WARNING: For your own safety, turn the switch OFF and remove the plug from the electrical outlet
before performing maintenance or lubricating the band saw.
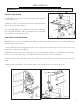
1. Routinely remove the sawdust from the inside of the housing. Blow out the sawdust from the motor.
2. Clean off the pitch which accumulates on the table, blade guides, and bearings.
3. Remove pitch and dust from the upper and lower wheels using a stiff brush. Do not use solvents.
4. Apply a thin coat of automotive polish to the table top for a slick surface.
5. Replace blades and the wheel tires when worn.
WARNING: Replace the power cord immediately if it is worn, cut, or damaged in any way.
GENERAL CUTTING
WARNING: Operating a band saw involves a certain
amount of hazard. Read the instructions and plan your work
before cutting a workpiece.
1. Use scrap lumber to check the settings and to get the feel of op-
erating the band saw before attempting regular work.
2. Do not turn the power on until all adjustments have been made.
Check to make sure the upper and lower guard are in place. Always
OPERATION
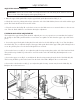
Fig. O
keep the upper blade guard close to your work, approximately 1/8 of an inch above the workpiece.
3. Do not force the workpiece against the blade. Light contact permits easier cutting and prevents unwanted
friction and heating of the blade. Sharp saw blades need little pressure for cutting. Steadily move the workpiece
against the blade without forcing it.
4. It is recommended that a dust collector be connected to the 2-inch dust port when sawing wood (Fig. O - 1).
5. Use the band saw for straight line operations such as cross-cutting, ripping, miter cutting, beveling, compound
cutting, and resawing.
6. To avoid twisting the blade, do not turn sharp corners; instead, saw around corners. A band saw is basically a
“curve-cutting” saw. It is not capable of doing intricate inside cutting as can be done with a scroll saw.
WARNING: Do not use this band saw to cut ferrous metals.
CIRCLE CUTTING GUIDE
BLADE WIDTH 1/8 in. 3/16 in. 1/4 in. 3/8 in. 1/2 in. 3/4 in. 1 in.
MINIMUM RADIUS 3/16 in. 5/16 in. 5/8 in. 1-1/2 in. 2-1/2 in. 5-1/2 in. 7 in.
1