
Product Manual
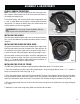


ATTACH / REMOVE THE BATTERY
NOTE: The battery is not fully charged at the time of purchase. Be-
fore using the string trimmer for the first time, place the battery in
the charger and charge it fully.
To insert the battery, slide it into the back of the string trimmer until
a “click” is heard. Make sure the battery is fully inserted and latched
into position. To remove the battery, press the release button and
slide the battery out of the string trimmer.
INSTALLING THE HANDLE
Slide the front handle into place and swivel it into the desired posi-
tion. Use the included bolt and handle adjustment knob to secure it
into place.
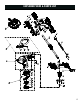
INSTALLING THE GUARD AND EDGE GUIDE
The guard of the trimmer’s head can be installed with a single screw.
Slide the guard into place onto the head of the string trimmer. On
the underside of the guard, right next to the spool casing, there is
a small screw hole. Attach the guard in place by fastening a screw.
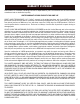
Once the guard has been put into place, attach the edge guide into
the holes mounted on either side of the front of the motor housing
(Fig. A - 1). The guide requires slight stretching for installation, al-
lowing each end to snap into its respective hole.
1
3
2
Fig. B
Fig. A
ASSEMBLY & ADJUSTMENTS
WARNING! Do not insert or remove the battery while the
trigger is pressed or while the blade is in motion.
INSTALLING THE SPOOL OF STRING
The WEN String Trimmer and Edger accepts prewound replacement spools. To install the spool:
1. Press the two buttons on either side of the string trimmer’s string casing (the buttons have a “>>>” symbol on
them) to remove the lid of the casing (Fig. A - 2).
2. Place the string trimmer spool onto the internal spindle. The base of the spool has grooves that lock into place
with the triangular notches found at the bottom of the string trimmer casing. Make sure the racheting side of the
spool faces towards the inside of the head. The smoother side should be facing out and towards the ground.
3. Fish the string through the holes on either side of the spool casing. Each hole should have one string coming out
of it (Fig. B).
4. Replace the cover of the string casing. Make sure the lid snaps into place.
11