
Product Manual
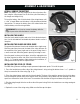


STRING TRIMMER PRE-CHECK
Before starting the string trimmer, check that the trigger switches and
safety switches are moving freely, returning automatically and quickly
upon release. Also check that the cooling air vents are not obstructed
and that both the front and rear handles are clean and dry.
IMPORTANT: Remove the small plastic cover found on the cut-off
blade of the string guard before starting the tool. This will cut the
string as it gets too long. Save the cover in order to put it back on the
blade for safe storage.
After making sure that the string trimmer isn’t demonstrating any
symptoms of damage and that the battery has been fully charged,
you are ready to begin trimming grass and weeds.
STARTING THE STRING TRIMMER
The string trimmer is equipped with a safety switch. In order to power
the machine on, you must first press the safety switch. While holding
down the safety switch, squeeze the trigger into order to power the
string trimmer. Always hold the string trimmer with both hands dur-
ing operation.
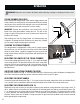
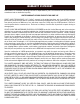
ADJUSTING THE LENGTH OF THE STRING TRIMMER
Turn the telescoping adjustment lock (Fig. C - 1) to unlock the length
of the string trimmer. The directional arrows on the lock show which
directions will lock and unlock the length. Once unlocked, slide the
string trimmer to the desired length and re-tighten the telescoping
adjustment lock.
Fig. C
1
2
3
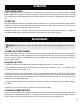
Fig. D
12 in. 14 in.
13 in.
OPERATION
WARNING! Always be sure to remove the battery before adjusting, cleaning, or checking a function on the
tool.
SWITCHING FROM STRING TRIMMER TO EDGER
Pull up on the rotation lock (Fig. C - 2) to allow the head of the string to freely rotate 180 degrees for edging func-
tions. Once the head has been fully rotated, relock the rotation lock to secure it in place.
ADJUSTING THE FRONT HANDLE
Unlock the handle adjustment knob (Fig. C - 3) in order to adjust the angle and position of the front handle. Once it
is in a position that is comfortable, relock the adjustment knob so the handle can no longer freely move.
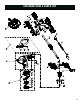
ADJUSTING THE STRING LENGTH (FIG. D)
Depending on the task at hand, you may want to decrease the maximum cutting diameter of the string’s reach. To
do so, remove the two screws found on the underside of the blade guard that hold the cut-off blade in place (Fig.
A - 3). Remove these two screws and adjust the blade to any of the three positions. The farthest position creates
a 14-inch diameter, the middle position creates a 13-inch diameter, and the innermost position creates a 12-inch
diameter. Always make sure the blade is facing away from the guard and that the blade cover has been removed
before operating the string trimmer.
12