
Product Manual


4
1
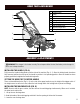
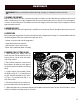
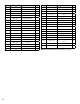
1 Trigger Switch
2 Safety
3 Key Switch
4 Grass Catcher
5 Cutting Height Adjustment Handle
6 Side Chute
7 Side Discharge Door
8 Rear Discharge Door
9 Battery Holder
5
2
3
8
9
KNOW YOUR LAWN MOWER
6
7
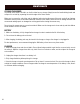
ASSEMBLY & ADJUSTMENTS
WARNING! This charger is for indoor use only. Do not expose either the tool, the battery or the charger to
rain or use in damp locations.
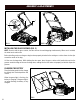
INSTALLING THE HANDLE (FIG. A)
Fully loosen the handle locking knobs on either side of the machine (Fig. A - 1). Once the locking knobs have been
fully loosened, pull back on the top of the handle to position it into operating position. Once the handle has been
properly positioned, retighten the handle locking knobs.
SETTING THE HEIGHT OF THE UPPER HANDLE
There are three different holes (Fig. A - 2) on the side of the upper handle to vary the height of the trigger switch. If
the height seems too tall or too short, adjust the hole through which this locking knob is placed accordingly.
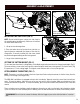
INSTALLING THE MULCHING PLUG (FIG. B)
NOTE: Do not install the grass catcher, the side chute or the mulching plug simultaneously. When one is installed,
the other two should not be.
1. Lift up the rear discharge door.
2. Grab the handle of the mulching plug and slide it into the opening in the back of the mower.
3. Lower the rear discharge door.
11