
Use and Care Manual


14
Assembly and adjustments (continued)
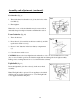
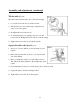
Remove the chuck (Fig. 14)
1. Turn the feed handles (1) to lower the chuck (2) to the
lowest position.
2. Place a ball joint separator (not shown) above the chuck
(3) and tap it lightly with a hammer (4) to cause the
chuck to drop from the spindle.
Note: To avoid possible damage, be prepared to catch the
chuck as it falls.
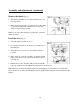
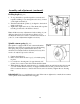
Install the belt (Fig. 15)
1. Open the pulley and belt cover (1).
2. Loosen the belt tension lock knobs (2) on both sides of
the drill press.
3. Slide the motor (3) as close to the drill press head as
possible.
4. Place a belt (4) on the motor pulley (5) and the spindle
pulley (6) in the proper position for the desired speed
(see Fig. 17).
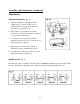
5. Pull the motor away from the drill press head until the
belt is properly tensioned. Tighten the belt tension lock knobs (2).
Note: The belt (4) should be tight enough to prevent slippage. Correct tension is set if the belt
flexes about 1/2" (13 mm) when thumb pressure is applied at the midpoint of the belt between the
pulleys.