
User Manual


4214 WENPRODUCTS.COM
20
Operation
(continued)
General drilling guidelines
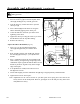
WARNING: To prevent the workpiece and the backup material from slipping from your hand
while drilling, position the workpiece and backup material to the left side of the column. If the
workpiece and the backup material are not long enough to reach the column, clamp the workpiece and
backup material to the table. Failure to do this could result in personal injury.
Drill a hole
1. Mark where you want to drill in workpiece by using a center punch or a sharp nail or turn ON Laser
Line to mark drilling point.
2. Before turning ON the drill press, turn the feed handles to bring the drill bit down. Line the drill bit tip up
with the mark. Clamp the workpiece in place.
3. Turn ON the drill press and pull down on the feed handles with appropriate force needed to allow the
drill bit to drill material.
Note: Feeding too slowly might cause the drill bit to turn in the chuck. Feeding too rapidly
might stop the motor, cause the belt to slip, force the workpiece loose, or break the drill bit.
Practice with scrap material to get the feel of the machine before attempting to do
any drilling operation.
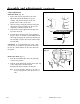
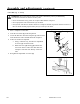
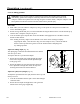
Adjust the drilling depth (Fig. 25)
The depth gauge controls the maximum distance the drill bit
will move up or down.
To stop the drill bit at a pre-measured depth:
1. Rotate the lower depth scale knob (2) until the bottom
Fig. 25
1
2
of the knob is aligned with the desired depth mark (5)
5
on the gauge scale.
2. Rotate the depth scale lock knob (1) until it meets the 4
lower depth scale knob (2). The chuck will stop after
travelling downward to the selected distance.
3
Adjust the quill (return) height (Fig. 25)
To adjust the upward distance the quill (shaft that moves up and
down) can travel:
1. Turn the feed handles until the quill is at the desired height
and hold it there.
2. Rotate the lower depth knob (3) until it rests against the
bottom of the metal gauge support (4).