Air Filtration System Model: 3410 Questions? Problems? Please call our customer help line: (800) 232-1195 M-F 8-5 CST or by email: techsupport@wenproducts.
Table of Contents Technical data ………………………………………………………………… General safety rules …………………………………………………………… Specific safety rules for air filters …………………………………………….. Electrical information …………………………………………………………. Know your air filtration system………………………………………………… Assembly and adjustments ……………………………………………………. Operation ……………………………………………………………………… Maintenance …………………………………………………………………… Exploded view and parts list …………………………………………………... Warranty ……………………………………………………………………….
General safety rules Safety is a combination of common sense, staying alert and knowing how the air filter works. SAVE THESE SAFETY INSTRUCTIONS. WARNING: To avoid mistakes that could cause serious injury, do not plug in the saw until the following steps have been read and understood. 1. READ and become familiar with this entire instruction manual. LEARN the tool’s applications, limitations, and possible hazards. 2. AVOID DANGEROUS CONDITIONS.
General safety rules (continued) 14. DO NOT operate the tool if you are under the influence of drugs, alcohol, or medication that could affect your ability to use the tool properly. 15. USE SAFETY GOGGLES AT ALL TIMES—that comply with ANSI Z87.1. Normal safety glasses only have impact resistant lenses and are not designed for safety. Wear a face or dust mask when working in a dusty environment. Use ear protection, such as plugs or muffs, during extended periods of operation.
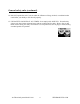
Specific safety rules for air filters 1. To reduce the risk of injury, unplug the air filter from the power source before changing filters or servicing. 2. If mounting the air filter to the ceiling: a. Make sure the bottom of the air filter is at least 7' above the floor. b. Make sure the air filter is anchored to a building structure that is capable of supporting a minimum of 100 lbs. c. Do not mount the air filter to non-structural elements such as dry wall, false ceiling panels, etc. 3.
Electrical information Grounding Instructions IN THE EVENT OF A MALFUNCTION OR BREAKDOWN, grounding provides the path of least resistance for electric current and reduces the risk of electric shock. This tool is equipped with an electric cord that has an equipment grounding conductor and a grounding plug. The plug MUST be plugged into a matching outlet that is properly installed and grounded in accordance with ALL local codes and ordinances. DO NOT MODIFY THE PLUG PROVIDED.
Know your air filtration system A B C D E Carrying handle Control panel/receiver Fuse Power cord Filter lock clip F G H I J Outer filter Hangers and locknuts (4) Wood screw hooks (4) Chains (4) Remote control Not shown: 1-Inner filter (Assembled on the machine) 2-AA batteries Unpacking Carefully unpack the air filter and all its parts. Do not discard the carton or any packaging until the air filter is completely assembled. Air Filtration System Model: 3410 7 WENPRODUCTS.
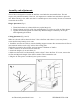
Assembly and adjustments The air filter is designed to circulate air and filter wood and other non-metallic dust. The unit requires only minimal assembly. However, it is important to consider how and where to place the unit. When selecting a site, make sure there is a suitable power source nearby. Do not use extension cords with the air filter. Hanger placement (Fig. 1) 1. Thread the locknuts (1) almost all the way up the hanger (2). 2.
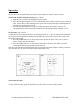
Operation The air filter can be operated directly using the control panel or with the remote control. Turn on the air filter and speed setting (Fig. 3 and 4) 1. Plug the power cord into an appropriate power source. 2. Press the ON/Speed button (1) on the control panel or the remote control to power on the air filter. The air filter will be running at low speed. The LO LED will light, indicating that the unit has been worked at low speed. 3. Press the ON/Speed button (1) again to change the speed.
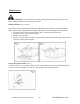
Maintenance WARNING: To reduce the risk of injury, unplug the air filter from the power source before changing the filters or servicing the air filter. Change the filters (Fig. 5 and 6) Check the inner and outer filters periodically, depending on the amount of use, and change the filters when needed. Clogged filters will reduce the amount of air circulating through the filter. 1. Lift up the clips (1) and remove the outer filter (2) from the cabinet housing. 2. Pull the inner filter (3) out of the cabinet.
Maintenance (continued) Replace the batteries in the remote control 1. Open the battery compartment on the remote control. 2. Remove the old batteries. 3. Install 2 new "AA" batteries according to the picture shown in the battery compartment. Air Filtration System Model: 3410 11 WENPRODUCTS.
Exploded view and parts list Air Filtration System Model: 3410 12 WENPRODUCTS.
Exploded view and parts list (continued) Item# 1 2 3 4 5 6 7 8 9 10 11 12 13 14 15 16 17 18 19 20 21 22 23 24 25 26 27 28 29 As01 36 37 38 Part # 90243-001 90243-002 90243-003 90243-004 90243-005 90243-006 90243-007 90243-008 90243-009 90243-010 90243-011 90243-012 90243-013 90243-014 90243-015 90243-016 90243-017 90243-018 90243-019 90243-020 90243-021 90243-022 90243-023 90243-024 90243-025 90243-026 90243-027 90243-028 90243-029 90243-AS01 90243-036 90243-037 90243-038 Description Hex Nut 4 Flat Washer
Warranty WEN® AIR FILTRATION SYSTEM WARRANTY WEN Products is committed to build tools that are dependable for years. Our warranties are consistent with this commitment and our dedication to quality. LIMITED WARRANTY OF WEN CONSUMER POWER TOOLS PRODUCTS FOR HOME USE GREAT LAKES TECHNOLOGIES, LLC ("Seller") warrants to the original purchaser only, that all WEN consumer power tools will be free from defects in material or workmanship for a period of two (2) years from date of purchase.