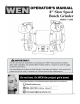
CONTENTS Technical data…..……………………………………………………….. General safety rules…….……………………………………………….. Specific safety rules for bench grinder..………………………………… Electrical information…………………………………………………... Know your bench grinder……………………………………………….. Assembly………………………………………………………………… Operation………………………………………………………………... Maintenance…………………………………………………………….. Troubleshooting………………………………………………………….
GENERAL SAFETY RULES GENERAL SAFETY INSTRUCTIONS Operating a bench grinder can be dangerous if safety and common sense are ignored. The operator must be familiar with the operation of the tool. Read this manual to understand this bench grinder. DO NOT operate this bench grinder if you do not fully understand the limitations of this tool. DO NOT modify this bench grinder in any way.
12. ALWAYS UNPLUG THE TOOL FROM THE ELECTRICAL RECEPTACLE when making adjustments, changing parts, or performing maintenance. 13. KEEP PROTECTIVE GUARDS IN PLACE AND IN WORKING ORDER. 14. AVOID ACCIDENTAL STARTING. Make sure that the power switch is in the OFF position before plugging in the power cord to the electrical receptacle. 15. REMOVE ALL MAINTENANCE TOOLS from the immediate area prior to turning on the Bench Grinder. 16. USE ONLY RECOMMENDED ACCESSORIES.
SPECIFIC SAFETY RULES FOR BENCH GRINDER 1. USE GRINDING WHEELS suitable for the speeds of the grinder. 2. STAND BESIDE the bench grinder during start-up, not directly in front. 3. DO NOT REMOVE THE WHEEL GUARD. 4. DO NOT USE THE GRINDING WHEEL TO CUT ANYTHING. 5. DO NOT USE ANYTHING TO STRESS THE GRINDING WHEEL. 6. USE A GRINDING WHEEL DRESSING TOOL to shape or remove glaze from grinding wheels. 7. ADJUST DISTANCE between wheel and tool rest to maintain at most a 1/8-inch (3.
18. DO NOT TURN THE MOTOR SWITCH ON AND OFF RAPIDLY. This could cause the wheel to loosen and create a hazard. Should this ever occur, stand clear and allow the wheel to come to a complete stop. Disconnect your grinder from the power supply and retighten the wheel nut securely. 19. RISK OF INJURY DUE TO ACCIDENTAL STARTING. Do not use in an area where children may be present. 20. NEVER START THE GRINDER when the wheel is in contact with the workpiece. 21. SECURE WORK.
ELECTRICAL INFORMATION Grounding instructions IN THE EVENT OF A MALFUNCTION OR BREAKDOWN, grounding provides the path of least resistance for electric current and reduces the risk of electric shock. This tool is equipped with an electric cord that has an equipment grounding conductor and a grounding plug. The plug MUST be plugged into a matching outlet that is properly installed and grounded in accordance with ALL local codes and ordinances. DO NOT MODIFY THE PLUG PROVIDED.
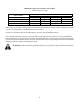
Minimum Gauge for Extension Cords (AWG) (When using 120 V only) Ampere Rating 0 – 6 Amps 6 – 10 Amps 10 – 12 Amps 12 – 16 Amps Total Length of Cord in feet 50' 100' 150' 16 gauge 16 gauge 14 gauge 16 gauge 14 gauge 12 gauge 16 gauge 14 gauge 12 gauge 12 gauge Not Recommended 25' 18 gauge 18 gauge 16 gauge 14 gauge Make sure your extension cord is properly wired and in good condition. Always replace a damaged extension cord or have it repaired by a qualified person before using it.
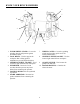
KNOW YOUR BENCH GRINDER 6 5 7 4 3 8 2 1 1 2 3 4 5 6 9 10 INNER WHEEL GUARD - Covers the grinding wheels and protects against accidental contact. TOOL RESTS - Used to support the workpiece that is being ground. Adjustable to provide angled surfaces. GRINDING WHEEL 120 GRIT - Used to remove light material from workpiece. EYESHIELD - Protective Lexan see-thru shields to prevent any loose debris from contacting the operator. LOCKING KNOB-Lock the eyeshield in position.
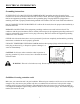
ASSEMBLY Warning: To avoid injury from unexpected starting or electrical shock, do not plug the power cord into a source of power during unpacking and assembly. This cord must remain unplugged whenever you are adjusting/assembling the grinder. If any part is missing or damaged, do not attempt to assemble the grinder or plug in the power cord. All of the parts needed for assembly should be located and accounted for before beginning. Tool rest assembly 1.
OPERATION Caution: Keep all bystanders a safe distance away from the tool and not in direct line, front or back of the grinder. 1. To operate the bench grinder, always wear safety glasses and turn the tool on while standing at the side of the grinder (as opposed to in front). Allow it to reach full speed before grinding. 2. Hold the work piece firmly against the tool rest. Hold very small pieces with pliers or other suitable clamps. 3. Feed the work piece smoothly and evenly into the grinding wheel. 4.
MAINTENANCE Warning: For your own safety, turn switch to OFF and remove plug from power source outlet before adjusting and maintaining your bench grinder. If power cord is worn, cut or damaged in any way, have it replaced immediately. 1. Regularly check the tool and use a soft brush to remove accumulated dust. Wear safety goggles to protect your eyes while cleaning. 2. If the body of the grinder needs cleaning, wipe it down with a soft, damp cloth. A mild detergent can be used.
TROUBLESHOOTING Symptom Grinder won’t start Possible Cause Blown line fuse or tripped circuit breaker Low line voltage Excessive vibration Motor overheating Material wedged between wheel and guard Defective switch Defective, blown capacitor Improper mounting of grinder or accessories Grinding wheel out of balance Improper wheel mounting Excess pressure required to grind material Grinding on side of wheel Motor not turning freely (without power) Fuses are being blown or circuit breakers are being tripp
EXPLODED VIEW 14
PARTS LIST Item 1 2 3 4 5 6 7 8 9 10 11 12 13 14 15 16 17 18 19 20 21 22 23 24 25 26 27 28 29 Stock # 4286-001 4286-002 4286-003 4286-004 4286-005 4286-006 4286-007 4286-008 4286-009 4286-010 4286-011 4286-012 4286-013 4286-014 4286-015 4286-016 4286-017 4286-018 4286-019 4286-020 4286-021 4286-022 4286-023 4286-024 4286-025 4286-026 4286-027 4286-028 4286-029 Description Screw Bolt Left guard cover Nut Flange Grinding wheel 120# Screw Lock washer Spark deflector Flat washer Left eyeshield (magnifier) Lef
LIMITED TWO YEARS WARRANTY WEN Products is committed to build tools that are dependable for years. Our warranties are consistent with this commitment and our dedication to quality. LIMITED WARRANTY OF WEN CONSUMER POWER TOOLS PRODUCTS FOR HOME USE GREAT LAKES TECHNOLOGIES, LLC ("Seller") warrants to the original purchaser only, that all WEN consumer power tools will be free from defects in material or workmanship for a period of two (2) years from date of purchase.