2-Stroke 900 Rated Watt Generator Item # 56100 Owner’s Manual Manual del Propietario FEATURES: • 1000 Surge Watt Output • 900 Rated Watt Output (7.
GENERATOR IDENTIFICATION For information and questions, please contact the Customer Service Help Line by calling 800-2321195. Certain information will be requested by the Customer Service Representative and to facilitate that, please fill in the information below. Refer to the illustration below for the location of Serial Number. Record generator information in the spaces provided below.
TABLE OF CONTENTS GENERATOR IDENTIFICATION ................................................................................................i INTRODUCTION ............................................................................................................................ 1 NOTICE REGARDING EMISSIONS ........................................................................................... 1 SAFETY INFORMATION............................................................................................
INTRODUCTION Thank You for Purchasing a Power Pro Product. This manual provides information regarding the safe operation and maintenance of this product. Every effort has been made to ensure the accuracy of the information in this manual. Power Pro reserves the right to change this product and specifications at any time without prior notice. Please keep this manual available to all users during the entire life of the generator.
SAFETY INFORMATION Before operating this generator read and observe all warnings, cautions, and instructions on this sheet, on the generator, and in the Owner’s Manual. NOTE: The following safety information is not meant to cover all possible conditions and situations that may occur. Read the entire Owner’s Manual for safety and operating instructions. Failure to follow instructions and safety information could result in serious injury or death.
GENERAL SAFETY PROCEDURES For any questions regarding the hazard and safety notices listed in this manual or on the product, please call (800) 232-1195 M-F 8-5 CST before using the generator. DANGER: CARBON MONOXIDE. Using a generator indoors CAN KILL YOU IN MINUTES. Generator exhaust contains carbon monoxide (CO). This is a poison gas you cannot see or smell. If you can smell the generator exhaust, you are breathing CO. But even if you cannot smell the exhaust, you could be breathing CO.
WARNING: This generator produces powerful voltage, which can result in electrocution. • • • • • • ALWAYS ground the generator before using it (see the “Ground the Generator” portion of the “Generator Preparation” section). Generator should only be plugged into electrical devices, either directly or with an extension cord. NEVER connect to a building electrical system without a qualified electrician. Such connections must comply with local electrical laws and codes.
IMPORTANT SAFETY INSTRUCTIONS • SAVE THESE INSTRUCTIONS – This manual contains important instructions for the Power Pro 1000 generator. • Generators vibrate in normal use. During and after the use of the generator, inspect the generator as well as extension and power supply cords connected to it for damage resulting from vibration. Have damaged items repaired or replaced as necessary. Do not use plugs or cords that show signs of damage such as broken or cracked insulation or damaged blades.
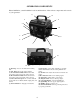
GENERATOR COMPONENTS Please familiarize yourself with the locations and functions of the various components and controls of your generator. 1 12 2 11 3 4 10 5 9 6 7 8 13 15 14 Fig.2 - Component Location (1) Fuel Cap- Access to the fuel tank for adding fuel. (2) Volt Meter-Shows the voltage number. (3) AC Circuit Reset Button-Reset button that protects the generator from AC outlet overload. (4) DC Circuit Reset Button- Reset button that protects the generator from DC outlet overload.
ASSEMBLY In order to best protect the generator while in the package, this product comes with some components disassembled. Please complete the following assembly steps before proceeding to use the generator. For ease of assembly, we recommend attaching the components in the order listed in this manual. If after reading this section, you are unsure about how to perform any of the steps, please call (800) 232-1195 M-F 8-5 CST for customer service.
Mixing Gasoline and Oil WARNING Never store generator with fuel in the fuel tank inside a building with potential sources of ignition such as hot water tanks, space heaters, clothes dryers, electric motors, etc. Notes: DO NOT mix gasoline and oil directly in the fuel tank USE NMMA or TC-WII or TC-W3 or JASO FB or JASO FC classified oil. • Make sure fuel container is outside and in a well ventilated area. • Fill the approved, clean red gasoline container with ¼ of the recommended gasoline amount.
Step 3- Ground the Generator WARNING: Failure to properly ground the generator can result in electrocution. Ground the generator by first loosening the grounding nut, hooking a grounding wire under the nut and then tightening the grounding nut (see figure 3). A generally acceptable grounding wire is a No. 12 AWG (American Wire Gauge) stranded copper wire. This grounding wire should be connected at the other end to a copper or brass grounding rod that is driven into the earth.
• ONLY use a generator outside and far away from windows, doors, and vents. These openings can pull in generator exhaust. Even if you use a generator correctly, CO may leak into the home. ALWAYS use a batterypowered or battery-backup CO alarm in the home. If you start to feel sick, dizzy, or weak after the generator has been running, move to fresh air RIGHT AWAY. See a doctor. You may have carbon monoxide poisoning. WARNING: This generator produces powerful voltage, which can result in electrocution.
To start your generator, perform the following steps: 1. No electrical devices should be connected to the generator during starting. Devices can make it difficult for the engine to start. 2. Check that the generator is properly grounded (see “Ground the Generator”). 3. Check the fuel level. 4. Turn the fuel valve to the “on” position (see figure 4). 5. Move the choke lever to the “closed” position. (Move to far left position. See figure 5). 6. Set the engine switch to the “on” position.
Step 1– Check the Fuel Level Before starting the generator, check to see that there is sufficient gasoline/oil mixture in the fuel tank.. Add fuel if necessary but leave sufficient room in tank for expansion. WARNING: This generator may emit highly flammable and explosive gasoline vapors, which can cause severe burns or even death if ignited. A nearby open flame can lead to explosion even if not directly in contact with fuel. • • • • • • • • Do not operate near open flame. Do not smoke near generator.
USING THE GENERATOR WARNING: When this generator is used to supply a building wiring system: Generator must be installed by a qualified electrician and connected to a transfer switch as a separately derived system in accordance with the National Electrical Code, NFPA 70. The generator shall be connected to a transfer switch that switches all conductors other than the equipment grounding conductor. The frame of the generator shall be connected to an approved grounding electrode.
When the rated wattage requirement of each electrical device has been determined, add these numbers to find the total rated wattage needed. If this number exceeds the rated wattage of the generator, DO NOT connect all these devices. Select a combination of electrical devices, which has a total rated wattage lower than or equal to the rated wattage of the generator. CAUTION: The generator can run at its surge wattage capacity for only a short time.
CIRCUIT RESET BUTTONS The circuit reset buttons help to prevent the generator from electrical overload. If your receptacle short circuits or becomes overloaded by an electrical device or devices with too great a wattage rating, the circuit protector may shut off power to the receptacle. In the event of such an overload, disconnect all electrical devices from the generator and press the circuit reset buttons. Note, the circuit breakers used are thermally activated.
STOPPING THE GENERATOR To stop the generator: 1. Turn off all electrical devices prior to unplugging them from the generator. Unplugging running devices can cause damage to the generator. 2. Turn the start switch to the “off” position. (Move Rocker Switch to Lower position). 3. Turn the fuel valve to the “off” (horizontal) position. WARNING: Allow the generator to cool for several minutes before touching areas that become hot during use.
1. 2. 3. 4. 5. Undo the 4 bolts holding the air cleaner cover in place. Remove the sponge-like elements from the casing. Wipe the dirt from inside the empty air cleaner casing Wash the sponge-like elements in household detergent and warm water. Allow to dry. Drip the sponge-like element in clean engine oil, squeeze out extra oil and reinsert into the casing. 6. Attach the air cleaner cover with the 4 bolts. Spark Plug Maintenance The spark plug is important for proper engine operation.
4. Using a pair of pliers, slide the fuel line clamp off the fuel valve so the line can be disconnected. 5. Collect any fuel left in the fuel line going to the carburetor. 6. Place the fuel tank over the fuel collecting container and open the fuel valve. The fuel should drain from the tank. 7. Reconnect the fuel line and reattach the fuel tank with the four (4) bolts. 8 Start and run the engine until fuel runs out. 9. Store the emptied fuel in a suitable place.
SPECIFICATIONS Generator DC Output Wattage Voltage Amperage AC Output 100W 12V 8.3A Rated Wattage 900W Surge Wattage 1000 W Rated Voltage 120 V Rated Amperage 7.5A Rated Frequency 60 Hz Phase Single Dimensions(in): Length: 15 width: 12 height: 14.5 Dry mass 39 lbs Engine Engine type Ignition system 2-stroke single cylinder with forced air cooling system non-contact transistor Displacement 72 cc Fuel tank capacity: 1.0 US gal.
TROUBLESHOOTING IMPORTANT: If trouble persists please call our customer help line at (800) 232-1195 M-F 8-5 Central Time. Problem Cause Engine will not start Engine switch is set to "off". Set engine switch to "on". Fuel valve is turned to "OFF” position. Turn fuel valve to "ON" position. Choke is open. Close the choke Engine runs but there is no electrical output Solution Engine is out of fuel Engine is filled with contaminated or old fuel Spark plug is dirty. Air cleaner is dirty. Add fuel.
EXPLODED VIEW 21
Item Stock # Qty 1 56100-001 1 2 56100-002 3 Description Item Stock # Qty Description Generator Cover 24 56100-024 2 Stud M6x60 3 Bolt M6x85 25 56100-025 4 Bolt M6x20 56100-003 1 Bolt M8x160 26 56100-026 1 Carburetor 4 56100-004 1 Rotor 27 56100-027 1 Ignition Switch 5 56100-005 1 Stator 28 56100-028 1 Panel 6 56100-006 1 Left Crankcase 29 56100-029 4 Bolt M5x16 7 56100-007 1 Oil Seal 30 56100-030 1 Air Filter Cover 8 56100-008 1 Bearing 31
WIRING DIAGRAM 23
NOTES: 24
WARRANTY STATEMENT FOR POWER PRO GENERATORS Remember to save your receipt and to accurately fill out and mail your product registration card. You must provide proof of purchase for all warranty work. POWER PRO generators are warranted to be free from defects in materials and workmanship for a period of one (1) year from date of original purchase. Generators used for Commercial or Rental use have a warranty period of 90 days from date of original purchase.