
Owner's manual

17
1. Undo the 4 bolts holding the air cleaner cover in place.
2. Remove the sponge-like elements from the casing.
3. Wipe the dirt from inside the empty air cleaner casing
4. Wash the sponge-like elements in household detergent and warm water. Allow to dry.
5. Drip the sponge-like element in clean engine oil, squeeze out extra oil and reinsert into the
casing.
6. Attach the air cleaner cover with the 4 bolts.
Spark Plug Maintenance
The spark plug is important for proper engine operation. A good spark plug should be intact, free
of deposits, and properly gapped. To inspect the spark plug:
1. Pull on the spark plug cap to remove it.
2. Unscrew the spark plug from the generator using the spark plug wrench included with this
product.
3. Visually inspect the spark plug. If it is cracked or chipped, discard and replace with a new
spark plug.
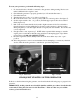
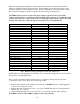
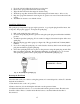
4. Measure the plug gap with a gauge (see figure 10). The gap should be 0.7-0.8mm (0.028-
0.031in).
5. If you are re-using the spark plug, use a wire brush to clean any dirt from around the spark
plug base and then re-gap the spark plug.
6. Screw the spark plug back into its place on the generator using the spark plug wrench. Do
not over-tighten spark plug. Recommended tightening of spark plug is ½ to ¾ of a turn
after spark plug gasket contacts spark plug hole. Reinstall the spark plug cap.
Fig. 10 - Measuring the spark plug gap
Draining the Fuel Tank
Clean fuel tank each year or before storing the generator for extended periods of time. To drain the
fuel tank and carburetor:
1. Turn the fuel valve to the “off” position.
2. Remove the four (4) bolts holding the fuel tank onto the generator frame.
3. Lift the fuel tank and rotate it so as to clear the tank from the generator frame. The fuel valve
should be visible. Place a container under the fuel valve to catch fuel when the fuel line is
disconnected.
Recommended Spark Plug
NGK BP5ES or Similar