
User Manual


17
MAINTENANCE & CARE
CHANGING/ADDING OIL
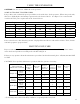
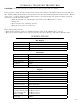
Change the oil according to the Recommended Maintenance Schedule in Figure 9 using the maintenance hatch
door found on the side panel of the generator.. Change the oil when the engine is warm. This will allow for
complete drainage. Change oil more often if operating under heavy load or high ambient temperatures. It is also
necessary to drain the oil from the crankcase if it has become contaminated with water or dirt. The oil capacity of
the generator engine is 0.37 qts. Add oil when the oil level is low. For proper type and weight of oil refer to “add
oil” portion of the “Generator Preparation” section.
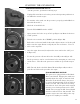
1. Place generator on elevated platform such as table or desk. Put a container next to it to hold the used oil. Turn
the vacuum relief valve to “OFF” position.
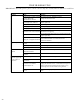
Air Cleaner Cover
2. Unscrew the dipstick from the engine and set aside.
3. Tilt the generator so the used oil flows from the engine into the con-
tainer. Tilt some more to ensure all oil is out of the crankcase.
4. Fill the crankcase with fresh oil and reinstall the dipstick. Clean any
oil spillage before closing the side panel.
To rell the crankcase with oil, follow these steps:
1. Make sure the generator is on a level surface. Tilting the generator
to assist in filling will cause oil to flow into engine areas and will cause
damage. Keep generator level!
Fig. 10
2. Remove the dipstick from the engine.
3. Using a funnel or appropriate dispenser, add the correct amount of oil into the crankcase. The engine is
equipped with a low oil pressure sensor and will not start if the amount of oil is insufficient.
4. Reinstall dipstick.
NOTE: Never dispose of used motor oil in the trash or down a drain. Please call a local recycling center or auto
garage to arrange oil disposal.
AIR CLEANER MAINTENANCE
Routine maintenance of the air cleaner helps maintain proper airflow to the carburetor. Occasionally check that
the air cleaner is free of excessive dirt. Refer to Recommended Maintenance Schedule in Figure 8.
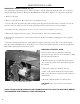
1. Remove the side panel opposite of the recoil starter by unscrewing the three screws around the outside edge.
2. Take the cover off of the air cleaner assembly by unscrewing the middle screw in order access the foam air
cleaner assembly (Fig. 10).
3. Check and clean the foam air cleaner element. Replace with a new one if the element is damaged. Good ele-
ments can be washed in soapy water, dried and reused. There is no need to add oil to the element. Wipe off
excessive oil from the air cleaner case. Small amount of oil in the element is normal and necessary for the engine
to work properly.
4. Reinstall the air cleaner element, cartridge and access panel.