
Use and Care Manual


8
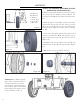
ASSEMBLY
STEP 1 - ATTACHING THE TIRES TO THE
HYDRAULIC TANK (FIGURE 1)
1. Slide a bearing (1A) and the tire onto axle with the
valve stem (valve for inflation) facing out (Figure 1A)
(bearings 1A and 1B may already be mounted on the
tire).
2. Slide the other bearing (1B), a washer (2) and the
slotted castle nut (3) onto the axle. Using a wrench,
tighten the nut. Turn hub to ensure the bearings are
seated properly. Make sure the tire spins freely (Fig-
ure 1B)
3. Insert cotter pin (4) through the hole in the slotted
castle nut (3) and axle. Bend and spread prongs in
opposite directions so the axle nut will not come off
(Figure 1C).
4. Install the hub cap (4). Gently tap on the hub cap
with a hammer to drive the hub cap into place (Figure
1C).
5. Repeat these steps to install the other tire.
1A
2
3
4
1A - Bearing
1B - Bearing
2 - Washer
3 - Castle Nut
4 - Cotter Pin
5 - Hub Cap
1B
5
Figure 1A
Figure 1B Figure 1C
Figure 1
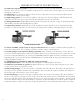
Caution: Heavy lifting required.
Some of the components in these
assembly instructions are heavy
and cannot be safely lifted by one
person. Please plan on assembling
this product when another person
can be available to help out.