MODEL 5662, 5664 SNOW BLASTER Instruction Manual NEED HELP? CONTACT US! Have product questions? Need technical support? Please feel free to contact us: 1-800-232-1195 (M-F 8AM-5PM CST) TECHSUPPORT@WENPRODUCTS.COM IMPORTANT: Your new tool has been engineered and manufactured to WEN’s highest standards for dependability, ease of operation, and operator safety. When properly cared for, this product will supply you years of rugged, trouble-free performance.
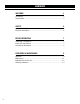
CONTENTS WELCOME 3 Introduction...................................................................................................... 3 Specifications.................................................................................................... 3 SAFETY 4 General Safety Rules......................................................................................... 4 Electrical Information........................................................................................
INTRODUCTION Thanks for purchasing the WEN Snow Blaster. We know you are excited to put your tool to work, but first, please take a moment to read through the manual. Safe operation of this tool requires that you read and understand this operator’s manual and all the labels affixed to the tool. This manual provides information regarding potential safety concerns, as well as helpful assembly and operating instructions for your tool. Indicates danger, warning, or caution.
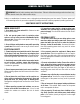
GENERAL SAFETY RULES WARNING! Read all safety warnings and all instructions. Failure to follow the warnings and instructions may result in electric shock, fire and/or serious injury. Safety is a combination of common sense, staying alert and knowing how your item works. The term “power tool” in the warnings refers to your mains-operated (corded) power tool or battery-operated (cordless) power tool. SAVE THESE SAFETY INSTRUCTIONS. WORK AREA SAFETY 1. Keep work area clean and well lit.
GENERAL SAFETY RULES WARNING! Read all safety warnings and all instructions. Failure to follow the warnings and instructions may result in electric shock, fire and/or serious injury. Safety is a combination of common sense, staying alert and knowing how your item works. The term “power tool” in the warnings refers to your mains-operated (corded) power tool or battery-operated (cordless) power tool. SAVE THESE SAFETY INSTRUCTIONS. 7.
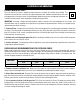
ELECTRICAL INFORMATION DOUBLE-INSULATED TOOLS The tool’s electrical system is double-insulated where two systems of insulation are provided. This eliminates the need for the usual three-wire grounded power cord. Double-insulated tools do not need to be grounded, nor should a means for grounding be added to the product. All exposed metal parts are isolated from the internal metal components with protecting insulation.
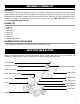
UNPACKING & PACKING LIST UNPACKING With the help of a friend or trustworthy foe, such as your inlaws, carefully remove the snow blaster from the packaging and place it on a sturdy, flat surface. Make sure to take out all contents and accessories. Do not discard the packaging until everything is removed. Check the packing list below to make sure you have all of the parts and accessories.
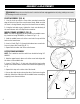
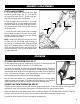
ASSEMBLY & ADJUSTMENTS WARNING! Always be sure that the tool is switched off and unplugged before adjusting, adding accessories, or checking a function on the tool. 24 23 22 21 CHUTE ASSEMBLY (FIG. A) 20 19 18 17 16 15 14 13 12 11 10 9 8 7 6 5 4 3 2 1 Fig. A R 1. Line the chute up with the screw holes mounted around the edge of the hole in top of the snow thrower’s body. Make sure that the chute is facing forward, away from the lower frame assembly. Q P 2.
ASSEMBLY & ADJUSTMENTS CHUTE CRANK ASSEMBLY Fig. D 1. Locate the upper chute crank in the parts bag. Loosen the thumb screw (Fig. D - 1) located on the lower chute crank (Fig. D - 2) that comes preattached to the body of the snow thrower. 2. Slide the upper chute crank (Fig. D - 3) through the grommet (Fig. D - 4) in the middle frame assembly into the lower chute crank, lining up the holes in each respective part of the crank to allow room for the thumb screw. 3 4 2 1 3.
OPERATION IMPORANT: DO NOT PULL THE UNIT BACKWARDS THROUGH THE SNOW. Snow will go into the air vents found on the back of the machine and damage the unit. PLOWING THE SNOW WARNING! Keep the area of operation free of foreign objects that can become thrown by the auger blades. Perform a thorough inspection of the area before plowing since some objects may be hidden from view by surrounding snow.
MAINTENANCE WARNING! Make sure to turn off the switch and disconnect the extension cord before performing any maintenance tasks on your snow thrower. 1. KNOW YOUR LIMITATIONS. Do not overload your snow thrower’s capacity by attempting to clear snow at too fast of a rate. 2. Use of the snow thrower for operations outside of its intended usages could result in a dangerous situation. 3. Do not attempt to repair the snow thrower unless you have the proper tools and knowledge for disassembly and repair.
EXPLODED VIEW & PARTS LIST 12
EXPLODED VIEW & PARTS LIST No. 1 1.1 1.2 1.3 1.4 1.5 1.6 1.7 1.8 1.9 1.10 1.11 1.12 2 3 4 5 6 7 8 9 10 11 12 13 14 15 16 16.1 16.2 16.3 16.4 17 17.1 17.2 17.3 17.4 17.5 18 18.1 18.2 18.3 19 20 20.1 20.2 20.3 20.4 20.5 20.6 20.7 21 22 23 24 25 26 27 27.1 27.2 27.3 27.4 28 28.1 Part No.
WARRANTY STATEMENT WEN Products is committed to building tools that are dependable for years. Our warranties are consistent with this commitment and our dedication to quality. LIMITED WARRANTY OF WEN PRODUCTS FOR HOME USE GREAT LAKES TECHNOLOGIES, LLC (“Seller”) warrants to the original purchaser only, that all WEN consumer power tools will be free from defects in material or workmanship during personal use for a period of two (2) years used for professional or commercial use.
NOTES 15
THANKS FOR REMEMBERING V. 2021.06.