Table of Contents Technical Data…………………………………………………………… 2 General Safety Rules……………………………………………………… 3 Specific Safety Rules for Brad Nailer……………………………………... 6 Know Your Nailer…………………………………………………………. 8 Operation………………………………………………………………... 9 Troubleshooting……………………………………………………….. 12 Exploded View………………………………………………………….. 13 Parts List…………………………………………………………………. 14 Warranty………………………………………………………………… 15 Technical Data Operating pressure range 60 psi-100 psi Air inlet 1/4" NPT Air consumption 1.
General Safety Rules The purpose of safety symbols is to attract your attention to possible dangers. The safety symbols, and the explanations with them, deserve your careful attention and understanding. The safety warnings do not by themselves eliminate any danger. The instructions or warnings they give are not substitutes for proper accident prevention measures. Symbol Meaning Safety Alert Symbol: Indicated danger, warning, or caution, may be used in conjunction with other symbols or pictographs.
• • • • • • • • • • • • • • • • Only use air hose that is rated for a maximum working pressure of at least 150 psi (10.3 BAR) or 150% of the maximum system pressure, which ever is greater. Do not use bottled gases to power this tool. Bottled compressed gases such as oxygen, carbon dioxide, nitrogen, hydrogen, propane, acetylene or air are not for use with pneumatic tools. Never use combustible gases or any other reactive gas as a power source for this tool.
• • • • • • • • • • Refer to the Maintenance and Repairs for detailed information on the proper maintenance of the tool. Always operate the tool in a clean, lighted area. Be sure the work surface is clear of any debris and be careful not to lose footing when working in elevated environments such as rooftops. Do not drive fasteners near edge of material. The workpiece may split causing the fastener to ricochet, injuring you or a co-worker.
Specific Safety Rules for Brad Nailer 1. KEEP WORKING AREA CLEAN. Cluttered areas invite injuries. 2. DON’T ALLOW CHILDREN KEEP AT THE WORKING AREA. Don’t let them handle the tool. 3. DO NOT OPERATE THIS TOOL IF UNDER THE INFLUENCE OF ALCOHOL OR DRUGS. Read warning label on prescriptions to determine if your judgment or reflexes are impaired while taking drugs. If there is any doubt, do not attempt to operate. 4. USE SAFETY GLASSES. Safety glasses should conform to ANSI Z87.1 specifications.
pressure when the air supply is disconnected. If the wrong fitting is used, the tool can be charged with air after being disconnected and still be able to drive a fastener. 18. WHEN CONNECTING THE AIR. The tool can possibly fire the fasteners. Therefore, remove all the fasteners before connecting to the air. 19. DO NOT DEPRESS THE SAFE BRACKET AND THE TRIGGER WHEN LOADING. 20. IF THE FASTENERS ARE JAMMED. Disconnect the tool from the air and remove the jammed fasteners out.
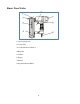
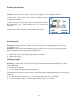
Know Your Nailer 1-Jam Clearing Latch 2-Contact Trip 3-Low Nail Indicator Window 4-Magazine 5-Air Inlet 6-Trigger 7-Exhaust 8-Depth Adjustment Wheel 8
Operation WARNING - if any parts are missing, do not operate this tool until the missing parts are replaced. Failure to do so could result in possible serious personal injury. Lubrication This tool requires lubrication before using the tool for the first time and before each use. If an inline oiler is used, manual lubrication through the air inlet is not required. Note: The work surface can become damaged by excessive lubrication. Proper lubrication is the owner’s responsibility.
Loading the fasteners Caution: Always disconnect the tool from the air supply before loading the fasteners. 1. Depress the lock to release the movable magazine and pull the magazine out fully. 2. Place a full clip of the specified type and size fasteners on the fixed magazine, up to 100 fasteners may be loaded in the magazine. 3. Push the movable magazine forward until it was locked.
Clearing a jammed nail Warning: Disconnect air line from tool and remove fasteners from magazine before making adjustments or personal injury may result. If a nail becomes jammed in the nosepiece, keep the tool pointed away from you and follow these instructions to clear: 1. Disconnect air supply from tool. 2. Press magazine lock to release movable magazine. 3. Push down jam clearing latch then pull up to open front plate. 4. Remove jammed nail, using pliers if necessary. 5.
Troubleshooting Caution: Stop using the tool immediately if any of the following problems occur. Serious personal injury could occur. Any repairs or replacements must be done by a qualified person or an authorized WEN® service center only.
Exploded View 13
Parts List Item Stock # Description Stock # Description 1 61720-001 SCREW 37 61720-037 O-RING 15×1.
LIMITED ONE YEAR WARRANTY WEN Products is committed to build tools that are dependable for years. Our warranties are consistent with this commitment and our dedication to quality LIMITED WARRANTY OF WEN CONSUMER POWER TOOLS PRODUCTS FOR HOME USE GREAT LAKES TECHNOLOGIES, LLC ("Seller") warrants to the original purchaser only, that all WEN consumer power tools will be free from defects in material or workmanship for a period of one (1) year from date of purchase.