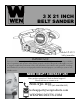
3 X 21 INCH BELT SANDER Model # 6321 bit.ly/wenvideo IMPORTANT: Your new tool has been engineered and manufactured to WEN’s highest standards for dependability, ease of operation, and operator safety. When properly cared for, this product will supply you years of rugged, trouble-free performance. Pay close attention to the rules for safe operation, warnings, and cautions. If you use your tool properly and for intended purpose, you will enjoy years of safe, reliable service.
TABLE OF CONTENTS 2 3 4 5 7 7 8 9 10 12 Technical Data General Safety Rules Specific Safety Rules For Sander Electrical Information Know Your Sander Assembly and Adjustments Operation Maintenance Exploded View and Parts List Warranty TECHNICAL DATA Model Number: Motor: Speed: Belt Size: Weight: 2 6321 120 V, 60 Hz, 7A 820 feet per minute 3˝ x 21˝ 6 lbs
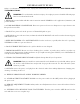
GENERAL SAFETY RULES Safety is a combination of common sense, staying alert and knowing how your item works. SAVE THESE SAFETY INSTRUCTIONS. WARNING: To avoid mistakes and serious injury, do not plug in your tool until the following steps have been read and understood. 1. READ and become familiar with this entire instruction manual. LEARN the tool’s applications, limitations, and possible hazards. 2. AVOID DANGEROUS CONDITIONS. Do not use power tools in wet or damp areas or expose them to rain.
GENERAL SAFETY RULES 14. NEVER STAND ON A TOOL. Serious injury could result if the tool tips or is accidentally hit. DO NOT store anything above or near the tool. 15. DO NOT OVERREACH. Keep proper footing and balance at all times. Wear oil-resistant rubber-soled footwear. Keep the floor clear of oil, scrap, and other debris. 16. MAINTAIN TOOLS PROPERLY. ALWAYS keep tools clean and in good working order. Follow instructions for lubricating and changing accessories. 17. CHECK FOR DAMAGED PARTS.
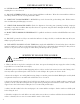
SPECIFIC RULES FOR THE SANDER 7. Unplug the tool before changing accessories. Accidental start-ups may occur if the tool is plugged in during an accessory change. Before plugging the tool back in, check that the trigger is OFF. 8. After changing sanderpaper, rotate the sanderpaper to make sure the sandpaper doesn’t hit any part of the tool. 9. Always hold the tool firmly with both hands for maximum control. 10. Never pull the tool backwards over the workpiece. Loss of control may occur. 11.
ELECTRICAL INFORMATION GUIDELINES FOR USING EXTENSION CORDS AMPERAGE 7A REQUIRED GAUGE FOR EXTENSION CORDS 25 ft. 50 ft. 100 ft. 150 ft. 18 gauge 16 gauge 14 gauge 12 gauge Make sure your extension cord is in good condition. When using an extension cord, be sure to use one heavy enough to carry the current your product will draw. An undersized cord will cause a drop in line voltage resulting in loss of power and overheating.
KNOW YOUR SANDER ON/OFF SWITCH TENSION LEVER DUST PORT TRACKING KNOB ASSEMBLY AND ADJUSTMENTS REMOVING OR INSTALLING ABRASIVE BELT WARNING: To avoid injury from accidental startups, turn switch OFF and remove the plug from the power source outlet before making any adjustments. 1. Turn the tool upside down and pull the tension lever (4) to retract the front roller and release the belt tension. 2. Slide the abrasive belt (6) off. 3. Mount a new abrasive belt.
ASSEMBLY AND ADJUSTMENTS ADJUSTING BELT TRACKING The belt life will be increased by using the tracking adjustment. 1. Turn the tool upside down and hold it firmly with one hand. Then start the tool and observe the tracking of the sanding belt. 2. Stop the tool and adjust the tracking of the belt by rotating the adjusting knob (7) until the edge of the belt is even with the outer edges of both the front and rear rollers. CAUTION: Check that the belt doesn’t rub against the tool’s frame.
OPERATION Hold the tool firmly with both hands. Turn the switch on and permit the rotation of the abrasive belt to reach full speed. Then gently place the tool on the work piece surface. Move the tool back and forth. Never exert excessive pressure on the tool. The weight of the tool applies adequate pressure. Excessive pressure will retard the abrasive action, leave an uneven finish and cause extra wear to both the tool and the abrasive belt.
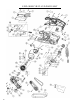
EXPLODED VIEW AND PARTS LIST 10
EXPLODED VIEW AND PARTS LIST Item 1 2 3 4 5 6 7 9 10 11 12 13 14 15 16 17 18 19 20 21 22 23 24 25 26 27 28 30 31 32 33 34 35 36 37 38 39 Stock # 6321-001 6321-002 6321-003 6321-004 6321-005 6321-006 6321-007 6321-009 6321-010 6321-011 6321-012 6321-013 6321-014 6321-015 6321-016 6321-017 6321-018 6321-019 6321-020 6321-021 6321-022 6321-023 6321-024 6321-025 6321-026 6321-027 6321-028 6321-030 6321-031 6321-032 6321-033 6321-034 6321-035 6321-036 6321-037 6321-038 6321-039 Description Power Cord Cord Pro
LIMITED TWO YEAR WARRANTY WEN Products is committed to building tools that are dependable for years. Our warranties are consistent with this commitment and our dedication to quality. LIMITED WARRANTY OF WEN CONSUMER POWER TOOLS PRODUCTS FOR HOME USE GREAT LAKES TECHNOLOGIES, LLC (“Seller”) warrants to the original purchaser only, that all WEN consumer power tools will be free from defects in material or workmanship for a period of two (2) years from date of purchase.