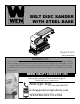
BELT DISC SANDER WITH STEEL BASE Model # 6500 bit.ly/wenvideo IMPORTANT: Your new tool has been engineered and manufactured to WEN’s highest standards for dependability, ease of operation, and operator safety. When properly cared for, this product will supply you years of rugged, trouble-free performance. Pay close attention to the rules for safe operation, warnings, and cautions. If you use your tool properly and for intended purpose, you will enjoy years of safe, reliable service.
TABLE OF CONTENTS 2 3 4 5 7 8 10 11 12 13 15 Technical Data General Safety Rules Specific Safety Rules For Belt/Disc Sander Electrical Information Know Your Belt/Disc Sander Assembly and Adjustments Operation Maintenance Troubleshooting Exploded View and Parts List Warranty TECHNICAL DATA Model Number: Motor: Speed: Disc Diameter: Belt Size: Belt Bed Tilt: Net Weight: Product Dimensions: 2 6500 120 V, 60 Hz, 3.2 A 1150 FPM 6˝ 4˝ x 36˝ 0 to 90° 32.
GENERAL SAFETY RULES Safety is a combination of common sense, staying alert and knowing how your item works. SAVE THESE SAFETY INSTRUCTIONS. WARNING: To avoid mistakes and serious injury, do not plug in your tool until the following steps have been read and understood. 1. READ and become familiar with this entire instruction manual. LEARN the tool’s applications, limitations, and possible hazards. 2. AVOID DANGEROUS CONDITIONS. Do not use power tools in wet or damp areas or expose them to rain.
GENERAL SAFETY RULES 15. DO NOT OVERREACH. Keep proper footing and balance at all times. Wear oil-resistant rubber-soled footwear. Keep the floor clear of oil, scrap, and other debris. 16. MAINTAIN TOOLS PROPERLY. ALWAYS keep tools clean and in good working order. Follow instructions for lubricating and changing accessories. 17. CHECK FOR DAMAGED PARTS. Check for alignment of moving parts, jamming, breakage, improper mounting, or any other conditions that may affect the tool’s operation.
SPECIFIC RULES FOR THE BELT SANDER 10. Do not sand pieces of material that are too small to be safely supported. 11. When sanding a large workpiece, provide additional table height support. 12. Do not sand with the workpiece unsupported. Support the workpiece with the backstop or table. The only exception is curved work performed on the outer sanding drum. 13. Always remove scrap pieces and other objects from the table, backstop, or belt before turning the sander ON. 14.
ELECTRICAL INFORMATION CAUTION: In all cases, make certain the outlet in question is properly grounded. If you are not sure, have a licensed electrician check the outlet. WARNING: This tool is for indoor use only. Do not expose to rain or use in damp locations. Guidelines for using extension cords Make sure your extension cord is in good condition. When using an extension cord, be sure to use one heavy enough to carry the current your product will draw.
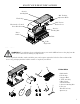
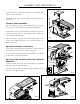
KNOW YOUR BELT/DISC SANDER Abrasive Sanding Belt Belt Tracking Adjustment Knob Work Stop Belt Tension Release Lever Horizontal to Vertical Pivot Hex Nuts Abrasive Sanding Disc Power Switch Table Table Angle Scale UNPACKING WARNING: To avoid injury from accidental startups, turn switch OFF and remove the plug from the power source outlet before making any adjustments. Carefully unpack the belt/disc sander and all its parts, and compare against the list below.
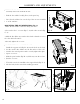
ASSEMBLY AND ADJUSTMENTS FEET INSTALLATION (Fig. B) 1. Carefully set the belt sander on its side. 1 2. Find the four rubber feet (Fig. B - 1) in the parts bag. 3. Press-fit each rubber foot over the lip of the corners around the base of the machine. MOUNTING THE ALUMINUM DISC (Fig. C) 1. Place the belt sander so that it is sitting on its feet. 2. Loosen the disc’s set screw (Fig. C - 2) with a hex wrench (Fig. C - 1). Fig. B 3.
ASSEMBLY AND ADJUSTMENTS MOUNTING THE WORK STOP 1. Loosen and remove the hex bolt (Fig. F - 1) and the flat washer (Fig. F - 2) from the plate. 2. Install the work stop and replace the hex bolt and washer to hold it in place. 1 LEVELING TABLE ASSEMBLY 1. Place a combination square (not included, Fig. G - 1) on the table so that it contacts both the table and the sanding disc. 2. If the table is not at a perfect 90 degrees with the disc, loosen the angle lock knob (Fig.
OPERATION ON/OFF SWITCH 1. To turn sander ON, insert the safety key into the key slot in the center of the switch. 2. Push key firmly into the slot, then push switch to the ON position to start the sander. 3. To turn the sander OFF push switch to the OFF position. 4. Remove the safety key when the sander has come to a complete stop by gently pulling it forward and out. WARNING: The keyed switch is intended to prevent unauthorized use of the sander. Remove the safety key whenever the sander is not in use.
MAINTENANCE WARNING: For your own safety, turn the switch OFF and remove the plug from the electrical outlet before adjusting or performing maintenance or lubrication work on the belt/disc sander. Before using, check to make sure parts are not damaged, missing, or worn. Check for alignment of moving parts, binding of moving parts, improper mounting, or any other conditions that may affect the sander operation.
TROUBLESHOOTING PROBLEM Sanding grains easily rub off belt or discs Deep sanding grooves or scars in workpiece. Sanding surface clogs quickly Burns on workpiece CAUSE 1) Sanding belt/disc has been stored in an incorrect environment. 2) Sanding belt/disc has been damaged or folded. 1) Sanding belt/disc grit is too coarse for the desired finish. 2) Workpiece sanded across the grain. 3) Too much sanding force on workpiece. 4) Workpiece held still against belt-disc for too long.
EXPLODED VIEW AND PARTS LIST No. 1 2 3 4 5 6 7 8 9 10 11 12 13 14 15 16 17 18 19 20 21 22 23 24 25 26 27 28 29 30 31 32 33 34 35 36 37 38 39 40 41 42 Part Number Description Qty.
EXPLODED VIEW AND PARTS LIST 14
LIMITED TWO YEAR WARRANTY WEN Products is committed to building tools that are dependable for years. Our warranties are consistent with this commitment and our dedication to quality. LIMITED WARRANTY OF WEN CONSUMER POWER TOOLS PRODUCTS FOR HOME USE GREAT LAKES TECHNOLOGIES, LLC (“Seller”) warrants to the original purchaser only, that all WEN consumer power tools will be free from defects in material or workmanship for a period of two (2) years from date of purchase.
THANKS FOR REMEMBERING