
Use and Care Manual

10
OPERATION
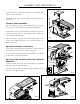
ON/OFF SWITCH
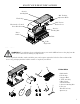
1. To turn sander ON, insert the safety key into the key slot in the center of the switch.
2. Push key firmly into the slot, then push switch to the ON position to start the sander.
3. To turn the sander OFF push switch to the OFF position.
4. Remove the safety key when the sander has come to a complete stop by gently pulling it forward and out.
WARNING: The keyed switch is intended to prevent unauthorized use of the sander.
Remove the safety key whenever the sander is not in use. Place the key in a safe place and out of the
reach of children.
SURFACE SANDING ON SANDING BELT
Hold the workpiece firmly with both hands. Keep fingers away from sanding belt. Keep the workpiece end against
the backstop and move it slowly across the sanding belt. Apply enough pressure to remove material; excessive
pressure will reduce sanding efficiency.
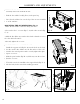
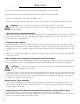
SANDING INSIDE CURVES
When sanding inside-curves on the belt-sander, always sand on the idler drum end of the work support station
(right side of the machine as shown in diagram). Hold the workpiece firmly, keeping fingers away from the sand-
ing belt. Keep the curve pressed firmly against the idler drum, moving the work evenly back and forth across the
drum.
Note: Use extra caution when sanding very thin pieces, and apply only enough pressure to allow the sanding belt
to remove the material.
END SANDING AND OUTSIDE CURVE SANDING WITH THE DISC
Use for sanding the ends of small and narrow workpieces and outside curved edges. Always work on the left side
of the disc (downward rotation side), holding the workpiece firmly with light pressure against the sanding disc.
CAUTION: To avoid personal injury and/or damage to the workpiece, become familiar with the rota-
tion of the belt and disc sanding surfaces.
The disc sander rotates counterclockwise, downward toward the table on the left side of the disc and upward from
the table on the right side of the disc. Always use the left side of the disc; using the right side of the disc will cause
the workpiece to fly up or kickback and could result in injury. Review this instruction manual for correct opera-
tion, adjustments, and basic sanding operations.
MITER GAUGE - DISC SANDER
A miter-gauge is supplied with your sander, and can be used on the disc table. The miter gauge head can be set
anywhere up to 60º (right or left) by loosening the lock-knob, setting the miter gauge head to the desired angle,
and retightening the lock-knob.
SANDING SMALL END GRAIN AND OTHER SMALL SURFACES USING MITER GAUGE
Use of the miter gauge is recommended for sanding small end surfaces on the sanding disc.
Note: Always move the workpiece across the sanding disc from the left side towards the right side, and be sure to
hold the workpiece down tightly onto the table surface.