
Product Manual


ASSEMBLY
OPERATION
TO MOVE THE STAND:
Hold the tabletop and step down on the foot pedal to
unlock and engage the wheel. Carefully move the stand to
a new location. CAUTION: Tipping can occur if wheels
are stopped abruptly by debris on the floor.
TO SET DOWN THE STAND:
Hold the tabletop and push the foot pedal up to raise
the wheel. Support the weight as the stand drops into the
locked position.
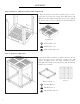
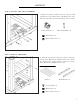
STEP 5: ATTACH THE POWER TOOL
M8 Washers x 4
M8-1.25 Hex Nuts x 4
M8-1.25X60 Bolts x4
5. Now is the moment you’ve been waiting for. Unplug and
bring over your favorite power tool. Make sure the weight
does not exceed the stand capacity and the tool is wider than
it is tall. Place the power tool on the center of the tabletop
to maximize stability. Orient it so you will be operating the
tool on the side perpendicular to the direction of the stand’s
travel.
Mount the power tool onto the stand using four M8-
1.25X60 bolts, M8 washers and M8-1.25 hex nuts. Check
to make sure the tool is securely mounted and the stand is
stable.
8
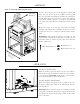
WARNING: Only mount the planer so boards are fed
perpendicular to the direction of the wheels’ rotation. Never
mount the planer so boards are fed in the same direction
that the stand travels.
WARNING: Do not operate any power tool that is mounted
to the planer stand when the wheel is engaged. Always make
sure the wheel is in the raised position and the stand is stable
before operation.
Stand Travel
Direction
Operating
Direction