MODEL HA5932 HANDHELD SPINDLE SANDER Instruction Manual NEED HELP? CONTACT US! Have product questions? Need technical support? Please feel free to contact us: 800-232-1195 (M-F 8AM-5PM CST) TECHSUPPORT@WENPRODUCTS.COM IMPORTANT: Your new tool has been engineered and manufactured to WEN’s highest standards for dependability, ease of operation, and operator safety. When properly cared for, this product will supply you years of rugged, trouble-free performance.
CONTENTS WELCOME 3 Introduction...................................................................................................... 3 Specifications.................................................................................................... 3 SAFETY 4 General Safety Rules......................................................................................... 4 Specific Rules for Your Spindle Sander............................................................. 6 Electrical Information.........
INTRODUCTION Thanks for purchasing the WEN Spindle Sander. We know you are excited to put your tool to work, but first, please take a moment to read through the manual. Safe operation of this tool requires that you read and understand this operator’s manual and all the labels affixed to the tool. This manual provides information regarding potential safety concerns, as well as helpful assembly and operating instructions for your tool. SAFETY ALERT SYMBOL: Indicates danger, warning, or caution.
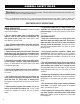
GENERAL SAFETY RULES WARNING! Read all safety warnings and all instructions. Failure to follow the warnings and instructions may result in electric shock, fire and/or serious injury. Safety is a combination of common sense, staying alert and knowing how your item works. The term “power tool” in the warnings refers to your mains-operated (corded) power tool or battery-operated (cordless) power tool. SAVE THESE SAFETY INSTRUCTIONS. WORK AREA SAFETY 6. If operating a power tool in a damp location is un1.
GENERAL SAFETY RULES WARNING! Read all safety warnings and all instructions. Failure to follow the warnings and instructions may result in electric shock, fire and/or serious injury. Safety is a combination of common sense, staying alert and knowing how your item works. The term “power tool” in the warnings refers to your mains-operated (corded) power tool or battery-operated (cordless) power tool. SAVE THESE SAFETY INSTRUCTIONS. 7.
SPECIFIC RULES FOR YOUR SPINDLE SANDER WARNING! Do not operate the power tool until you have read and understood the following instructions and the warning labels. SANDER RULES 8. Spindle Direction. Feeding workpiece / tool incor1. Two-hand operation. This machine requires the use rectly can cause it to jump or kick back, causing a loss of control or contact injury. To reduce these risks, feed of two hands to ensure safe operation. workpiece / tool against direction of spindle rotation and 2.
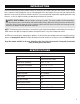
SPECIFIC RULES FOR YOUR SPINDLE SANDER WARNING! Extreme caution required when sanding paint. The dust residue may contain LEAD, which is poisonous. Exposure to even low levels of lead can cause irreversible brain and nervous system damage, to which young and unborn children are particularly vulnerable. Any pre-1960s building may have paint containing lead on wood or metal surfaces that has since been covered with additional layers of paint.
ELECTRICAL INFORMATION DOUBLE-INSULATED TOOLS The tool’s electrical system is double-insulated where two systems of insulation are provided. This eliminates the need for the usual three-wire grounded power cord. Double-insulated tools do not need to be grounded, nor should a means for grounding be added to the product. All exposed metal parts are isolated from the internal metal motor components with protecting insulation.
UNPACKING & TRANSPORTATION WARNING! Do not plug in or turn on the tool until it is fully assembled according to the instructions. Failure to follow the safety instructions may result in serious personal injury. UNPACKING With the help of a friend or trustworthy foe, carefully remove the Spindle Sander from the packaging. Make sure to take out all contents and accessories. Do not discard the packaging until everything is removed.
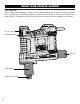
KNOW YOUR SPINDLE SANDER TOOL PURPOSE Spindle Sanders make sanding easy, and dare I say fun, while also aiding you in taking on arcs, curves, contours, faces, and more. Refer to the following diagrams to become familiarized with all the parts and controls of your Spindle Sander. The components will be referred to later in the manual for assembly and operation instructions.
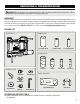
ASSEMBLY & ADJUSTMENTS WARNING! Do not plug in or turn on the tool until it is fully assembled according to the instructions. Read through and become familiarized with the following procedures of handling and adjusting your tool. Failure to follow the safety instructions may result in serious personal injury. ATTACHING THE DUST PORT 1. Align the dust port (Fig. 1 - 1) with the keyed opening (Fig. 2 - 1) at back of tool. Turn the dust port clockwise until it is locked in place. Fig. 1 2.
ASSEMBLY & ADJUSTMENTS BENCHTOP INSTALLATION 1. Place the mounting pad (Fig. 4 - 1) along the edge of a flat benchtop so that the sander notches face up. 2 2. Place the sander (Fig. 4 - 2) upside-down on top of the mounting pad and fit it into the designated notches. 3 3. Insert two (2) anchor bolts (Fig. 4 - 3) completely into the mounting holes on either side of the sander body. 4 5 4. Fasten two (2) clips (Fig. 4 - 4) and two (2) wing nuts (Fig.
OPERATION WARNING! Do not plug in or turn on the tool until it is fully assembled according to the instructions. Read through and become familiarized with the following procedures of handling and adjusting your tool. Failure to follow the safety instructions may result in serious personal injury. OPERATING THE SANDER 1. Connect the tool to power supply. Fig. 5 2. Hold the sander base in contact with a stable, secure workpiece (Fig. 5) and flip the ON / OFF switch (Fig. 6 - 1) to the ON position. 3.
TROUBLESHOOTING GUIDE WARNING! Stop using the tool immediately if any of the following problems occur. Repairs and replacements should only be performed by an authorized technician. For any questions, please contact our customer service at (800) 232-1195, M-F 8-5 CST or email us at techsupport@wenproducts.com. PROBLEM Sanding grains easily rub off. Deep sanding grooves or scars in workpiece.
MAINTENANCE WARNING! To avoid accidents, turn OFF and unplug the tool from the electrical outlet before cleaning, adjusting, or performing any maintenance work. . WARNING! Any attempt to repair or replace electrical parts on this tool may be hazardous. Servicing of the tool must be performed by a qualified technician. When servicing, use only identical WEN replacement parts. Use of other parts may be hazardous or induce product failure.
57 56 55 54 45 53 52 48 47 46 45 58 34 35 51 50 49 59 106 40 36 60 44 43 61 33 105 39 37 38 42 28 29 30 31 26 27 32 104 103 107 22 21 23 25 24 41 102 101 62 12 5 8 13 14 15 20 63 64 65 18 19 17 16 11 10 9 67 66 102 4 1 2 3 EXPLODED VIEW & PARTS LIST
EXPLODED VIEW & PARTS LIST NO PART NO DESCRIPTION QTY NO PART NO DESCRIPTION QTY 1 HA5932-001 Nameplate Label 1 44 HA5932-044 Secondary Label 1 2 HA5932-002 Housing, Left 1 45 HA5932-045 Ball Bearing, 6004ZZ 2 3 HA5932-003 Dust Port, 1-1/2" 1 46 HA5932-046 Transmission Pulley 1 4 HA5932-004 Power Cord 1 47 HA5932-047 Differential Pulley 1 5 HA5932-005 Cable Guard 1 48 HA5932-048 Output Shaft 1 8 HA5932-008 Cable Clamp 1 49 HA5932-049 Flat Washer, 4mm 1
WARRANTY STATEMENT WEN Products is committed to building tools that are dependable for years. Our warranties are consistent with this commitment and our dedication to quality. LIMITED WARRANTY OF WEN PRODUCTS FOR HOME USE GREAT LAKES TECHNOLOGIES, LLC (“Seller”) warrants to the original purchaser only, that all WEN consumer power tools will be free from defects in material or workmanship during personal use for a period of two (2) years from date of purchase or 500 hours of use; whichever comes first.
NOTES 19
THANKS FOR REMEMBERING