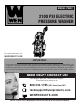
MODEL PW22 2100 PSI ELECTRIC PRESSURE WASHER For replacement parts visit WENPRODUCTS.COM IMPORTANT: Your new tool has been engineered and manufactured to WEN’s highest standards for dependability, ease of operation, and operator safety. When properly cared for, this product will supply you years of rugged, trouble-free performance. Pay close attention to the rules for safe operation, warnings, and cautions.
TABLE OF CONTENTS Specifications.......................................................................................2 Introduction.........................................................................................3 General Safety Rules............................................................................4 Specific Rules for Pressure Washers....................................................6 Electrical Information...........................................................................
INTRODUCTION Thanks for purchasing the WEN Pressure Washer. We know you are excited to put your tool to work, but first, please take a moment to read through the manual. Safe operation of this tool requires that you read and understand this operator’s manual and all the labels affixed to the tool. This manual provides information regarding potential safety concerns, as well as helpful assembly and operating instructions for your tool. WARNING: Indicates danger, warning, or caution.
GENERAL SAFETY RULES Safety is a combination of common sense, staying alert, and knowing how your item works. SAVE THESE SAFETY INSTRUCTIONS. WARNING: Read and understand all warnings, cautions and operating instructions before using this tool. Failure to follow all instructions listed below may result in personal injury and tool damage. WORK AREA SAFETY 1. Keep work area clean and well lit. Cluttered or dark areas invite accidents. 2.
GENERAL SAFETY RULES 4. Prevent unintentional starting. Ensure the switch is in the off-position before connecting to power source and/or battery pack, picking up or carrying the tool. Carrying power tools with your finger on the switch or energizing power tools that have the switch on invites accidents. 5. Remove any adjusting key or wrench before turning the power tool on. A wrench or a key left attached to a rotating part of the power tool may result in personal injury. 6. Do not overreach.
SPECIFIC RULES FOR PRESSURE WASHERS WARNING: To avoid mistakes and serious injury, do not plug in your tool until you have read and understood the following safety rules. Learn the tool’s applications, limitations, and possible hazards to maximize your safety and the lifetime of the tool. BEFORE OPERATION 1. KNOW YOUR TOOL. Be thoroughly familiar with the controls of your pressure washer.
SPECIFIC RULES FOR PRESSURE WASHERS OPERATING THE PRESSURE WASHER 1. STAY ALERT. Watch what you are doing and use common sense when operating your tool. Do not use the tool while you are tired or under the influence of drugs, alcohol, or medication. A moment of inattention during operation may result in serious bodily injury. 2. INJECTION HAZARD. The high pressure stream of water can cut through skin and cause serious injury. Keep clear of the nozzle.
ELECTRICAL SAFETY RULES OPERATING THE PRESSURE WASHER 1. STAY ALERT. Watch what you are doing and use common sense when operating your tool. Do not use the tool while you are tired or under the influence of drugs, alcohol, or medication. A moment of inattention during operation may result in serious bodily injury. IMPORTANT: Servicing a double-insulated product requires extreme care and knowledge of the system, and should be done only by a qualified service personnel using identical replacement parts.
KNOW YOUR PRESSURE WASHER Spray gun Handle High Pressure Hose Gun Holder High Pressure Hose Coupler ON / OFF Switch Onboard Detergent Tank Trigger with Safety Lock Hose Connector Hose Reel Spray Lance Power Cord Water Inlet Adapter 9
KNOW YOUR PRESSURE WASHER PACKING LIST Check your packing list against the diagram below. If any part is damaged or missing, please contact our customer service at (800) 232-1195, M-F 8-5 CST or email us at techsupport@wenproducts.com. Gun Holder & Nozzle Cleaner Spray gun + Pressure Washer Assembly Spray Lance Detergent Tank & Bracket WARNING: Do not attempt to assemble or operate this pressure washer until you have read and understood this entire manual.
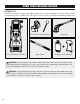
ASSEMBLY ASSEMBLING THE PRESSURE WASHER 1 1. Slide the gun holder (Fig. 1 - 1) onto the rail on the side of the pressure washer. 2 2. Slide the detergent tank bracket onto the rail on the side of the pressure washer. Install the onboard detergent tank (Fig. 1 - 2) in the bracket. ATTACHING THE TRANSFER HOSE Fig. 1 1. One end of the transfer hose (Fig. 2 - 1) will come pre-assembled under the hose reel. The other end of the transfer hose will need to be connected to the pump outlet (Fig. 2 - 2).
OPERATION USING THE SPRAY GUN Flip the lock tab (Fig. 6 - 1) behind the trigger up or down until it clicks to apply or remove the safety. Pull back on the trigger (Fig. 6 - 2) to begin operating pressure washer. To stop water flow, release trigger. 2 USING THE ADJUSTABLE NOZZLE (FIG. 7) 1 The spray gun features an adjustable nozzle that lets you adjust the spray pattern from a full fan spray (widest spray width) to a direct stream spray (narrowest spray width). Fig.
OPERATION OPERATING THE PRESSURE WASHER 1. Make sure the ON / OFF switch is in the OFF position. Plug the Ground Fault Circuit Interrupter (GFCI) into a matching receptacle (see page 8 for important electrical information). We recommend that you test the GFCI as part of your startup procedure each time you use your pressure washer as instructed below. 1 2 Press the RESET button (Fig. 8 - 1), and the power indication light should turn on. Press the TEST button (Fig.
OPERATION SHUTTING DOWN THE UNIT 1. Turn off the ON / OFF switch (Fig. 10) and unplug the power plug from the outlet. 2. Turn off the water supply. 3. Pull the high pressure gun trigger to relieve all the built-up pressure in the machine. Release the trigger and engage the gun safety lock. NOTE: To maximize safety, always engage the safety lock when the gun is not in use. 4. Disconnect the garden hose from the water inlet on the back of the unit. Fig.
MAINTENANCE & STORAGE STORING THE PRESSURE WASHER FOR EXTENDED PERIODS 1. Clean the spray nozzle and water inlet filter before storing the unit. 2. To protect and extend the life of your pressure washer, we recommended running the unit with a pump antifreeze, pump conditioner, or other pump protector before storing the unit for long periods of time. Follow the directions on your preferred pump protector for proper use. 3.
1 2 34 33 32 5 4 3 6 81 37 38 7 78 19 18 8 9 10 13 12 11 14 51 52 70 69 20 21 22 16 15 39 30 31 17 44 29 47 48 41 46 45 54 53 49 43 42 40 50 77 80 72 71 56 55 23 28 27 57 25 26 73 60 61 35 59 58 65 24 35 36 64 62 63 76 75 74 79 66 68 67 83 82 84 EXPLODED VIEW & PARTS LIST
EXPLODED VIEW & PARTS LIST NO. PART NO. DESCRIPTION QTY. NO. PART NO. DESCRIPTION QTY. 1 2 PW22-001 ON / OFF Switch 1 43 PW22-043 O-Ring 2.7 2 PW22-002 ON / OFF Switch Silver Ring 1 44 PW22-044 Split Ring 2 3 PW22-003 Upper Housing Panel 1 45 PW22-045 Stainless-Steel End Cap 1 4 PW22-004 Center Housing Panel 1 46 PW22-046 Screw M3.
WARRANTY STATEMENT WEN Products is committed to building tools that are dependable for years. Our warranties are consistent with this commitment and our dedication to quality. LIMITED WARRANTY OF WEN PRODUCTS FOR HOME USE GREAT LAKES TECHNOLOGIES, LLC (“Seller”) warrants to the original purchaser only, that all WEN consumer power tools will be free from defects in material or workmanship during personal use for a period of two (2) years from date of purchase or 500 hours of use; whichever comes first.
NOTES 19
THANKS FOR REMEMBERING