
User`s manual


User’s manual CAB EASYFLEX S-Slim L and XL
Page 4 / 7
• Drill holes are still visible on the wall after the device bracket and the cable management system is removed. After use for a
longer time period, a spot may remain on the wall.
• Do not install the product at places subject to direct solar radiation, or strong light. This will increasingly tire the eyes while
looking at the display. Keep sufficient space around the output devices, as well as audio / video devices, and around the
entire system to ensure proper ventilation and clearance, and to avoid damages.
• During transport, observe the details listed in the Chapter “Specifications”, and implement measures suitable for transport.
• For questions, defects, mechanical damages, malfunctions, and other functional problems which cannot be resolved by this
guide, please contact your dealer for repair or replacement, as described in the Chapter “Warranty and Liability”.
• The supplied components are only suitable for installation to a solid stone and concrete wall. If the structure of your wall is
different, corresponding installation material must be used. In any case, consult a specialist.
•
Make sure to observe the correct thread size during installation of the display screen to the wall bracket.
5 Installing
5.1 Installing to the wall
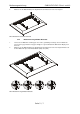
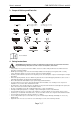
1. Check before drilling, whether gas, water, or power lines are located behind the wall.
2. Use the wall bracket (A) as a template for the holes in the wall to mark it with a spirit level.
3. Drill the holes with a 10mm masonry drill 60mm deep.
4. Plug a wall plug (WB) into the drilled holes.
5. Attach the wall bracket (A) with the 6 screws (W-A) and washers (W-C).
Fig. 1: Marking at the wall Fig. 2: Installing to the wall
5.2 Assembling the adaptor brackets
WARNING! Risk of injury by overburding and stumbling.
>> Let a second person help you.
>> Incorrectly selected screws can damage the screen.
>> Improperly installed screens may fall off and injure people and damage property!
5.2.1 Screens with flat back
1. Lean the screen against a soft vertical and large surface or a wall and secure it against scratches and
falling over. NEVER lay screens with display downwards!
2. Assemble the adaptor brackets like shown with holding noses facing downwards.
Fig. 3: Screens with flat back