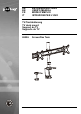
DE EN FR IT BETRIEBSANLEITUNG USER‘S MANUAL MODE D‘EMPLOI ISTRUZIONI PER L‘USO TV-Tischhalterung TV desk mount Support de TV Supporto da TV 69296 ScreenFlex Twin
Betriebsanleitung BETRIEBSANLEITUNG.............................................. USER’S MANUAL........................................................ MODE D‘EMPLOI........................................................ ISTRUZIONI PER L‘USO............................................. BETRIEBSANLEITUNG Inhalt 1 Sicherheitshinweise....................................................................3 1.1 Allgemeines.....................................................................3 1.
1 Sicherheitshinweise 1.1 • • • • • Allgemeines Lesen Sie die beiliegende Produktdokumentation vollständig und sorgfältig vor Benutzung. Diese ist Bestandteil des Produkts. Beachten Sie die Sicherheitshinweise in Produktdokumentation, auf Produkt und Zubehör, sowie auf der Verpackung. Benutzen Sie Produkt, Produktteile und Zubehör nur in einwandfreiem Zustand. Bewahren Sie die Produktdokumentation für andere potentielle Benutzer und zum Nachlesen auf.
Betriebsanleitung Sachschaden durch inkompatible Produktkombinationen Inkompatible Produktkombinationen erfüllen nicht die gewünschte Funktion, können Qualitätsverluste oder Sachschaden zur Folge haben. >> Technische Daten aller verwendeter Produkte vergleichen. Diese müssen übereinstimmen oder im angegebenen Bereich liegen. Sachschaden durch ungeeignete Umgebungsbedingungen Falsche Umgebungsbedingungen können Sachen beschädigen.
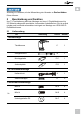
Warnung vor Gefahren, die bei Missachtung der Hinweise zu Sachschäden führen können. 2 Beschreibung und Funktion Ihre TV-Tischhalterung dient der Montage von bis zu 2 Flachbildschirmen bis 23“ Bildschirmdiagonale an stabilen, horizontalen Arbeitsflächen. Sie ist vertikal neigbar und horizontal schwenkbar und eignet zur Montage von VESA MIS-D Flachbildschirmen. 2.
Betriebsanleitung Werkzeug Innensechskant-Schlüssel 4mm mit Schraubendreher P-A 1 Innensechskant-Schlüssel 5mm P-B 1 Tab. 2: Lieferumfang 2.2 benötigtes Werkzeug Werkzeug Abbildung Kreuzschlitz-Schraubendreher zweite Person Tab.
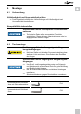
4 Montage 4.1 Vorbereitung Vollständigkeit und Unversehrtheit prüfen >> Packungsinhalt mithilfe des Lieferumfangs auf Vollständigkeit und Unversehrtheit kontrollieren. Kompatibilität sicherstellen Sachschaden durch inkompatible Produktkombinationen >> Technische Daten aller verwendeter Produkte vergleichen. Diese müssen übereinstimmen oder im angegebenen Bereich liegen. Tab. 4: Kompatibilität sicherstellen 4.
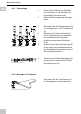
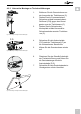
Betriebsanleitung 4.2.1 Vormontage 1. Prüfen Sie die Stärke und Stabilität der Unterlage vor der Montage und beschädigen Sie diese nicht. 2. Wählen Sie eine geeignete Montage stelle. 3. Schrauben Sie die Stangeneinheit (B) im Uhrzeigersinn in die Tischklemme (C). 4. Blockieren Sie diese anschließend durch Festschrauben der abgebilde ten Innensechskant-Schrauben mittels Innensechskant-Schlüssel (P-A).
4.2.3 Alternative Montage an Tischdurchführungen 1. Entfernen Sie die Gummischoner an der Innenseite der Tischklemme (C). 2. Drehen Sie die 3 Innensechskant Schrauben mittels Innensechskant Schlüssel (P-B) gegen den Uhrzei gersinn aus der Tischklemme (C). 3. Drehen Sie die Schraube der Konterplatte mittels Kreuzschlitz Schraubendreher aus der Tischklem me (C). Fig. 4: Tischmontage - Montage an Tischdurchführungen 1 P-D 4.
Betriebsanleitung 4.3 Flachbildschirmmontage Verletzungsgefahr durch Stolpern und Sturz >> Produkt, Produktteile und Zubehör sicher platzieren, installieren und transportieren. Sachschaden durch ungeeignete Vorgehensweise >> Beim Anziehen von Schrauben mäßige Kraft aufwenden, um Gewinde nicht zu beschädigen. >> >> Flachbildschirm NIE flach auf den Boden legen. Flachbildschirm nicht durch zu lange Schrauben beschädigen. Tab.
4.4 Einhängen und Sichern der Flachbildschirme Verletzungsgefahr durch Stolpern und Sturz >> >> Produkt, Produktteile und Zubehör sicher platzieren, installieren und transportieren. Bei Arbeiten mit Lasten sich und den Arbeitsort sichern und von 2. Person helfen lassen. Sachschaden durch ungeeignete Umgebungsbedingungen >> Um Quell- und Ausgabegeräte sowie um Schwenkund Neigebereich ausreichend Platz für gute Belüftung und Beweglichkeit lassen. Tab.
Betriebsanleitung 4.5 Gerätekabel verlegen und Position einstellen 4.5.1 Gerätekabel verlegen 1. Wählen Sie ausreichend lange Kabel, um die Beweglichkeit des Flachbildschirms zu gewährleisten. 2. Klemmen Sie die Kabel in die Kabelführungen wie abgebildet. Fig. 11: Gerätekabel verlegen Ende der Montage. Zur Demontage gehen Sie in rückwärtiger Reihenfolge vor. 4.5.2 Ausrichten der Flachbildschirme KreuzschlitzSchraubendreher 2. Person 1.
5 Gewährleistung und Haftung • Der Hersteller gewährt auf ein neues Produkt 2 Jahre gesetzliche Gewährleistung. • Da der Hersteller keinen Einfluss auf die Installation des Produktes hat, deckt die Gewährleistung nur das Produkt selbst ab. • Falls ein Fehler oder Defekt an Ihrem Gerät festgestellt werden sollte, wenden Sie sich bitte an Ihren Fachhändler und zeigen Sie ggf. Ihre Quittung oder Rechnung als Kaufnachweis vor.
Betriebsanleitung 7 Problembehebung Problem Hilfe Welche Unterlagen sind geeignet? >> >> >> Massivholzplatten, sowie Arbeitsplatten und Metallplatten mit einer Stärke von 10-40 mm Die TVTischhhalterung lässt sich schwer ausrichten. >> >> Gelenke etwas lockern. Die maximale Schwenkbarkeit kann bedingt durch die TV Größe kleiner sein, als angegeben. andere Fragen >> Händler kontaktieren. Tab.
MIS-F 400x200 / 400x400 / 600x200 / 600x400 / 800x400mm Tab. 10: Informationen zum VESA-Standard 10 Entsorgungshinweise Dieses Produkt gehört nicht in den Hausmüll. Bitte geben Sie Ihr Gerät am Ende seiner Lebensdauer an die dafür eingerichteten, öffentlichen Sammelstellen oder an die Verkaufsstelle kostenlos zurück. Einzelheiten zur Entsorgung regelt das jeweilige Landesrecht. Wertstoffe werden dem Recyclingkreislauf zugeführt, um daraus neue Rohstoffe zu gewinnen.
User‘s Manual BETRIEBSANLEITUNG.............................................. USER’S MANUAL........................................................ MODE D‘EMPLOI........................................................ ISTRUZIONI PER L‘USO............................................. USER’S MANUAL Content 1 Safety Instructions.................................................................... 17 1.1 General Notes............................................................... 17 1.2 User Groups...........
1 Safety Instructions 1.1 • • • • • General Notes Read the including product documentation completely and carefully before use. It is part of the product. Attend to the safety instructions in product documentation, on product and accessories, such as on the package. Use product, product parts and accessories only in perfect condition. Keep the product documentation for other potential users and for later requests.
User‘s Manual >> Do not modify or alter either the product or the accessories! Risk of material damage by inappropriate ambient conditions Incorrect ambient conditions can damage things. >> Avoid extreme conditions, such as extreme heat, coldness, humidity or direct exposure to the sun, as well as vibrations and mechanical pressure. >> Keep enough space around product and to the whole system to ensure proper ventilation and mobility. >> Mount only to sufficiently stable and thick surfaces.
2 Description and Function Your TV desk mount is made for mounting up to 2 flat screens up with max. size of 23” to stable and horizontal work surfaces. It is tiltable, swivelable and is suitable for mounting VESA MIS-D flat screens. 2.
User‘s Manual 2.2 Required Tools Tool Figure Phillips screwdriver Second person Tab. 13: Required Tools 3 Intended Use This product is made for mounting flat screens with specific screen sizes, weights and mounting points, which are summarized in chapter “Specifications“, on a horizontal work surfaces. Another use than described in chapter “Description and Function“ is not permitted.
Risk of material damage by inappropriate ambient conditions >> >> >> Keep enough space around product and to the whole system to ensure proper ventilation and mobility. Mount only to sufficiently thick and stable surfaces. Protect against pressure points. Tab. 15: Wall mounting Allen key 4mm with screwdriver P-A Allen key 5mm P-B 4.2.1 Pre-assembly 1. Check the strength and stability of the surface before installing and do not damage them. 2.
User‘s Manual 4.2.3 Alternative through desk mounting 1. Remove the rubber protectors at the desk clamps (C) inside. 2. Remove the 3 Allen screws by Allen key (P-B) anti-clockwise out of the desk clamp (C). 3. Turn the screw of the counter plate off the desk clamp (C) by Phillips screwdriver. Fig. 17: Desk mounting - Alternative through desk mounting 1 P-D 4.
4.3 Flat screen mounting Risk of injury by tripping and falling >> Place, transport and install product, parts and acceories in a safe way. Risk of material damage by improper procedure >> Only use moderate force when tightening the screws in order to avoid damaging threads. >> >> NEVER set the screen on the front during installation! Do not damage the flat screen by too long screws. Tab.
User‘s Manual 4.4 Attaching, fixing and locking the flat screen Risk of injury by tripping and falling >> >> Place, transport and install product, parts and acceories in a safe way. When working with burdens, secure yourself and the working place, let a second person help you. Risk of material damage by inappropriate ambient conditions >> Keep enough space around product and to the whole system to ensure proper ventilation and mobility. Tab.
4.5 Laying the cables and positioning 4.5.1 Laying the cables 1. Select sufficiently long cables for ensuring mobility of the flat screens. 2. Clip the cables in the cable manage ment system like shown. Fig. 24: Laying the cables End of installing. To remove, proceed in reversed order. 4.5.2 Positioning Phillips screwdriver 2nd person 1. Loosen the Phillips screws on the backside a little bit, to move the flat screens horizontally. 2.
User‘s Manual 5 Warranty and Liability • The producer grants a 2 years warranty to a new device. • As the manufacturer has no influence on installation, warranty only applies to the product itself. • If any fault or damage is detected on your device, please contact your dealer and provide your sales slip or invoice as evidence of the purchase, if necessary. Your dealer will repair the fault either on site, or send the device to the manufacturer.
7 Troubleshooting Problem Help Which surfaces are suitable? >> >> >> Massive wood plates, Working plates and Metal plates with a thickness of 10-40 mm The TV desk mount is hard to align. >> >> Loosen the joints a little bit. Due to the screen size, the maximum swivel angle may be lower than described. Other questions >> Contact your dealer. Tab. 18: Troubleshooting 8 Specifications Physical size Specification Unit TV diameter 13-23 “ / Inches VESA 75x75 / 100x100 mm Load max.
User‘s Manual 10 Disposal Instructions This product should not be disposed together with domestic waste. Please return your product free of charge at the end of its service life at the producer, the sales outlet, or a public collection point, established for this purpose. Details for disposal are regulated in the relevant federal state law. Potential recyclable materials are fed into the recycling cycle to obtain new raw materials from them.
Mode d‘emploi BETRIEBSANLEITUNG.............................................. USER’S MANUAL........................................................ MODE D‘EMPLOI........................................................ ISTRUZIONI PER L‘USO............................................. 2 16 30 44 MODE D‘EMPLOI Contenu 1 Consignes de sécurité........................................................................31 1.1 Notes général..........................................................................
1 Consignes de sécurité 1.1 Notes général • • • • • Lisez attentivement toute la documentation du produit fournie avant utilisation. Elle fait partie du produit. Consultez les consignes de sécurité de la documentation du produit, sur le produit et les accessoires, comme l‘emballage. N‘utilisez le produit, les pièces du produit et les accessoires que s‘ils sont en parfait état. Conservez la documentation du produit pour d‘autres utilisateurs potentiels et pour une utilisation ultérieure.
Mode d‘emploi Risque d‘intervention personnelle et de mauvaise utilisation Les interventions personnelles et les mauvaises utilisations cachent des risques difficiles à prévoir et peuvent entraîner une fin de garantie. >> Ne modifiez ni le produit ni les accessoires! Risque de dommage du matériau par combinaison inappropriée du produit La combinaison du produit incompatible ne répond pas aux fonctions requises, elle peut entraîner une perte de qualité ou un dommage matériel.
Mises en garde contre les dangers pouvant entraîner des blessures graves ou la mort en cas de non respect. Mises en garde contre les dangers pouvant entraîner des blessures en cas de non respect. Mises en garde contre les dangers pouvant entraîner un dommage matériel en cas de non respect. 2 Description et fonction Votre support de téléviseur est utilisé pour monter jusqu’à 2 écrans plats jusqu’à 23“ écran diagonal stable, sur les surfaces horizontales.
Mode d‘emploi Montage d‘écran plat 2x M4x14 M-A 4 M5x14 M-B 4 Rondelle D5 M-C 4 Clé Allen 4mm avec tournevis P-A 1 Clé Allen 5mm P-B 1 Outils Tab. 22: Contenu de la livraison 2.2 Outils requis Tool Figure Tournevis cruciforme Seconde personne Tab. 23: Outils requis 3 Utilisation prévue Ce produit est destiné au montage des écrans plats de tailles d‘écrans, de poids et de points de montage spécifiques sur un base horizontal, résumés dans le chapitre „Spécifications“.
4 Installation 4.1 Préparation Vérifiez l‘intégralité et l‘intégrité >> Vérifiez le contenu de l‘emballage en le comparant à la livraison concernant l‘intégralité et l‘intégrité. Assurer la compatibilité Risque de dommage du matériau par combinaison inappropriée du produit >> Les spécifications de tous les produits utilisés doivent correspondre ou être comprises dans la gamme spécifiée. Tab. 24: Assurer la compatibilité 4.
Mode d‘emploi 2. Choisissez un emplacement approp rié. 3. Visser l‘unité tige (B) dans le sens horaire à la pince de table (C). 4. Bloquer ce alors en serrant les vis à six pans creux indiqués avec la clé Allen (P-A). 5. Réglez la hauteur du siège (S) de sorte que les écrans plats pas mis sur le tapis dans le panneau plat de montage. Fig. 28: Montage sur la table - Pré-montage 1 6.
P-D 4. Visser la plaque de pression (P-D) à la place de la pince de table (C) à la face inférieure de la base. 5. Fixez les protecteurs de caoutchouc à l‘arrière. Fig. 32: Montage sur la table - Alternative montage sur des trou de table 2 6. Placez le piédestal au-dessus de la mise en œuvre de table et exécuter la tige filetée à travers la plaque de pression (P-D). 7. Visser dans le sens horaire en mesure fileté à la main. Fig.
Mode d‘emploi Tournevis cruziforme 1. Penchez l‘écran plat verticalement sur une grande surface molle ou un mur et le protéger des égratignures et de s‘écrouler. 2. Retirez les plaques VESA de A l‘unité de support (A) en retirant les vis de fixation à l‘arrière avec la clé Allen (P-A). L‘installation est seulement possible qu‘avec l‘écrans sauvegarde avec plat arrière. Tab. 27: Montage de l‘écran plat 1 3.
Clé Allen 4mm avec tournevis P-A Tournevis cruziforme Seconde personne 1. Vérifiez que les distances de montage sont suffisantes avant de monter la taille de votre écrans plat. 2. Modifiez les fentes par tournevis cruciforme si nécessaire. 3. Accrochez les plaques VESA associées aux écrans plats avec une deuxième personne sur l‘unité de support (A). Fig. 34: Raccrocher l‘écrans plat 4.
Mode d‘emploi 4.5.2 .Alignez les écrans plats Tournevis cruziforme Seconde personne 1. Desserrer la vis Phillips sur le dos à écran plat un peu pour aligner l‘horizontalement. 2. Dévissez la vis Phillips. Fig. 37: Alignez les écrans plats 1 Aligner l‘écran plat au besoin >> Verticalement, >> Horizontalement et / ou >> À partir de l‘axe de rotation. Fig.
• • Ne modifiez pas et n‘altérez pas le produit ni ses accessoires. Toute utilisation autre que celle décrite dans le présent manuel d’utilisation est interdite, et provoque l‘annulation de la garantie et nous dégage de toute responsabilité. Nous réservons tous les droits en cas d’erreur d‘impression et de modification de l‘appareil, de l‘emballage ou du manuel d‘utilisation.
Mode d‘emploi 8 Spécifications Taille Spécification Unité TV Taille 13-23 “ / Pouce VESA 75x75 / 100x100 mm Charger max. 2x8 kg Angle d'inclinaison +/-15 ° Angle de pivotement, bras pivotant +/-15, 360 ° Angle de rotation 360 ° Distance du table (du centre de l‘écran) 62-330 mm Dimensions 772x510x115 mm Poids 3.5 kg Tab.
concernées. Les éléments recyclables sont intégrés dans le cycle de recyclage des déchets afin d’en retirer de nouvelles matières premières. Les matériaux recyclables suivants sont recueillis dans les points de recueils locaux: • Déchets de verre, plastique, déchets métalliques, plaques métalliques, etc. Ce type de recyclage des équipements usagés contribue de façon significative à la protection de notre environnement.
Istruzioni per l‘uso BETRIEBSANLEITUNG.............................................. USER’S MANUAL........................................................ MODE D‘EMPLOI........................................................ ISTRUZIONI PER L‘USO............................................. 2 16 30 44 ISTRUZIONI PER L‘USO Contenuto 1 Istruzioni per la sicurezza...................................................................45 1.1 Note Generali.........................................................
1 Istruzioni per la sicurezza 1.1 Note Generali • • • • • Leggere in modo completo ed accurato la documentazione del prodotto prima dell‘uso Fa parte del prodotto. Osservare le istruzioni di sicurezza riportate nella documentazione del prodotto, sul prodotto e sugli accessori, come ad esempio sulla confezione. Utilizzare il prodotto, le parti del prodotto e gli accessori solo se sono in perfette condizioni.
Istruzioni per l‘uso >> Non modificare o alterare né il prodotto né gli accessori! Rischio di danni materiali causati da combinazioni inappropriate di prodotti La combinazione di prodotti incompatibili non soddisfa le funzioni necessarie, può causare la perdita di qualità o danni materiali. >> Le specifiche di tutti i prodotti utilizzati devono corrispondere o essere comprese nell‘intervallo specificato.
Avvisi relativi a pericoli che possono tradursi in lesioni in caso di inosservanza. Avvisi relativi a pericoli che possono tradursi in danni materiali in caso di inosservanza. 2 Descrizione e Funzione Supporto da TV scrivania viene utilizzato per montare fino a 2 schermi piatti fino a 23“ superfici diagonale dello schermo stabili, orizzontale di lavoro. È regolabile in orizzontale e in verticale ed è adatto per il montaggio schermi piatti VESA MIS-D. 2.
Istruzioni per l‘uso Strumenti Chiave a brugola da 4mm con un cacciavite P-A 1 Chiave a brugola da 5 mm P-B 1 Tab. 34: Scopo della consegna 2.2 Strumenti necessari Strumento Figura Cacciavite a croce Seconda persona Tab. 35: Strumenti necessari 3 Scopo d‘utilizzo Questo prodotto è realizzato per l’installazione su una scrivania orizzontale di schermi piatti con dimensioni, pesi e punti d’installazione specifici, che sono riassunti nel capitolo „Specifiche“.
Garantire la compatibilità Rischio di danni materiali causati da combinazioni inappropriate di prodotti >> Le specifiche di tutti i prodotti utilizzati devono corrispondere o essere comprese nell‘intervallo specificato. Tab. 36: Garantire la compatibilità 4.2 Montaggio Tavolo Rischio di lesioni provocate da condizioni ambientali inappropriate >> Non installare il prodotto in luoghi esposti alla luce diretta del sole o artificiale. Questo contribuisce all’affaticamento della vista.
Istruzioni per l‘uso 7. Inserire i tappi (D) ciascuno sul lato destro e sinistro del detentore (A). Fig. 40: Montaggio Tavolo - Pre-assemblaggio 3 4.2.2 Montaggio sul bordo del tavolo Avvitare il morsetto (C) in senso orario con la mano. Fig. 41: Montaggio Tavolo - Montaggio sul bordo del tavolo 4.2.3 Montaggio alternativo su bronzine tavolo 1. Rimuovere la gomma copre l‘interno del morsetto (C). 2.
4.3 Montare lo schermo piatto Pericolo di lesioni da incespicamento e caduta >> Collocare, trasportare ed installare il prodotto, sue parti ed accessori in modo sicuro. Rischio di danni materiali a causa di procedure inappropriate >> Utilizzare solo una forza moderata per stringere le viti in modo da evitare di danneggiare la filettatura. >> Non collocare MAI lo schermo sulla parte anteriore durante l‘installazione! Non danneggiare lo schermo piatto con viti troppo lunghe. >> Tab.
Istruzioni per l‘uso Fig. 46: Montare lo schermo piatto 2 4.4 Impiccagione e secure dello schermi piatti Pericolo di lesioni da incespicamento e caduta >> >> Collocare, trasportare ed installare il prodotto, sue parti ed accessori in modo sicuro. Quando si lavora con pesi, proteggere sé stessi ed il luogo di lavoro, e farsi aiutare da una seconda persona.
1. Controllare che le distanze di montaggio sono sufficienti prima di montare le dimensioni dello schermo piatto. 2. Modificare gli slot da cacciavite a croce, se necessario. 3. Appendere le piastre associati ai monitor a schermo piatto VESA insieme ad una seconda persona sull‘unità supporto (A). Fig. 47: Impiccagione dello schermi piatti 4. Fissare il schermi piatti saldamente A serrando le viti di bloccaggio in senso orario.
Istruzioni per l‘uso Seconda persona 1. Allentare le viti a croce sul retro un po per allineare il pannello orizzontale piatto. 2. Svitare nuovamente le viti Phillips. Fig. 50: Allineamento lo schermi piatti 1 Allineare lo schermi piatti, se necessario >> Verticale, >> Orizzontalmente e / o >> Dall‘asse di rotazione. Fig.
6 • • • • • • • • • Manutenzione, Cura, conservazione e trasporto Il prodotto deve essere mantenuto solo da officine specializzate. Proteggere gli angoli da sporco e grasso regolarmente con olio leggero per macchine. Usare un panno di stoffa asciutto per pulire il prodotto. Prestare attenzione per evitare di graffiare il prodotto. Usare un panno leggermente inumidito per pulire le macchie difficili. Prestare attenzione ai cavi di massa! Non usare alcun prodotto detergente.
Istruzioni per l‘uso Angolo di rotazione di ciascun braccio girevole +/-15, 360 ° Angolo di rotazione 360 ° Distanza dalla tavolo (dal centro monitor) 62-330 mm Dimensioni 772x510x115 mm Carico 3.5 kg Tab.
DE EN FR IT BETRIEBSANLEITUNG USER‘S MANUAL MODE D‘EMPLOI ISTRUZIONI PER L‘USO TV-Tischhalterung TV desk mount Support de TV Supporto da TV 69296 Revision 2014-05-14 Version 1.3 Goobay ® Pillmannstraße 12 38112 Braunschweig Germany Made in China. Hotline: +49 (0180) 5005882 E-Mail: info@goobay.de Web: www.mygoobay.de *(0,14 € pro Minute aus dem deutschen Festnetz. Maximal 0,42 € pro Minute aus dem Mobilfunknetz.