Motors | Energy | Automation | Coatings Frequency Inverter Convertidor de Frecuencia Inversor de Freqüência Frequenzumrichter Variateur de Vitesse Преодразователь частоты Frequentie Regelaar Frekvensomvandlare CFW-08 User's Guide Manual del Usuario Manual do Usuário Bedienungsanleitung Manuel d'utilisation Руководство пользователя Gebruikers Handleiding Användarinstruktioner
FREQUENCY INVERTER MANUAL Series: CFW-08 Software: version 5.2X Language: English Document: 0899.5242 / 09 03/2009 ATTENTION! It is very important to check if the inverter software version is the same as indicated above.
Summary of Revisions The table below describes all revisions made to this manual. Revision 1 2 3 4 5 6 7 8 9 2 Description Section First Edition Inclusion of the item 3.3 - European Refer to item 3.3 EMC Directive - Requirements for Conforming Installations General Revision External Parallel Keypad and Refer to item 8.3 Fix Kit included and and 8.18 General Revision Description changed of the Refer to item 8.5 Parallel Cable for the External Parallel Keypad Item 7.
Summary Quick Parameter Reference, Fault and Status Messages I Parameters .................................................................... 8 II Fault Messages ........................................................... 16 III Other Messages ........................................................... 16 CHAPTER 1 Safety Notices 1.1 Safety Notices in the Manual ..................................... 17 1.2 Safety Notices on the Product ................................... 17 1.
Summary 3.3.2 Emission and Immunity Levels Description ........ 52 3.3.3 Inverter Models and Filters .................................. 54 3.3.4 EMC Filters Characteristics ............................... 57 CHAPTER 4 Keypad (HMI) Operation 4.1 Keypad (HMI) Description ......................................... 67 4.2 Use of the Keypad (HMI) ........................................... 68 4.2.1 Keypad Operation .............................................. 69 4.2.2 Inverter Status ...........................
Summary CHAPTER 7 Diagnostics and Troubleshooting 7.1 Faults and Possible Causes ................................... 141 7.2 Troubleshooting ....................................................... 144 7.3 Contacting WEG ..................................................... 145 7.4 Preventive Maintenance .......................................... 145 7.4.1 Cleaning Instructions ......................................... 146 CHAPTER 8 CFW-08 Options and Accessories 8.1 HMI-CFW08-P .............................
Summary 8.24.1 Introduction .................................................... 173 8.24.2 RS-485 and RS-232 Interfaces Description . 174 8.24.2.1 RS-485 .............................................. 175 8.24.2.2 RS-232 .............................................. 176 8.24.3 Definitions ..................................................... 176 8.24.3.1 Used Terms ....................................... 176 8.24.3.2 Parameter/Variables Resolution ........ 177 8.24.3.3 Character Format ...................
Summary CHAPTER 9 Technical Specifications 9.1Power Data .............................................................. 204 9.1.1 200-240 V Power Supply.................................. 204 9.1.2 380-480 V Power Supply.................................. 205 9.2 Electronics/General Data ........................................ 208 9.3 WEG Standard IV-Pole Motor Data .........................
CFW-08 - QUICK PARAMETER REFERENCE QUICK PARAMETER REFERENCE, FAULT AND STATUS MESSAGES Software: V5.2X Application: Model: Serial Number: Responsible: Date: / / . I.
CFW-08 - QUICK PARAMETER REFERENCE Parameter P133 P134 P136 (2) (*) P137 (2) P138 (2) P142 (2) (3) P145 (2) (3) P151 P156 P169 P178 (1) P202 (3) P203 (3) P204 (3) P205 P206 P208 P212 P213 P215 (3) (4) P219 (3) Function Speed Limits Minimum Frequency (Fmin) Maximum Frequency (Fmax) V/F Control Manual Torque Boost (IxR Compensation) Automatic Torque Boost (Automatic IxR Compensation) Slip Compensation Maximum Output Voltage Field Weakening Frequency (Fnom) Factory Setting Adjustable Range Un
CFW-08 - QUICK PARAMETER REFERENCE Parameter P220 (3) P221 (3) P222 (3) P229 (3) P230 (3) P231 (3) P233 P234 P235 (3) (5) Function Local/Remote Definition Local/Remote Selection Source Adjustable Range 0 = Always Local 1 = Always Remote 2 = HMI-CFW08-P or HMI-CFW08-RP Keypad (default: local) 3 = HMI-CFW08-P or HMI-CFW08-RP Keypad (default: remote) 4 = DI2 to DI4 5 = Serial or HMI-CFW08-RS Keypad (default: local) 6 = Serial or HMI-CFW08-RS Keypad (default: remote) Frequency Local Reference 0 = K
CFW-08 - QUICK PARAMETER REFERENCE Parameter P236 P238 P239 (6) (3)(5)(6) P240 (6) P248 P251 (6) Function Analog Input AI1 Offset Analog Input AI2 Gain Analog Input AI2 Function Analog Input AI2 Offset Analog Inputs Filter Time Constant Analog Output Analog Output AO Function P252 (6) P253 Analog Output AO Gain Analog Output AO Signal P263 (3) Digital Inputs Digital Input DI1 Function P264 (3) Digital Input DI2 Function P265 (3) (7) Digital Input DI3 Function Adjustable Range -999 to +999 0.
CFW-08 - QUICK PARAMETER REFERENCE Parameter Function P266 (3) Digital Input DI4 Function P267 (3) (5) Function of the Digital Input DI5 (only displayed when P235 = 2, 3 or 4) P268 (3) (5) (6) Function of the Digital Input DI6 (only displayed when P239 = 2, 3 or 4) 12 Adjustable Range 11, 12 = Not Used 13 = Flying Start Disable 14 = Multispeed (MS1) Using Ramp 2 15 = Manual/Automatic (PID) 16 = Increase E.P.
CFW-08 - QUICK PARAMETER REFERENCE Parameter Function P277 (3) Digital Output(s) Relay Output RL1 Function P279 (3) (6) Relay Output RL2 Function P288 P290 Fx Frequency Ix Current Inverter Data Rated Inverter Current (Inom) P295 (3) P297 (3) P300 P301 P302 P303 P304 P306 P308 (3) P310 (3) Switching Frequency Adjustable Range 0 = Fs > Fx 1 = Fe > Fx 2 = Fs = Fe 3 = Is>Ix 4 and 6 = Not Used 5 = Run 7 = No Fault 0 = Fs > Fx 1 = Fe > Fx 2 = Fs = Fe 3 = Is > Ix 4 and 6 = Not Used 5 = Run 7 = No Fa
CFW-08 - QUICK PARAMETER REFERENCE Parameter P311 P312 (3) P313 P314 P399 (1) (3) P400 (1) (3) P401 P402 (1) P403 (1) (3) P404 (1) (3) 14 Function Adjustable Range Voltage Ramp 0.1 to 10.
CFW-08 - QUICK PARAMETER REFERENCE Parameter P407 (3) Function Rated Motor Power Factor P408 (1) (3) Measured Parameters Run Self-Tuning P409 (3) Motor Stator Resistance P520 P521 P522 P525 P526 P527 P528 P535 P536 SPECIAL FUNCTION - P500 PID Regulator PID Proportional Gain PID Integral Gain PID Differential Gain Setpoint (Via Keypad) of the PID Regulator Process Variable Filter PID Action Process Variable Scale Factor Wake up Band Automatic Setting of P525 Adjustable Range 0.50 to 0.
CFW-08 - QUICK PARAMETER REFERENCE II. Fault Messages Display E00 E01 E02 E04 E05 E06 E08 E09 E10 E14 E22, E25, E26 and E27 E24 E28 E31 E32 E41 III.
CHAPTER 1 SAFETY NOTICES This Manual contains necessary information for the correct use of the CFW-08 frequency inverter. This Manual was developed for qualified personnel with suitable training and technical qualification to operate this type of equipment. 1.1 SAFETY NOTICES IN THE MANUAL The following safety notices are used in this manual: DANGER! If the recommended safety notices are not strictly observed, it can lead to serious or fatal injuries of personnel and/or material damage.
CHAPTER 1 - SAFETY NOTICES NOTE! In this manual, qualified personnel are defined as people that are trained to: 1. Install, ground, power up and operate the CFW-08 according to this manual and the local required safety procedures; 2. Use of safety equipment according to the local regulations; 3. Administer First Aid. DANGER! The inverter control circuit (ECC3, DSP) and the HMI-CFW08-P are high voltage circuits and are not grounded.
CHAPTER 2 GENERAL INFORMATION This chapter defines the contents and purposes of this manual and describes the main characteristics of the CFW-08 frequency inverter. Identification, receiving inspections and storage requirements are also provided. 2.1 ABOUT THIS MANUAL This manual is divided into 9 chapters, providing information to the user on how receive, install, start-up and operate the CFW-08. Chapter 1 - Safety notices. Chapter 2 - General information and receiving the CFW-08.
CHAPTER 2 - GENERAL INFORMATION 2.3 ABOUT THE CFW-08 The CFW-08 frequency inverter provides two control options: vector control (VVC: voltage vector control) or V/F (scalar); both types of control can be set according to the application. In the vector control mode, the motor performance is optimized relating to torque and speed regulation.
CHAPTER 2 - GENERAL INFORMATION Rsh1 NTC Power Supply R S T U V W Motor RFI Filter PE PE Rsh2 POWER CONTROL HMI-CFW08-RP HMI-CFW08-RP HMI-CFW08-P POWER SUPPLIES AND CONTROL / POWER INTERFACES or Interface MIP-CFW08-RP KDC-24VR-CFW08 HMI-CFW08-RS or Interface MIS-CFW08-RS KDC-24V-CFW08 24 V Power Supply 24 V Power Supply or PC-Software SuperDrive Interface RS-232 KCS-CFW08 "ECC3" CONTROL BOARD WITH DSP KRS-485 RS-485 KFB-CO or KFB-DN CANopen or DeviceNet Digital Inputs (DI1 to DI4) A
CHAPTER 2 - GENERAL INFORMATION Braking Resistor (External and Optional) +UD BR Pré-Carga Rsh1 RPC Rede de Alimentação R S T RFI Suppressor Filter (optional) U V W Motor RFI Filter PE -UD HMI-CFW08-RP Rsh2 HMI-CFW08-P Voltage Feedback POWER CONTROL PE HMI-CFW08-RP POWER SUPPLIES AND CONTROL / POWER INTERFACES or Interface MIP-CFW08-RP KDC-24VR-CFW08 HMI-CFW08-RS or Interface MIS-CFW08-RS KDC-24V-CFW08 24 V Power Supply 24 V Power Supply or PC-Software SuperDrive KRS-485 RS-485 Inter
CHAPTER 2 - GENERAL INFORMATION DC Link Inductor (optional) +UD DCR Braking Resistor (optional) BR Pré-Carga RPC Power Supply R S T RFI Suppressor Filter (optional) U V W PE Motor RFI Filter Rsh1 -UD HMI-CFW08-P HMI-CFW08-RP Voltage PE Feedback POWER CONTROL HMI-CFW08-RP POWER SUPPLIES AND CONTROL / POWER INTERFACES or Interface MIP-CFW08-RP KDC-24VR-CFW08 HMI-CFW08-RS 24 V Power Supply or Interface MIS-CFW08-RS KDC-24V-CFW08 24 V Power Supply or PC-Software SuperDrive KRS-485 Int
CHAPTER 2 - GENERAL INFORMATION 2.4 CFW-08 IDENTIFICATION WEG Part Number Software Version CFW-08 Model (Intelligent Code) Manufacturing Date Rated Input Data (Voltage, Current, etc) Rated Output Data (Voltage, Frequency) Serial Number Lateral Label of the CFW-08 MSCFW080100T3848SOA1Z WEG Part Number Serial Number 10194356 V 4.
0040 Number of phases of the power supply: S = single phase T = three phase B = single phase or three phase B Power Supply: 2024 = 200 to 240 V 3848 = 380 to 480 V 5060 (**) = 500-600 V 2024 Manual Language: P= Portuguese E = English S = Spanish E Options: S = standard O = with options O __ Control Board: Blank = standard control A1 = control 1 (Plus Version) A2 = control 2 (Plus Version with Als +/10 V) A3 = control 3 (Plus version with CANopen protocol) (*) A4 = control 4 (Plus version with DeviceNe
CHAPTER 2 - GENERAL INFORMATION For the effect of this code, the standard product is conceived as follows: - CFW-08 with standard control board. - Degree of protection: Nema 1 for the models 22 A, 28 A and 33 A/ 200-400 V and also 13 A,16 A, 24 A and 30 A/380-480 V, IP20 for the other models. CFW-08 Plus - A1 is composed of the inverter and the control board 1. Example: CFW080040S2024POA1Z. CFW-08 Plus - A2 is composed of the inverter and the control board 2. Example: CFW080040S2024POA2Z.
CHAPTER 2 - GENERAL INFORMATION 2.5 RECEIVING AND STORING The CFW-08 is supplied in cardboard boxes. The outside of the packing box has a nameplate that is identical to that on the CFW-08. Please check if the CFW-08 is the one you ordered. Check if the: CFW-08 nameplate data matches with your purchase order. The equipment has not been damaged during transport. If any problem is detected, contact the carrier immediately.
CHAPTER 3 INSTALLATION AND CONNECTION This chapter describes the procedures for the electrical and mechanical installation of the CFW-08. These guidelines and suggestions must be followed for proper CFW-08 operation. 3.1 MECHANICAL INSTALLATION 3.1.1 Environment The location of the inverter installation is an important factor to assure good performance and long useful life for its components.
CHAPTER 3 - INSTALLATION AND CONNECTION - ONLY REMOVE TERMINAL COVER WARNING AFTER 1 MIN. POWER HAS BEEN DISCONNECTED. - READ THE INSTRUCTIONS MANUAL. - SOMENTE REMOVA A TAMPA 1 MIN. APÓS A DESENERGIZAÇÃO. - LEIA O MANUAL DE INSTRUÇÕES. ATENÇÃO VIEW OF THE MOUNTING BASE FRONTAL VIEW LATERAL VIEW Figure 3.1 (cont.
CHAPTER 3 - INSTALLATION AND CONNECTION Inverter Model 1.6 A / 200-240 V 2.6 A / 200-240 V 4.0 A / 200-240 V 7.0 A / 200-240 V 7.3 A / 200-240 V 10 A / 200-240 V 16 A / 200-240 V 22 A/200-240 V 28 A/200-240 V 33 A/200-240 V 1.0 A / 380-480 V 1.6 A / 380-480 V 2.6 A / 380-480 V 2.7 A / 380-480 V 4.0 A / 380-480 V 4.3 A / 380-480 V 6.
CHAPTER 3 - INSTALLATION AND CONNECTION 3.1.3 Positioning and Fixing When installing the CFW-08, free space around the inverter must be left as indicated in figure 3.2. Table 3.2 shows the required free spaces. Install the inverter in vertical position according to the following recommendations: 1) Install the inverter on a flat surface. 2) Do not install heat sensitive components immediately above the inverter.
CHAPTER 3 - INSTALLATION AND CONNECTION CFW-08 Model 1.6 A / 200-240 V 2.6 A / 200-240 V 4.0 A / 200-240 V 7.0 A / 200-240 V 1.0 A / 380-480 V 1.6 A / 380-480 V 2.6 A / 380-480 V 4.0 A / 380-480 V 7.3 A / 200-240 V 10 A / 200-240 V 16 A / 200-240 V 2.7 A / 380-480 V 4.3 A / 380-480 V 6.5 A / 380-480 V 10 A / 380-480 V 22 A / 200-240 V 13 A / 380-480 V 16 A / 380-480 V 28 A/200-240 V 33 A/200-240 V 24 A/380-480 V 30 A/380-480 V A B C D 30 mm 1.18 in 5 mm 0.20 in 50 mm 2 in 50 mm 2 in 35 mm 1.
CHAPTER 3 - INSTALLATION AND CONNECTION 3.1.3.2 Surface Mounting Figure 3.3 shows the surface installation procedures of the CFW-08. AIR FLUX Figure 3.3 - Mounting procedures for CFW-08 3.2 ELECTRICAL INSTALLATION DANGER! The information below will be a guide to achieve a proper installation. Also follow all applicable local standards for electrical installations. DANGER! Be sure the AC input power has been disconnected before making any terminal connection.
CHAPTER 3 - INSTALLATION AND CONNECTION -UD: negative pole of the DC link circuit is not available on the models 1.6 A-2.6 A-4.0 A-7.0 A/200-240 V and models 1.0 A-1.6 A-2.6 A-4.0 A/380-480 V. It is used when the inverter supplied by DC voltage (with the terminal +UD). In order to avoid an incorrect braking resistor connection (mounted outside the inverter), there is a protective rubber plug on this terminal, which must be removed if the –UD terminal has to be used. BR: Connection for the braking resistor.
CHAPTER 3 - INSTALLATION AND CONNECTION d) 28-33 A/200-240 V and 24-30 A/380-480 V models 1 R 2 S LINE 3 T 4 U 5 6 7 8 9 10 V W -UD BR +UD DCR MOTOR Figure 3.4 (cont.) d) - Power terminals 3.2.2 Location of the Power Terminals, Grounding Terminals and Control Terminal Connections a) 1.6-2.6-4.0-7.0-7.3-10-16 A/200-240 V and 1.0-1.6-2.6-2.7-4.0-4.3-6.
CHAPTER 3 - INSTALLATION AND CONNECTION 3.2.3 Power/Grounding Wiring and Circuit Breakers ATTENTION! Install the inverter and power cables distant from sensitive equipment and wirings by 0.25 m (0.82 ft), for instance PLCs, temperature controllers, thermocouple cables, etc. Use the recommended wire cross section and circuit breakers as shown in table 3.4. Use only copper wire (70 ºC [158 ºF]). Table 3.
CHAPTER 3 - INSTALLATION AND CONNECTION Grounding Wiring N.m Lbf.in 0.5 4.34 0.5 4.34 0.5 4.34 0.5 4.34 0.5 4.34 0.5 4.34 0.5 4.34 0.5 4.34 0.5 4.34 0.5 4.34 0.5 4.34 0.5 4.34 0.5 4.34 0.5 4.34 0.5 4.34 0.5 4.34 0.5 4.34 0.5 4.34 0.5 4.34 0.5 4.34 0.5 4.34 0.5 4.34 Model 1.6 A / 200-240 V 2.6 A / 200-240 V 4.0 A / 200-240 V 7.0 A / 200-240 V 7.3 A / 200-240 V 10.0 A / 200-240 V 16.0 A / 200-240 V 22.0 A / 200-240 V 28.0 A / 200-240 V 33.0 A / 200-240 V 1.0 A / 380-480 V 1.6 A / 380-480 V 2.
CHAPTER 3 - INSTALLATION AND CONNECTION b) 7.3-10-16-22 A/200-240 V and 2.7-4.3-6.5-10-13-16 A/380-480 V models - Three phase power supply PE PE Q1 R S T U V W -Ud BR +Ud Braking Resistor (refer to item 8.23) PE T PE W V U R S T Shielding Power Supply Circuit Breaker c) 1.6-2.6-4.0-7.3-10 A / 200-240 V models - Single phase power supply PE PE Q1 T Phase R S T U V W -Ud BR +Ud PE Braking Resistor (**) (refer to item 8.
CHAPTER 3 - INSTALLATION AND CONNECTION d) 28-33 A / 200-240 V and 24-30 A / 380-480 V models - Three phase power supply PE PE Phase Q1 R S T U V W -Ud BR DCR PE T R S T Power Supply +Ud Circuit Breaker Braking Resistor DC Link Inductor (Optional) PE W V U Shielding Figure 3.6 d) - Power and grounding connections 3.2.4.1 AC Input Connection DANGER! Provide an AC disconnecting switch to switch OFF the input power to the inverter.
CHAPTER 3 - INSTALLATION AND CONNECTION If the CFW-08 is installed in networks which can supply more than 30.000 Arms, you must provide suitable protection circuits such as fuses and circuit breakers. DC link inductor / line reactors The requirements for use of line reactors or DC link inductor depend on several application factors. Refer to item 8.21.
CHAPTER 3 - INSTALLATION AND CONNECTION GROUNDING BAR INTERNAL TO THE PANEL Figure 3.7 - Grounding connections for more than one inverter ATTENTION! The AC input for the inverter must have a grounded neutral conductor. EMI – Electromagnetic interference When electromagnetic interference (EMI) generated by the inverter interferes in the performance of other equipment, use shielded wires, or install the motor wires in metallic conduits.
CHAPTER 3 - INSTALLATION AND CONNECTION 3.2.5 Signal and Control Connections The signal connections (analog inputs/outputs) and control connections (digital inputs and relay outputs) are made on the XC1 connector of control board (refer to the location in figure 3.5, item 3.2.2).
CHAPTER 3 - INSTALLATION AND CONNECTION Connector XC1 CW DI1 2 DI2 3 DI3 4 DI4 5 GND 0 V Reference Not connected to PE Analog Input1 or Digital Input 5 (0to10)Vdcor(0to20)mAor(4to20)mA and (-10 to +10) Vdc(*)(figure 3.
CHAPTER 3 - INSTALLATION AND CONNECTION DI AO AI1 AI2 Figure 3.10 - Jumpers position for selecting the analog inputs and outputs operation mode (voltage - 0 to 10 Vdc or current - 0 to 20 mA / 4 to 20 mA) as well as the digital inputs operation mode (high logic level - PNP or low logic level - NPN). Refer to the digital inputs definition on items 3.2.5.1 and 3.2.5.2 As a default, the analog inputs and outputs are set to voltage mode (0 to 10) Vdc and the digital inputs are set to active (NPN logic).
CHAPTER 3 - INSTALLATION AND CONNECTION During the signal and control wire installation note the following: 1) Cable cross section: (0.5 to 1.5) mm²/(20 to 14) AWG 2) Maximum Torque: 0.50 N.m (4.50 lbf.in). 3) XC1 wiring must be connected with shielded cables and installed at least 10 cm (3.9 in) minimum separately from other wiring (power, control at 110/220 V, etc) for lengths up to 100 m (330 ft) and 25 cm (9.8 in) minimum for total lengths over 100 m (330 ft).
CHAPTER 3 - INSTALLATION AND CONNECTION 3.2.5.1 Digital Inputs as Low Level Active (S1:1 to OFF) This option can be selected when a PLC is used with relay or transistor output is used (low logic level to activate the DI). a) Example using a PLC - relay output Connector XC1 1 DI1 2 DI2 3 DI3 4 DI4 5 GND COM PLC output relay b) Example using a PLC - NPN transistor output Connector XC1 1 DI1 2 DI2 3 DI3 4 DI4 5 GND PLC output NPN GND (PLC) Figure 3.
CHAPTER 3 - INSTALLATION AND CONNECTION 3.2.5.2 Digital Input as High Level Active (S1:1 to ON) This option can be selected when a PLC is used with PNP transistor output (high logic level to activate the DI) or PLC with relay output is used. For this last alternative you must apply an external power supply 24 V +/- 10 %.
CHAPTER 3 - INSTALLATION AND CONNECTION NOTES! The inverter is factory default programmed with the digital inputs as low level active (S1:1 in OFF). When the digital inputs are used as high level active, you must set the jumper S1:1 to ON. The jumper S1:1 selects the high level or low level active for all 4 digital inputs. You can not select them separately. 3.2.
CHAPTER 3 - INSTALLATION AND CONNECTION NOTES! For the proper operation of configuration 2, terminal 5 shall be connected to terminal 1 (general enable). The frequency reference can be sent via AI1 analog input (as shown in figure 3.16), via keypad HMI-CFW08-P, or via any other source (as described in the parameters P221 and P222). When a line fault occurs by using this type of connection with switch S3 at position "RUN", the motor will be enabled automatically as soon as the line is re-established.
CHAPTER 3 - INSTALLATION AND CONNECTION NOTES! S1 and S2 are push buttons, start (NO contact) and stop (NC contact), respectively. The speed reference can be via analog input AI1 (as in Connection 2), via keypad (HMI-CFW08-P), or via any other source (as described in the parameters P221 and P222).
CHAPTER 3 - INSTALLATION AND CONNECTION 3.3 EUROPEAN EMC DIRECTIVE REQUIREMENTS FOR CONFORMING INSTALLATIONS The CFW-08 inverter series was designed considering safety and EMC (Electromagnetic Compatibility) aspects. The CFW-08 units do not have an intrinsic function until connected with other components (e. g. a motor). Therefore, the basic product is not CE marked for compliance with the EMC Directive. The end user takes personal responsibility for the EMC compliance of the whole installation.
CHAPTER 3 - INSTALLATION AND CONNECTION 4) The length of the wiring between filter and inverter must be kept as short as possible. 5) The cables shielding (motor and control) must be solidly connected to the common back plate, using a metal bracket. 6) Grounding as recommended in this manual. 7) Use short earthing cable to earth the external filter or inverter. When an external filter is used, only use an earth cable at filter input - the inverter earth connection is done by the metallic back plate.
CHAPTER 3 - INSTALLATION AND CONNECTION Notes: (1) First environment: includes domestic premises. It also includes establishments directly connected without intermediate transformers to a low-voltage power supply network which supplies buildings used for domestic purposes. (2) Second environment: includes all establishments other than those directly connected to a low-voltage power supply network which supplies buildings used for domestic purposes.
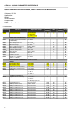
CHAPTER 3 - INSTALLATION AND CONNECTION 3.3.3 Inverter Models and Filters Id 1 2 3 4 5 6 7 8 9 10 11 12 13 14 15 16 17 18 19 20 21 22 23 Inverter Model Table 3.8 below shows the inverter models and the respective RFI filter and the EMC category. The description of each EMC categories is given in item 3.3.2. The characteristics of the footprint and external input RFI filters are given in item 3.3.4. Input RFI Filter CFW080016S2024...FAZ CFW080026S2024...FAZ CFW080040S2024...FAZ CFW080016B2024...
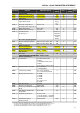
CHAPTER 3 - INSTALLATION AND CONNECTION Id Inverter Model 24 CFW080220T2024... 25 CFW080280T2024... 26 CFW080330T2024... 27 28 29 30 31 32 33 34 35 36 37 38 39 40 41 42 43 CFW080010T3848...FAZ CFW080016T3848...FAZ CFW080026T3848...FAZ CFW080040T3848...FAZ CFW080027T3848...FAZ CFW080043T3848...FAZ CFW080065T3848...FAZ CFW080100T3848...FAZ CFW080130T3848...FAZ CFW080160T3848...FAZ CFW080010T3848... CFW080016T3848... CFW080026T3848... CFW080040T3848... CFW080027T3848... CFW080043T3848...
CHAPTER 3 - INSTALLATION AND CONNECTION cabinet is required, the maximum length of the remote keypad cable is 3 m (9.84 ft). In this case, the remote keypad, the control and signal wiring must be located inside the cabinet (the remote keypad can be installed in the cabinet front door, refer to items 8.6.1 and 8.8). 2) The maximum switching frequency is 10 kHz. Exception: 5 kHz for models 27 up to 36 and models 47 to 450. For Class A1 systems also refer to note 7.
CHAPTER 3 - INSTALLATION AND CONNECTION 3.3.4 EMC Filters Characteristics Filter Manufacturer WEG P/N Rated Current FEX1-CFW08 FEX2-CFW08 WEG 417118238 417118239 10 A 5A FS6007-16-06 0208.2072 16 A FS6007-25-08 FS6007-36-08 0208.2073 0208.2074 25 A 36 A 0208.2075 7A FN3258-16-45 0208.2076 16 A FN3258-30-47 0208.2077 30 A FN3258-55-52 0208.
CHAPTER 3 - INSTALLATION AND CONNECTION a) Footprint Filter b) Footprint Filter and Inverter Lateral Right View Front View 79 Bottom View 190 175 53 Front View Lateral Right View 53 79 175 Terminal block for flexible or rigid cable of 4 mm2 or AWG 10. Max. torque: 0.8 Nm Bottom View 190 50 185 79 Note: figure dimensions are in mm. Figure 3.20 a) and b) - FEX1-CFW08 and FEX2-CFW08 footprint filter drawing 119 109 57.6 98.5 40 3.7 51 84.5 66 85.5 6.3x0.8 4.4 1.
CHAPTER 3 - INSTALLATION AND CONNECTION 119 113 57.6 98.5 3.7 40 51 84.5 66 85.5 M4 1.2 4.4 P/N 15.6 E Bolt type 08 = M4 Note: figure dimensions are in mm. Figure 3.22 - FS6007-25-08 and FS6007-36-08 external filter drawing Mechanical Data 41,8 30,3 19,3 Rated Current 11,5 Type/45 Terminal block for 6 mm2 solid cable, 4 mm2 flexible cable AWG 12.
CHAPTER 3 - INSTALLATION AND CONNECTION Toroid: Thornton NT35/22/22-4100-IP12R (WEG P/N 0208.2102) 35 22 22 Plastic clamp: HellermannTyton NXR-18 (WEG P/N 0504.0978) 19.3 33.3 to 38.1 30 1.5 5.8 Note: figure dimensions are in mm. Figure 3.24 - TOR1-CFW08 drawing Toroid: Thornton NT52/32/20-4400-IP12E (WEG P/N 0208.2103) Note: figure dimensions are in mm. Figure 3.
CHAPTER 3 - INSTALLATION AND CONNECTION NOTE! The following filters drawings belong to Epcos. It is possible to get further information about them in the Epcos website. 9 199,5 1,5 60 70 19 Terminals 4 mm2 Tightening torque of screw 0,5 - 0,6 Nm Not used for connection 46,4 38 Note: figure dimensions are in mm. 4,5 PE M5 Tightening torque 2,8 ± 0,1 Nm Marking 221 231 Figure 3.
CHAPTER 3 - INSTALLATION AND CONNECTION Litz wire 2,5 mm2 Terminals 4 mm2 Tightening torque of screw 0,7 ± 0,1 Nm 200 300 ±10 1 0,5 (31) 15 40 80 50 Marking 230 215 ±0,5 25 ±0,3 46 6,5 Earth connector M6 x 25 Tightening torque 4,8 ± 0,2 Nm Marking Note: figure dimensions are in mm. Figure 3.
CHAPTER 3 - INSTALLATION AND CONNECTION Terminals 6 mm2 Tightening torque 1,5 - 1,8 Nm 1 60 248 1 1 30 0,5 60 75 150 400 ±10 Litz wire 4 mm2 265 ±0,5 35 ±0,3 6,5 Marking Marking Line Load 56 280 PE M6x24 Tightening torque 3 ± 0,15 Nm Note: figure dimensions are in mm. Figure 3.
CHAPTER 3 - INSTALLATION AND CONNECTION Litz wire 10 mm2 Terminals 16 mm2 Tightening torque of screw 1,65 ± 0,15 Nm 60 500 ±10 0,5 1 30 (52) 75 150 300 330 315 ±0,5 35 ±0,3 56 6,5 Earth connector M6x25 Tightening torque 4,8 ± 0,2 Nm Marking Note: figure dimensions are in mm. Figure 3.32 - External filter drawing B84143-B50-R110 200 24 1,5 70 90 8 Terminals 10 mm2 Tightening torque of screw 1,2 - 1,5 Nm 4,5 Marking 255 265 Note: figure dimensions are in mm. Figure 3.
CHAPTER 3 - INSTALLATION AND CONNECTION Litz wire 1,5 mm2 Terminals 4 mm2 Tightening torque of screw 0,7 ± 0,1 Nm 200 300 ±10 1 0,5 (31) 15 40 80 50 Earth connector M6x25 Tightening torque 4,8 ± 0,2 Nm Marking 25 ±0,3 46 6,5 230 215 ±0,5 Marking Note: figure dimensions are in mm. Figure 3.
CHAPTER 3 - INSTALLATION AND CONNECTION Terminals 6 mm2 Tightening torque 1,5 - 1,8 Nm 1 60 1 248 1 0,5 60 30 75 150 400 ±10 Litz wire 6 mm2 Marking Line Load 56 Marking 35 ±0,3 280 PE M6x24 Tightening torque 3 ± 0,15 Nm 6,5 265 ±0,5 Note: figure dimensions are in mm. Figure 3.36 - External filter drawing B84143-G36-R110 NOTE! The declaration of conformity CE is available on the website www.weg.net or on the CD, which comes with the products.
CHAPTER 4 KEYPAD (HMI) OPERATION This chapter describes the standard Human Machine Interface (HMI) of the inverter (HMI-CFW08-P) and the manner to use it, presenting the following information: General keypad description. Use of the keypad. Parameter programming and reading. Description of the status indications and signalizations. 4.1 KEYPAD (HMI) DESCRIPTION The standard CFW-08 keypad has a LED display with 4 digits of 7 segments, 4 status LEDs and 8 keys. Figure 4.
CHAPTER 4 - KEYPAD (HMI) OPERATION FWD/REV Control Selection t FWD / REV Forward Forward Reverse t HMI LED Situation t OFF ON Flashing Figure 4.2 - Direction of rotation (FWD/REV) LEDs Basic functions of the keys: Starts the inverter via acceleration ramp. Stops (disables) the inverter via deceleration ramp. Also resets inverter after a fault has occurred. Toggles the LED display between parameter number and its value (number/value).
CHAPTER 4 - KEYPAD (HMI) OPERATION Operation of the inverter (keys , , ) and speed reference setting (keys 4.2.1 Keypad Operation , and and ). All functions relating to the CFW-08 operation (Start/Stop, Direction of Rotation, JOG, Increment/Decrement, Speed (Frequency) Reference, and selection of Local/Remote mode) can be performed through the HMI selection. For factory default programming of the inverter, all keypad keys are enabled when the Local mode has been selected.
CHAPTER 4 - KEYPAD (HMI) OPERATION Parameter P121 stores the speed (frequency) reference set by the keys: When pressed, it increases the speed (frequency) reference. When pressed, it decreases the speed (frequency) reference. Reference Backup: The last frequency reference set by the keys and is stored when inverter is stopped or the AC power is removed, provided P120 = 1 (reference backup active is the factory default).
CHAPTER 4 - KEYPAD (HMI) OPERATION 4.2.3 Read-Only Parameters Parameters P002 to P099 are reserved for the display of readonly values. The factory default display when power is applied to the inverter is P002 (frequency proportional value in V/F control mode (P202 = 0 or 1) and motor speed in rpm in vector control mode (P202 = 2)). Parameter P205 defines the initial monitoring parameter, i.e., defines the read-only variable that will be displayed when the inverter is powered up.
CHAPTER 4 - KEYPAD (HMI) OPERATION NOTE! (1) For parameters that can be changed with the motor running, the inverter will use the new value immediately after it has been set. For parameters that can be changed only with motor stopped, the inverter will use this new value only after the key is pressed. (2) By pressing the key after the reprogramming, the new programmed value will be stored automatically and will remain stored until a new value is programmed.
CHAPTER 4 - KEYPAD (HMI) OPERATION Programming Error – E24 JOG Local/Remote Disables Flying Start Reset On/Off Direc tion of Rotation FWD/REV Multispeed Electronic Potentiometer Rated Current DC Braking and Ride-through PID Ramp 2 Model Analog Input P265 = 3 and other(s) D I(s) Start-Stop or FWD and REV or ON and OFF P266 = 3 and other(s) D I(s) Start-Stop or FWD and REV or ON and OFF P267 = 3 and other(s) D I(s) Start-Stop or FWD and REV or ON and OFF P268 = 3 and other(s) D I(s) Start-Sto
CHAPTER 5 START-UP This chapter provides the following information: How to check and prepare the inverter before power-up. How to power-up and check for proper operation. How to operate the inverter when it is installed according to the typical connections (refer to item 3.2 - Electrical Installation). 5.1 PRE-POWER CHECKS The inverter shall be installed according to Chapter 3 Installation and Connection.
CHAPTER 5 - START-UP The four LEDs of the keypad remains ON during this procedure. Inverter runs some self-diagnosis routines. If no problems are found, the display shows: This means that the inverter is ready (rdy = ready) to be operated. - Inverter with dummy panel (TCL-CFW08 or TCRCFW08). The LEDs ON (green) and ERROR (red) are ON. Inverter runs some self-diagnosis routines. If no problems are found the LED ERROR (red) turns OFF. This means that the inverter is now ready to be operated. 5.
CHAPTER 5 - START-UP 5.3.1 Start-up Operation via Keypad (HMI) - Type of Control: Linear V/F (P202 = 0) The sequence below is valid for the connection 1 (refer to item 3.2.6). Inverter must be already installed and powered up according to chapter 3 and item 5.2. Connections according to figure 3.6.
CHAPTER 5 - START-UP 5.3.2 Start-up Operation via Terminals Control Mode: Linear V/F (P202 = 0) ACTION Refer to figure 3.16 Switch S1 (FWD / REV) = open Switch S2 (Reset) = open Switch S3 (Start/Stop) = open Potentiometer R1 (Ref.) = totally CCW Power-up inverter Press the key. This procedure is not necessary when inverters were delivered dummy panel, since it will be automatically in remote mode Close S3 – Start/Stop Connections are according to figures 3.6 and 3.16.
CHAPTER 5 - START-UP Increase/decrease the content of P136 gradually until you obtain an operation with constant current over the entire frequency range. For the case above, refer to parameter description in chapter 6. (3) If E01 fault occurs during deceleration, increase the deceleration time at P101 / P103. 5.3.
CHAPTER 5 - START-UP ACTION Use the and to select the control type HMI DISPLAY keys Press to save the selected option and to start the tuning routine after changing to Vector Control mode Press the DESCRIPTION P202 = 2: Vector Motor efficiency: 50 to 99.
CHAPTER 5 - START-UP ACTION HMI DISPLAY Press DESCRIPTION and use the keys and to set the correct value for the motor frequency Set rated motor frequency: 60 Hz (the default value is maintained) (2) Press the key to save the selected option and exit the programming mode Exit the programming mode Press the next parameter Rated motor power range: 0 to 15 (each value represents a power value) key to go to the Press the key and use the keys and to set the correct motor power Selected rated motor pow
CHAPTER 5 - START-UP ACTION Press the Press the HMI DISPLAY DESCRIPTION Motor accelerates up to 90 rpm (for IV pole motor - minimum speed) in CW direction of rotation (3) key key and hold it depressed until the speed of 1980 rpm is reached Motor accelerates up to 1980 rpm (for IV pole motor - maximum speed) Press the key Motor decelerates (4) to 0 rpm and then reverses the direction of rotation CW CCW, accelerating back to 1980 rpm Press the key Motor decelerates down to 0 rpm Press the key
CHAPTER 5 - START-UP Switch on the inverter. Set P000 = 5 and P408 = 1. Follow from now on the start-up procedures described in item 5.3.3. (2) For each inverter type, the parameters P399 to P407 are set automatically to the rated motor data, considering a standard WEG motor, IV poles, 60 Hz. When different motors are used, you must set the parameters manually, according to the motor nameplate data. (3) If the direction of rotation of the motor is not correct, switch off the inverter.
CHAPTER 6 DETAILED PARAMETER DESCRIPTION This chapter describes in detail all CFW-08 parameters and functions. 6.1 SYMBOLS Some symbols used in this chapter are presented below: AIx = Analog input number x. AO = Analog output. DIx = Digital input number x. F* = Frequency reference. This is the frequency value that indicates the desired motor speed at the inverter output. Fe = Input frequency of the acceleration and deceleration ramp. Fmax = Maximum output frequency, defined at P134.
CHAPTER 6 - DETAILED PARAMETER DESCRIPTION In V/F control, the speed regulation, that can be obtained by setting properly slip compensation can be maintained within 1 % to 2 % of the rated speed. For instance, for a IV pole motor/60 Hz, the minimum speed variation at no load condition and at rated load can be maintained between 18 and 36 rpm. There is still a variation of the linear V/F control: the quadratic V/F control.
CHAPTER 6 - DETAILED PARAMETER DESCRIPTION 6.2.4 Frequency Reference Sources The frequency reference (i.e.
CHAPTER 6 - DETAILED PARAMETER DESCRIPTION HMI-CFW08-RP or HMI-CFW08-RS HMI-CFW08-P Frequency Reference Selection P221 or P222 KEYPAD REFERENCE (P121) RS-232 0 - Keypad 5 - Serial or CANopen or DeviceNet PC and CLP KRS-485 RS-485 KFB-CO or KFB-DN CANopen or DeviceNet P264 = 7 P265 = 7 P266 = 7 P124 to P131 KCS-CFW08 1 2 3 4 5 6 7 8 9 10 11 12 DI2 P131 P130 P129 P128 P127 P126 P125 P124 DI3 DI4 6 - Multispeed 000 001 010 011 100 101 110 111 0V AI1 MULTISPEED Reset AI2 Inverter Disabled
CHAPTER 6 - DETAILED PARAMETER DESCRIPTION P151 DC Link Regulation Ud Power Supply P151 P100 Ud P101 P133 P134 Fe P136, P137,P138, P202 P295 P142, P145 Acceleration and Deceleration Ramp P102 Inverter Control (V/F or Vector) P103 Frequency Reference Limits Acceleration and Deceleration Ramp 2 Command via Digital Input (DI) Motor P178 Parameters (P399 to P409) I PWM Vs Vs Is IM 3Ø P169 Is P169 Output Current Limiting Is Figure 6.
CHAPTER 6 - DETAILED PARAMETER DESCRIPTION 6.2.5 Commands The inverter has the following commands: PWM pulse enabling/ disabling, definition of the direction of rotation and JOG. As the frequency reference, the inverter commands can de defined in several ways. The command sources are the following: Via keypad - keys , , and Via control terminals (XC1) - digital inputs. Via serial interface. . The inverter enabling and disabling commands can be defined as follows: Via keypad and of the HMI. Via serial.
CHAPTER 6 - DETAILED PARAMETER DESCRIPTION Local/Remote Selection (P220) + Local/Remote Command LOCAL 0 Keypad (HMI-CFW08-P, HMI -CFW08- RP and HMI-CFW08-RS) Frequency 1 AI1 Reference 2 or 3 AI2 P221 4 EP 5 Serial 6 Multispeed 7 Add AI 8 Add AI > 0 0 Keypad (HMIControls P229 CFW08-P and HMICFW08-RP) (stop/run, FWD/REV 1 Terminals XC1 (DIs) 2 Serial or HMIand JOG) CFW08-RS keypad ( , DI, Serial, etc) F* REFERENCE COMMANDS REMOTE Frequency Reference P222 0 Keypad (HMI-CFW08-P, HMI - CFW08- RP and HMI-
CHAPTER 6 - DETAILED PARAMETER DESCRIPTION Following notes may appear in some parameters during the detailed description: (1) This parameter is only displayed in vector mode (P202 = 2). (2) This parameter is only displayed in scalar mode P202 = 0 or 1. (3) This parameter can be changed only when the inverter is disabled (stopped motor). (4) This parameter is only available with HMI-CFW08-RS. (5) The analog input value is represented by zero when it is not connected to an external signal.
CHAPTER 6 - DETAILED PARAMETER DESCRIPTION Parameter P008 Heatsink Temperature Range [Factory Setting] Unit Description / Notes 25 to 110 [-] 1 oC Indicates the current power at the heatsink in Celsius degrees (°C). The inverter overtemperature protection (E04) acts when heatsink temperature reaches: Inverter P008 in ºC (ºF) @ E04 1.6-2.6-4.0-7.0 A/200-240 V 103 (217.4) 1.0-1.6-2.6-4.0 A/380-480 V 90 (194) 7.3-10-16 A/200-240 V 90 (194) 2.7-4.3-6.5-10 A/380-480 V 103 (217.4) 13-16 A/380-480 V 108 (226.
CHAPTER 6 - DETAILED PARAMETER DESCRIPTION 6.3.2 Regulation Parameters - P100 to P199 Parameter Range [Factory Setting] Unit Description / Notes P100 Acceleration Time 0.1 to 999 [ 5.0 s ] 0.1s ( 99.9 s); 1s ( 100 s) P101 Deceleration Time 0.1 to 999 [ 10.0 s ] 0.1s ( 99.9 s); 1s ( 100 s) P102 Ramp 2 Acceleration Time 0.1 to 999 [ 5.0 s ] 0.1s ( 99.9 s); 1s ( 100 s) P103 Ramp 2 Deceleration Time 0.1 to 999 [ 10.0 s ] 0.1s ( 99.
CHAPTER 6 - DETAILED PARAMETER DESCRIPTION Parameter P120 Digital Reference Backup Range [Factory Setting] Unit Description / Notes 0 to 2 [1] - It defines if the inverter should save or not the last used digital reference. This backup function is only applicable to the keypad reference (P121). P120 0 1 2 Reference Backup Inactive Active Active, but always given by P121, independently of the sorce reference Table 6.
CHAPTER 6 - DETAILED PARAMETER DESCRIPTION Parameter P122 JOG Speed Reference Range [Factory Setting] Unit Description / Notes 0.00 to P134 Defines the frequency reference (speed) for the JOG [ 5.00 Hz ] function. The JOG function can be activated in several 0.01 Hz ways: ( 99.99 Hz); The key of the P229 = 0 (local mode) or 0.1 Hz HMI-CFW08-P P230 = 0 (remote mode) ( 100.
CHAPTER 6 - DETAILED PARAMETER DESCRIPTION Parameter P127 Multispeed Reference 4 Range [Factory Setting] Unit Description / Notes P133 to P134 The frequency reference is defined by the status of the [ 30.00 Hz ] digital inputs programmed to multispeed as shown in 0.01 Hz table below: ( 99.99 Hz); 8 speeds 0.1 Hz 4 speeds ( 100.0 Hz) 2 speeds P128 Multispeed Reference 5 P133 to P134 [ 40.00 Hz ] 0.01 Hz ( 99.99 Hz); 0.1 Hz ( 100.0 Hz) P129 Multispeed Reference 6 P133 to P134 [ 50.00 Hz ] 0.
CHAPTER 6 - DETAILED PARAMETER DESCRIPTION Range [Factory Setting] Parameter Unit Description/Notes P134 P133 to 300.0 P134 and the gain and offset of the analog input(s) (P234, Maximum [ 66.00 Hz ] P236, P238 and P240) defines the scale and the range Frequency (Fmax) 0.01 Hz of the speed variation via analog input(s). For more ( 99.99 Hz); details refer to the parameter P234 to P240. 0.1 Hz ( 100.0 Hz) P136 (2) Manual Torque Boost (IxR Compensation) 0.0 to 30.
CHAPTER 6 - DETAILED PARAMETER DESCRIPTION Range [Factory Setting] Parameter Unit Description / Notes P137 (2) 0.00 to 1.00 The automatic torque boost compensates for the voltage Automatic Torque [ 0.00 ] drop in the stator resistance in function of the active motor Boost current. (Automatic IxR The criteria for setting P137 are the same of the Compensation) parameter P136.
CHAPTER 6 - DETAILED PARAMETER DESCRIPTION Parameter Range [Factory Setting] Unit Description / Notes Output Voltage (function of the motor load) Output Frequency Figure 6.10 - V/F curve with slip compensation To set the parameter P138 use the following procedure: - Run the motor without load up to approximately half of the application top speed. - Measure the actual motor or equipment speed. - Apply rated load to equipment. - Increase parameter P138 until the speed reaches its no-load speed.
CHAPTER 6 - DETAILED PARAMETER DESCRIPTION Parameter Range [Factory Setting] Unit Description / Notes Output Voltage P142 0 0.1 Hz Output P145 Frequency Figure 6.11 - Adjustable V/F curve P151 DC Link Voltage Regulation Level 325 to 410 (line 200-240 V) [ 380 V ] 1V 564 to 820 (line 380-480 V) [ 780 V ] 1V The DC link voltage regulation (ramp holding) avoids overvoltage trips (E01) during deceleration of high inertia loads and/or short deceleration times.
CHAPTER 6 - DETAILED PARAMETER DESCRIPTION Parameter Range [Factory Setting] Unit Description / Notes If even with these settings the motor does not decelerate within the required time, you will have the following alternatives - Use the dynamic braking (for more details, refer to the item 8.23). - If inverter is being operated in V/F control, increase P136. - If inverter is being operated in vector control, increase P178. NOTE! When dynamic braking is used, set P151 to the maximum value.
CHAPTER 6 - DETAILED PARAMETER DESCRIPTION Parameter P169 Maximum Output Current Range [Factory Setting] Unit 0.2xInom to 2.0xInom [ 1.5 x P295 ] 0.01 A ( 9.99 A); 0.1 A ( 10.0 A) Description / Notes Prevents motor stalling during an overload. If motor load increases its current will increase too. If the motor current attempts to exceed the value set at P169, the motor speed will be decreased by following the deceleration ramp until the current becomes lower than P169.
CHAPTER 6 - DETAILED PARAMETER DESCRIPTION 6.3.3 Configuration Parameters - P200 to P398 Parameter P202 (3) Control Mode Range [Factory Setting] Unit Description / Notes Defines the inverter control mode. Item 5.3 gives some 0 to 2 guidelines relating to the selection of control mode. [0] P202 0 1 2 Control Mode Linear V/F Control (scalar) Quadratic V/F Control (scalar) Sensorless Vector Control Table 6.
CHAPTER 6 - DETAILED PARAMETER DESCRIPTION Parameter Range [Factory Setting] Unit Description / Notes b) Quadratic V/F Output Voltage P136 = 0 P142 0 P145 Output Frequency Figure 6.15 b) -V/F control modes (scalar) Vector control modes: The vector control allows a better performance regarding to torque and speed control. The CFW-08 vector control operates without motor speed sensor (sensorless).
CHAPTER 6 - DETAILED PARAMETER DESCRIPTION Parameter Range [Factory Setting] Unit Description / Notes P204 (3) Load Factory Setting 0 to 5 [0] - Programs all parameters to the standard factory default, when P204 = 5. The parameters P142 (maximum output voltage), P145 (field weakening frequency), P295 (rated current), P308 (inverter address) and P399 to P407 (motor parameters) are not changed when the factory default parameters are loaded through P204 = 5.
CHAPTER 6 - DETAILED PARAMETER DESCRIPTION Parameter Range [Factory Setting] Unit Description / Notes Motor Pole Number II poles IV poles VI poles P208 to P002 Indicate the Speed in rpm 60 30 20 Table 6.10 - Configuration of P208 so P002 indicates the motor speed in rpm Always when programmed to vector mode (P202 = 2), the parameter P208 is set according to the value of P402 (motor speed) to indicate the speed in rpm, in P002. P212 Frequency to Enable the Sleep Mode 0.00 to P134 [ 0.00 ] 0.
CHAPTER 6 - DETAILED PARAMETER DESCRIPTION Parameter P215 (3) (4) Keypad Copy Function Range [Factory Setting] Unit Description / Notes 0 to 2 [0] - The keypad copy function is used to transfer the content of the parameters from one inverter to another. P215 0 1 2 Action No Function Notes Transfers the current parameter values of the inverter to non volatile memory Copy (EEPROM) of the HMI-CFW08-RS (inverter keypad) keypad.
CHAPTER 6 - DETAILED PARAMETER DESCRIPTION Parameter Range [Factory Setting] Unit Description / Notes Please consider still the following: - If the inverters A and B are driving different motors, check the motor parameters (P399 to P409) related to inverter B. - To copy the parameter content of the inverter A to other inverter(s), repeat steps 4 and 5 above.
CHAPTER 6 - DETAILED PARAMETER DESCRIPTION Parameter Range [Factory Setting] Unit Description / Notes models the switching frequency reduction at low speed for maintaining the performance is not required. This is possible because the output current acquisition circuit is different in these models. It is recommended to set P219 according to the switching frequency as shown below: P297 (Fsw) Recommended P219 4 (5 kHz) 6.00 Hz 6 (10 kHz) 12.00 Hz 7 (15 kHz) 18.00 Hz Table 6.
CHAPTER 6 - DETAILED PARAMETER DESCRIPTION Parameter Range [Factory Setting] Unit Description / Notes P221 (3) Frequency Local Reference Selection 0 to 8 [0] - P222 (3) Frequency Remote Reference Selection 0 to 8 [1] - Defines the frequency reference selection in the Local and Remote mode.
CHAPTER 6 - DETAILED PARAMETER DESCRIPTION Range [Factory Setting] Parameter Unit Description / Notes Defines the direction of rotation. P231 (3) 0 to 3 Forward/Reverse [2] P231 Direction of Rotation Selection - Local 0 Always forward and Remote 1 Always reverse 2 3 Commands as defined in P229 and P230 DIx Table 6.
CHAPTER 6 - DETAILED PARAMETER DESCRIPTION Parameter Range [Factory Setting] Unit Description / Notes Reference P134 P133 0 0 ................ 10 V 0 ................ 20 mA 4 mA ........... 20 mA Alx Signal Figure 6.18 - Analog input response with Active (P233 = 1) Dead Zone P234 Analog Input AI1 Gain 0.00 to 9.99 [ 1.00 ] 0.01 The analog inputs AI1 and AI2 define the inverter frequency reference as shown in the curves presented in the parameter P233 (figure 6.17 and figure 6.18).
CHAPTER 6 - DETAILED PARAMETER DESCRIPTION Parameter Range [Factory Setting] Unit Description / Notes As an example, refer to the following situation:AI1 is set to voltage input (0 to 10 V) – P235 = 0,AI1 = 5 V, P234 = 1.00 and P236 = -70 %. Thus: AI1' = 1 . 5 (-70) + = -0.2 = -20 % 10 100 The motor will run in reverse direction of rotation as defined by the commands (negative value) - if this is possible (P231 = 2), with a module reference equal to 0.2 or 20 % of the maximum output frequency (P134). I.
CHAPTER 6 - DETAILED PARAMETER DESCRIPTION Parameter Range [Factory Setting] Unit Description / Notes To use the bipolar option (-10 to +10) V with the version “A2” of the control board (refer to item 2.4) the following settings are needed: - P234 = 2 and P236 = -50 - using AI1 - P238 = 2 and P240 = -50 - using AI2 In the option 5 in P235 or P239, the AIx can detect an overtemperature fault (E32), through the motor PTC detector. For this, the AIx must be configured to current input, i. e.
CHAPTER 6 - DETAILED PARAMETER DESCRIPTION Range [Factory Setting] Parameter Unit Description / Notes P251 defines the variable to be indicated at the analog P251 (6) 0 to 9 ouput according to the following table: Analog Output AO [0] Function (6) P252 Analog Output AO Gain 0.00 to 9.99 [ 1.00 ] 0.
CHAPTER 6 - DETAILED PARAMETER DESCRIPTION Parameter P263 (3) Digital Input DI1 Function P264 (3) Digital Input DI2 Function P265 (3) (7) Digital Input DI3 Function P266 (3) Digital Input DI4 Function P267 (3) (5) Function of the Digital Input DI5 P268 (3) (5) (6) Function of the Digital Input DI6 Range [Factory Setting] Unit Description / Notes 0 to 14 Check possible options in the table below and details [0] about the operation of the functions in the figure 6.21.
CHAPTER 6 - DETAILED PARAMETER DESCRIPTION Parameter Range [Factory Setting] Unit Description / Notes DI Parameter Function General Enable Start/Stop No Function and General Enable No Function or Start/Stop FWD REV FWD with Ramp 2 REV with Ramp 2 ON OFF Multispeed Multispeed with Ramp 2 Increase E.P. Decrease E.P.
CHAPTER 6 - DETAILED PARAMETER DESCRIPTION The charts below give provide actuation and operating description of the digital input functions.
CHAPTER 6 - DETAILED PARAMETER DESCRIPTION e) ELECTRONIC POTENTIOMETER (EP) Minimum Frequency (P133) Output Frequency (Motor Speed) Time 0V 0V DI3 - Increase Open Time Reset 0V DI4 - Decrease Open Time DI - Start/Stop Open Time g) RAMP 2 f) FWD/REV 0V Open DI - Start/Stop Output Frequency (Motor Speed) Time CW Time CCW 0V Open DI - Ramp 2 Time 0V DI - FWD/ REV P103 P102 Output P100 Frequency (Motor Speed) Open Time P101 Time h) JOG Output Frequency (Motor Speed) Acceleration Ramp JOG Fr
CHAPTER 6 - DETAILED PARAMETER DESCRIPTION i) NO EXTERNAL FAULT Motor Runs Freely Output Frequency (Motor Speed) Time 0V DI - No External Fault Open Time j) FLYING START DISABLE Enabled Inverter Status Disabled Time 0V DI - Flying Start Disable Open Time Output Frequency (Motor Speed) Time k) RESET Fault (Exy) Inverter Status No Error (*) 0V DI - Reset Time Open 0V Time Reset (*) The condition that generated the fault persists. Time Figure 6.21 (cont.
CHAPTER 6 - DETAILED PARAMETER DESCRIPTION Parameter Range [Factory Setting] Unit Description / Notes P277 (3) Relay Output RL1 Function 0 to 7 [7] - P279 (3) (6) Relay Output RL2 Function 0 to 7 [0] - Check possible options on table below. P279 Output/Parameter P277 Function (RL1) (RL2) Fs > Fx 0 0 Fe > Fx 1 1 Fs = Fe 2 2 Is > Ix 3 3 Not used 4 and 6 4 and 6 Run (inverter enabled) 5 5 No fault 7 7 Table 6.
CHAPTER 6 - DETAILED PARAMETER DESCRIPTION The charts below give provide actuation and operating description of the relay output: a) Fs > Fx b) Fe > Fx Fx (P288) Fs Fx (P288) Fe Time Time ON ON Relay OFF Relay OFF d) Is > Ix c) Fs = Fe Fe Is Fs Ix (P290) Time Time Is ON ON OFF Relay Relay OFF f) No Fault e) Run Motor Running without E0X Stopped Motor or Running by Inertia Ready/Run State ON Time ON Fault State (Exy) Time Relay Relay OFF OFF Figure 6.
CHAPTER 6 - DETAILED PARAMETER DESCRIPTION Parameter P288 Fx Frequency Range [Factory Setting] Unit Description / Notes 0.00 to P134 [ 3.00 Hz ] 0.01 Hz ( 99.99 Hz); 0.1 Hz ( 100.0 Hz) P290 Ix Current 0 to 1.5xInom [ 1.0xInom ] 0.01 A ( 9.99 A); 0.1 A ( 10.0 A) P295 (3) Rated Inverter Current (Inom) 300 to 316 [ According to the rated inverter current (Inom) ] - Used in the relay output functions Fs > Fx, Fe > Fx and Is > Ix (refer to the parameters P277 and P279).
CHAPTER 6 - DETAILED PARAMETER DESCRIPTION Parameter Range [Factory Setting] Unit Description / Notes drive components temperature and thus reducing their useful life. The predominant frequency on the motor is twice the switching frequency set at P297. Thus, P297 = 4 (5 kHz) results in an audible motor noise corresponding to 10 kHz. This is due to the used PWM technique .
CHAPTER 6 - DETAILED PARAMETER DESCRIPTION Parameter P300 DC Braking Time P301 DC Braking Start Frequency P302 DC Braking Current Range [Factory Setting] Unit Description / Notes 0.0 to 15.0 [ 0.0 ] 0.1 s 0.00 to 15.00 [ 1.00 Hz ] 0.01 Hz The DC braking feature provides a motor fast stop via DC current injection. The applied DC braking current, that is proportional to the braking torque, is set at P302, and is adjusted as a percentage (%) relating to the rated inverter current.
CHAPTER 6 - DETAILED PARAMETER DESCRIPTION P303 Skip Frequency 1 P133 to P134 [ 20.00 Hz ] 0.01 Hz ( 99.99 Hz); 0.1 Hz ( 100.0 Hz) P304 Skip Frequency 2 P133 to P134 [ 30.00 Hz ] 0.01 Hz ( 99.99 Hz); 0.1 Hz ( 100.0 Hz) This feature (skip frequencies) prevents the motor from operating permanently at speeds where the mechanical system enters into resonance, causing high vibration or noise levels. The enabling of this function is performed by setting P306 0.00. Output Frequency P304 0.00 to 25.
CHAPTER 6 - DETAILED PARAMETER DESCRIPTION Parameter P310 (3) Flying Start and Ride-Through P311 Voltage Ramp Range [Factory Setting] Unit Description / Notes The parameter P310 selects the active function(s): 0 to 3 [0] P310 Flying Start Ride-Through 0.1 to 10.0 [ 5.0 s ] 0.1 s 0 1 2 3 Inactive Active Active Inactive Inactive Inactive Active Active Table 6.
CHAPTER 6 - DETAILED PARAMETER DESCRIPTION Parameter Range [Factory Setting] Unit Description / Notes DC Link Voltage Undervoltage Level (E02) tdisabled>tdead Enabled time Disabled t < 2s PWM pulses P311 Output Voltage 0V Output Frequency (Motor Speed) 0 Hz Figure 6.26 - Ride-Through actuation P312 (3) Serial Interface Protocol 0 to 9 [0 - WEG ] 1 It sets the type of the protocol for the serial communication. The serial interface can be configured for two distinct protocols: WEG and Modbus-RTU.
CHAPTER 6 - DETAILED PARAMETER DESCRIPTION Parameter P314 Serial Interface Watchdog Timeout Range [Factory Setting] Unit Description / Notes If the communication is re-established, E28 switches off and the inverter does not change its status. 0.0 to 99.9 [ 0.0 ] 0.1 s Actuation interval of the Serial Watchdog. If the value of P314 is equal to 0, the Serial Watchdog function is disabled.
CHAPTER 6 - DETAILED PARAMETER DESCRIPTION Parameter P402 (1) Rated Motor Speed Range [Factory Setting] Unit Description / Notes Set this parameter according to the motor nameplate 0 to 9999 data. [ according to This parameter is used only in Vector Control mode. the inverter model ] 1 rpm P403 (1) (3) Rated Motor Frequency 0.00 to P134 [ 50.00 Hz or 60.00 Hz depending on the market ] 0.01 Hz ( 99.99 Hz); 0.1 Hz ( 100.0 Hz) Set this parameter according to the motor nameplate data.
CHAPTER 6 - DETAILED PARAMETER DESCRIPTION Parameter P407 (3) Rated Motor Power Factor Range [Factory Setting] Unit Description / Notes 0.50 to 0.99 [ According to the inverter model ] 0.01 Set this parameter according to motor nameplate. If this value is not available: - If the rated motor efficiency is known (nom = P399), obtain the power factor through the following equation: P407 = cos = 433 x P V x I x nom Where: - P is the motor power in (HP) (to convert HP to W multiply by 750, i. e.
CHAPTER 6 - DETAILED PARAMETER DESCRIPTION 6.3.5 Special Function Parameters - P500 to P599 6.3.5.1 Introduction CFW-08 is fitted with the PID regulator that can be used for closed loop process control. This function acts as a proportional, integral and derivative regulator, superimposed on the normal inverter speed control.
CHAPTER 6 - DETAILED PARAMETER DESCRIPTION The parameter P040 indicates the value of the process variable (feedback) in the scale selected at P528, that is set according to the following equation: P528 = full scale value of the used sensor P234 Example: consider the data of the last example (pressure sensor of 0-25bar and P234 = 2.00) . P528 must be set to 25/2 = 12.5. The parameter P040 can be selected as the display default parameter P205 = 6.
AI1 Signal P235 AI2 Signal P238 P236 (AI1 Offset) AI1 Gian P234 AI2 Gain P240 (AI2 Offset) Feedback (measurement of the process variable) AI1 AI2 P239 P525 Setpoint Process Variable Scale Factor P528 Process Variable Filter P526 2, 3 - AI2 0-Key P221 (Local) or P222 (Remote) PID Setpoint (Key) Setpoint Definition (reference of the process variable) Differential Regulator P522 PID Ramp 0.
CHAPTER 6 - DETAILED PARAMETER DESCRIPTION NOTE! When the PID function (P203 = 1) is set: The digital input DI3 is automatically set to manual/ automatic (P265 = 15). Thus when DI3 is open, the manual mode is activated and when DI3 is closed, the PID regulator starts to operate (closed loop control - automatic mode). If the function of this digital input (DI3) is changed, the operation of the inverter will be always in manual mode.
CHAPTER 6 - DETAILED PARAMETER DESCRIPTION 2) Feedback (process variable measurement): the feeback is always realized via analog input AI1. Transducer (sensor) to be used for the feedback of the control variable: it is recommended to use a sensor with full scale with at least 1.1 times higher than the largest value of the process variable that shall be controlled. Example: if a pressure control at 20 bar is desired, select a sensor with a control capacity of at least 22 bar.
CHAPTER 6 - DETAILED PARAMETER DESCRIPTION 3) Reference (setpoint): local/remote mode. Reference source: set P221 or P222 according to definiton above. 4) Speed Limits: set P133 and P134 according to the application. 5) Indication - Display (P040): P040 can be the display default parameter by setting P205 = 6. Analog Output (AO): it is possible to indicate the process variable (feedback) or the setpoint of the PID regulator at the analog output by setting P251 to 6 or 9, respectively.
CHAPTER 6 - DETAILED PARAMETER DESCRIPTION Setpoint via AI2 (available with CFW-08 Plus only) P222 = 2 P238 = 1.00 P239 = 0 P240 = 0.00 5k 0-100 % (0-25 bar) 4-20 mA Pressure Transducer 0-25 bar CFW-08 1 2 OFF ON AI1 - Feedback DI3 - Manual/Auto DI4 - Start/Stop Setpoint can be changed by the keys 1 2 3 4 5 6 7 8 9 10 11 12 DI1 - Gen. Enable P525 Content 3 3 4 4 5 Process S1 6 X1 Line Remote mode operation (P220 = 1). Setpoint via keypad.
CHAPTER 6 - DETAILED PARAMETER DESCRIPTION Range [Factory Setting] Parameter Unit Description / Notes The integral gain can be defined as being the time P520 0.000 to 7.999 required to change the PI regulator output from 0 to P134, PID Proportional [ 1.000 ] that is given, in seconds, by the equation below: Gain 0.001 P521 PID Integral Gain 0.000 to 9.999 [ 1.000 ] 0.001 P522 PID Differential Gain 0.000 to 9.999 [ 0.000 ] 0.001 P525 Setpoint (via Keypad) of the PID Regulator 0.00 to 100.0 [ 0.00 ] 0.
CHAPTER 6 - DETAILED PARAMETER DESCRIPTION Range [Factory Setting] Parameter Unit Description / Notes P528 0.00 to 99.9 Defines the process variable scale. It makes the Process Variable [ 1.00 ] conversion between percentage value (used internally by Scale Factor 0.01 (< 10.0); the inverter) and the process variable unit. 0.1 (> 9.99) P528 defines how the process variable at P040 will be shown: P040 = value % x P528. Set P528 to: P528 = P535 Wake up Band 0.00 to 100.00 1.00 % 0.
CHAPTER 6 - DETAILED PARAMETER DESCRIPTION Parameter Range [Factory Setting] Unit Description / Notes If the action of the PID regulator is reverse (P527 = 1), the condition for the CFW-08 to leave the “Sleep Mode” is defined by P212, and by the PID regulator error must be lower than the P535 value, therefore: Srdy FE P212 erroPID -P535 t P213 run Being: FE - Frequency at the ramp input (frequency reference); ErroPID - The PID setpoint (P525 or AI2) subtracted from the process variable (
CHAPTER 7 DIAGNOSTICSAND TROUBLESHOOTING This chapter assists the user to identify and correct possible faults that can occur during the CFW-08 operation. Instructions about required periodical inspections and cleaning procedures are also provided. 7.1 FAULTS AND POSSIBLE CAUSES When a fault is detected, excepting the faults related to the serial communication,the inverter is disabled and the fault code is displayed on the readout in EXX form, where XX is the actual fault code.
CHAPTER 7 - DIAGNOSTICS AND TROUBLESHOOTING FAULT E02 DC link undervoltage RESET (1) Power-on Manual (key Auto-reset DI POSSIBLE CAUSES ) Power supply voltage too low, causing a DC link voltage lower than the minimum allowed value (read the value in parameter P004) Ud < 200 V - 200 - 240 V models Ud < 360 V - 380 - 480 V models Ambient temperature too high (> 40 oC [104 ºF]) and/or output current too high Blower locked or defective E04 Overtemperature at the power heatsink or in the inverter internal a
CHAPTER 7 - DIAGNOSTICS AND TROUBLESHOOTING FAULT E27 Serial communication error RESET (1) Refer to the item 8.24.5.4 POSSIBLE CAUSES Serial communication error E28 Serial interface Watchdog timeout error Refer to the item 8.24.5.
CHAPTER 7 - DIAGNOSTICS AND TROUBLESHOOTING references” at P120 has been enabled), the occurred fault number, the status of the integrator of the IxT function (overcurrent). E24: indicates the fault code on the LED display. E31: inverter proceeds to operate normally, but it does not accept the keypad commands; the fault code is indicated on the LED display.
CHAPTER 7 - DIAGNOSTICS AND TROUBLESHOOTING POINT TO BE CHECKED PROBLEM Motor speed too high or too low Display OFF CORRECTIVE ACTION Programming error (reference limits) 1.Check if the contents of P133 (minimum frequency) and P134 (maximum frequency) are according to the motor and to the application. Signal of the Reference Control (if used) 1.Check the level of the control signal of the reference. 2.Check the programming (gains and offset) at P234 to P240. Motor nameplate data 1.
CHAPTER 7 - DIAGNOSTICS AND TROUBLESHOOTING COMPONENTS PROBLEMS CORRECTIVE ACTIONS Terminal blocks Loose screws Loose connectors Tighten them Blowers / Cooling system Blowers are dirty Abnormal acoustic noise Blower is not running Abnormal vibration Dust in the air filters Dust, oil or moisture accumulation Smell Clean them Replace the blowers Printed circuit boards Clean or replace them Clean them and/or replace them Replace them Table 7.
CHAPTER 8 CFW-08 OPTIONS AND ACCESSORIES This chapter describes the optional devices that can be used internal or external with the CFW-08. Table below shows a list of existing optional devices and the types to which they are applied. In the other items also are given information about the optional devices and their application.
CHAPTER 8 - CFW-08 OPTIONS AND ACCESSORIES Name KDC-24V-CFW08 KAC-120-CFW08 N1M2 KMD-CFW08-M1 KFIX-CFW08-M1 KFIX-CFW08-M2 KN1-CFW08-M1 KN1-CFW08-M2 FIL1 FIL2 FIL4 FEX1-CFW08 FEX2-CFW08 FS6007-16-06 FN3258-7-45 FS6007-25-08 FS6007-36-08 FN3258-16-45 FN3258-30-47 FN3258-55-52 TOR1-CFW08 TOR2-CFW08 148 Models to which are applied 24 Vdc power supply with the CFW-08 HMI All Interface for 120 Vac digital inputs + Kit Nema 1 7.3-10-16 A/ 200-240 V and 2.7-4.3-6.5-10 A/ 380-480 V Rail Kit DIN EN 50.022 1.
CHAPTER 8 - CFW-08 OPTIONS AND ACCESSORIES 8.1 HMI-CFW08-P Parallel keypad (HMI): is the keypad that is mounted at the front side of the inverter. 21 [0.83] 57 [2.24] 43 [1.69] 13 [0.51] Figure 8.1 - Dimensions in mm [in] of the parallel HMI - HMI-CFW08-P 8.1.1 Instruction for Insertion and Removing of the HMI-CFW08-P a) Insertion b) Removing 1. Place the keypad as shown above. 2. Press it. 1. Unlock the keypad by using a screwdriver as shown above. 2.
CHAPTER 8 - CFW-08 OPTIONS AND ACCESSORIES 8.3 HMI-CFW08-RP External parallel keypad: this keypad is mounted externally to the inverters with Nema 12/IP54 degree of protection and can be used in the following cases: Applications that require a remote keypad (up to 10 m / 32.8 ft). For the HMI installation at a panel door (0.12 in) or command console. For a better visualization on the display and to facilitate the keypad operation, when compared with the parallel keypad (HMI-CFW08-P).
CHAPTER 8 - CFW-08 OPTIONS AND ACCESSORIES 8.4 MIP-CFW08-RP Interface for the external parallel keypad HMI-CFW08-RP, installed in the inverter instead of the standard keypad only when the remote parallel keypad (HMI-CFW08-RP) is used. The procedures for insertion and removing of the MIP-CFW08-RP are similar to those shown in figure 8.16 for the KCS-CFW08 module. Front View 21 [0.83] 43 [1.69] 57 [2.24] Lateral View 37 [1.46] Figure 8.6 - Dimensions in mm [in] of the MIP-CFW08-RP 8.
CHAPTER 8 - CFW-08 OPTIONS AND ACCESSORIES NOTE! Due to the internal processing time of CFW-08 it is not possible to use the external serial keypad, with the switching frequency set to 15 kHz (P297 = 7). This optional is not compatible with the version “A3” and “A4” of the control board. Refer to item 2.4 for further information on these control boards. 8.6.1 HMI-CFW08-RS Installation The remote serial keypad (HMI-CFW08-RS) can be installed in the cabinet door (door thickness between 1 and 3 mm [0.
CHAPTER 8 - CFW-08 OPTIONS AND ACCESSORIES 8.6.3 Keypad Copy Function The HMI-CFW08-RS keypad still has an additional function: the keypad copy function.This function is useful when one wants to copy the settings of one inverter (source inverter) to another (target inverter) or one needs to program several inverters with the same settings.
CHAPTER 8 - CFW-08 OPTIONS AND ACCESSORIES NOTE! The external serial keypad (HMI-CFW08-RS) can be used up to 150 m (492.1 ft), for distance higher than 10 m (32.8 ft) it is necessary to use a 12 Vdc external power supply in the external serial keypad, as shown in the figure below: Keypad Inverter RJ11 6X6 Connector Cable Connection Pins DB9 Pins RJ 1 1 2 6 3 4 5 5 DB9 Connector PIN 1 = +12 Vdc (250 mA) PIN 5 = 0 V Note: WEG supplies cables with this configuration for 15 m (49.2 ft), 20 m (65.
CHAPTER 8 - CFW-08 OPTIONS AND ACCESSORIES 53,1 [2.09] 43,2 [1.7] 57,6 [2.27] 36,8 [1.45] 9 [0.35] 6,1 [0.24] 20 [0.79] 10,9 [0.43] Figure 8.13 - Dimensions in mm [in] of the optional module KDC-24VR-CFW08 and XC16 connector signals 24 Vdc power supply with HMI for the CFW-08: This module makes it available a 24 Vdc power supply with 100 mA maximum current capacity and short-circuit protection. The power supply reference (0 V - GND) is the same of the terminal 5 on the control board.
CHAPTER 8 - CFW-08 OPTIONS AND ACCESSORIES 8.11 KCS-CFW08 Serial communication module RS-232: is inserted in the place of the parallel keypad, enabling the RS-232 connection (connector RJ-6). The RS-232 serial interface enables the point-to-point connection (inverter - master). It is gavanically isolated and enables the use of interconnecting cables in lengths up to 10 m (32.8 ft). Through the RS-232 serial interface you can control, set parameters and monitor the CFW-08.
CHAPTER 8 - CFW-08 OPTIONS AND ACCESSORIES 8.11.1 Instructions for KCS-CFW08 Insertion and Removal a) Insertion - Connect the cable of the communication module to XC5. - Place the communication module as shown in figure above. - Press it. b) Removing - Use a screwdriver to unlock the communication module. - Remove the module by pulling it on the lateral sides. - Remove the cable of the XC5 connector. Figure 8.16 a) and b) - Insertion and removal of the serial communication module RS-232 KCS-CFW08 8.
CHAPTER 8 - CFW-08 OPTIONS AND ACCESSORIES NOTE! For communication with the CFW-08 use the first generation programming software SuperDrive. The second generation software named SuperDrive G2 is not compatible with this product. To install the RS-232 communication kit on the PC, proceed as follows: - Remove the parallel keypad (HMI-CFW08-P) from the inverter. - Install the serial communication module RS-232 (KCSCFW08) in the place of the keypad. - Install the software “SuperDrive” in the PC.
CHAPTER 8 - CFW-08 OPTIONS AND ACCESSORIES The following figure shows some possibilities for connecting this module in a RS-485 network. Usually, the connection a) is applied, but connections b) and c) can also be used according to the situation. Notice that terminal indicated by the symbol shall be connected to the ground. a) b) CFW-08 Master c) CFW-08 Master CFW-08 Master A A A A A A B B B B B B COM COM XC12 COM COM XC12 XC12 Earth Earth COM COM Earth Figure 8.
CHAPTER 8 - CFW-08 OPTIONS AND ACCESSORIES The following figure shows some possibilities for connecting the module in a CANopen network. Usually, the connection a) is applied, but connection b) can also be used according to the situation. Notice that terminal indicated by the symbol shall be connected to the ground. b) a) CFW-08 Master CFW-08 Master CAN_H CAN_H CAN_H CAN_H CAN_L CAN_L CAN_L CAN_L Shield Shield Shield Shield V- VV- XC13 V- XC13 Figure 8.
CHAPTER 8 - CFW-08 OPTIONS AND ACCESSORIES 57 [2.24] 25.3 [1.0] 5.6 [0.22] 36 [1. .8 45 ] 42.6 [1.68] Figure 8.21 - Dimensions in mm [in] of the DeviceNet communication module KFB-DN-CFW08 The figure below shows how to connect this module in a DeviceNet network (this connection follows the DeviceNet resolution). NOTE! Terminal 5 (GND) of the control board shall be grounded. CFW-08 V+ Master V+ CAN_H CAN_H CAN_L CAN_L VShield VShield XC14 Figure 8.
CHAPTER 8 - CFW-08 OPTIONS AND ACCESSORIES 8.16 KAC-120-CFW08 KAC-120-CFW08-N1M1 KAC-120-CFW08-N1M2 This optional is used to operate the digital inputs with alternate voltage (120 Vac). This board shall be externally connected to the control board and the function of each terminal is described in the optional itself. For safety purposes, the Nema 1 kit shall be used along with this optional.
CHAPTER 8 - CFW-08 OPTIONS AND ACCESSORIES This device must be used when the installation of the inverter on 35 mm (1.38 in) rail, according to DIN EN 50.022, is desired Only available for the models: 1.6-2.6-4.0-7.0 A/ 200-240 V and 1.0-1.6-2.6-4.0 A/380-480 V Front View Section B-B 140 [5.51] 129 [5.08] Section A-A B A' 12 [0.47] A 75 [2.95] B 64 [2.52] 4 [0.16] 9 [0.35] 8.17 KMD-CFW08-M1 Figure 8.
CHAPTER 8 - CFW-08 OPTIONS AND ACCESSORIES 8.18 KFIX-CFW08-M1 KFIX-CFW08-M2 This kit must be used when a better access to the screw hole of the inverter is needed. Models that use this kit: KFIX-CFW08-M1 Models: 1.6-2.6-4.0-7.0 A/200-240 V; 1.0-1.6-2.6-4.0 A/ 380-480 V KFIX-CFW08-M2 Models: 7.3-10-16 A/200-240 V; 2.7-4.3-6.5-10 A/380-480 V Dimensions in mm (in) A B C D E KFIX-CFW08-M1 50 (1.97) 75 (2.95) 8 (0.31) 180 (7.09) 190 (7.48) KFIX-CFW08-M2 80 (3.15) 115 (4.53) 8 (0.31) 228 (8.98) 238 (9.
CHAPTER 8 - CFW-08 OPTIONS AND ACCESSORIES 8.19 KN1-CFW08-M1 KN1-CFW08-M2 This kit is used when a Nema 1/IP20 degree of protection is desired for the inverter or when wiring metallic conduits for the inverter are desired. Models that use this kit: KN1-CFW08-M1: Models: 1.6-2.6-4.0-7.0/220-240 V; 1.0-1.6-2.6-4.0/380-480 V KN1-CFW08-M2: Models: 7.3-10-16 A/200-240 V; 2.7-4.3-6.5-10 A/380-480 V Models 13 and 16 A/380-480 V have Nema 1/IP20 degree of protection in the standard version.
CHAPTER 8 - CFW-08 OPTIONS AND ACCESSORIES 8.20 RFI FILTER The installation of frequency inverters requires some care in order to prevent electromagnetic interferences (EMI). This electromagnetic interference may disturb the operation of the inverter itself or other devices, such as electronic sensors, PLCs, transducers, radio equipment, etc. installed in the proximity. To avoid these troubles, follow the installation instructions contained in this manual.
CHAPTER 8 - CFW-08 OPTIONS AND ACCESSORIES Driving Panel CFW-08 Filter Power Supply Conduit or Shielded Cable PE PE Ground Motor Install it as close as possible to the inverter Motor Ground (frame) Figure 8.28 - Connection of the external RFI filter - Category C1 8.
CHAPTER 8 - CFW-08 OPTIONS AND ACCESSORIES Always add a line reactor when capacitors for power factor correction are installed in the same line and near to the inverter. Figure 8.29 shows the line reactor connection to the input.
CHAPTER 8 - CFW-08 OPTIONS AND ACCESSORIES a) Single-phase power supply models PE Q1 PE R S T U V W PE W PE V U L N Shield Line Figure 8.29 a) - Power connection with line reactor at the input b) Three-phase power supply models PE R S T U V W PE W PE V U PE R S T Line Shield Figure 8.
CHAPTER 8 - CFW-08 OPTIONS AND ACCESSORIES Inverter Model Transformer Apparent Power [kVA] 1.6 A and 2.6 A/200-240 V 4 A/200-240 V 7 A and 7.3 A/200-240 V 10 A/200-240 V 16-22-28 A and 33 A/200-240 V 1 A-1.6 A and 2.6 A/380-480 V 4.0 A and 4.3 A/380-480 V 2.7 A/380-480 V 6.5-10 A and 13 A/380-480 V 16-24 A and 30 A/380-480 V 30 x rated inverter apparent power [kVA] 6 x rated inverter apparent power [kVA] 10 x rated inverter apparent power [kVA] 7.
CHAPTER 8 - CFW-08 OPTIONS AND ACCESSORIES PE R S T Disconnecting Switch PE R S T U V W PE Load Reactor PE W V U Shield Figure 8.30 - Load reactor connection 8.23 DYNAMIC BRAKING The dynamic braking is used where short deceleration times are required or where high inertia is present. For the correct sizing of the braking resistor, application data such as, deceleration time, load inertia, braking duty cycle must be considered.
CHAPTER 8 - CFW-08 OPTIONS AND ACCESSORIES For critical applications with very short braking times, high inertia loads (ex.: centrifuges) or with very short and frequent duty cycles, contact WEG to define the most suitable resistor. Inverter Model 1.6 A / 200-240 V 2.6 A / 200-240 V 4.0 A / 200-240 V 7.0 A / 200-240 V 7.3 A / 200-240 V 10A / 200-240 V 16A / 200-240 V 22A / 200-240 V 28A / 200-240 V 33A / 200-240 V 1.0 A / 380-480 V 1.6 A / 380-480 V 2.6 A / 380-480 V 2.7 A / 380-480 V 4.0 A / 380-480 V 4.
CHAPTER 8 - CFW-08 OPTIONS AND ACCESSORIES DANGER! The internal inverter braking circuit and the braking resistor can be damaged when not correctly sized or when the line voltage exceeds the maximum allowed value.
CHAPTER 8 - CFW-08 OPTIONS AND ACCESSORIES The inverters have a control software for data transmission/ reception through serial interface, thus facilitating the reception of data that have been sent by the master and the transmission of the data requested by the master. This software supports WEG protocol and nine different ModbusRTU modes, that can be selected via parameter P312. The subjects broached in this item refers to WEG protocol. For more details about the Modbus-RTU, refer to item 8.25.
CHAPTER 8 - CFW-08 OPTIONS AND ACCESSORIES 8.24.2.1 RS-485 This interface permits the linkage of up to 30 inverters to a master (PC, PLC, etc.), attributing and setting for each inverter an address (1 to 30). In addition to these 30 addresses, there are two addresses to perform special tasks: Address 0: any inverter in the network is inquired, independently of its address. Only one inverter can be connected to the network (point to point) in order to prevent short-circuits in the line interface.
CHAPTER 8 - CFW-08 OPTIONS AND ACCESSORIES Other ASCII characters used by the protocol: CODE 0 1 2 3 4 5 6 7 8 9 = STX ETX EOT ENQ ACK NAK ASCII DEC 48 49 50 51 52 53 54 55 56 57 61 02 03 04 05 06 21 HEX 30 31 32 33 34 35 36 37 38 39 3D 02 03 04 05 06 15 Table 8.7 - Others ASCII characters used by the protocol The connection between the network participants is performed through a pair of wires. The signal levels are according to the EIA RS-485 STANDARD with differential receivers and transmitters.
CHAPTER 8 - CFW-08 OPTIONS AND ACCESSORIES Basic variables: are those that can be accessed only through the serial interface. SCHEMATIC DIAGRAM: INVERTER BASIC VARIABLES SERIAL CONNECTION VARIABLES PARAMETERS 8.24.3.2 Parameter/ Variables Resolution MASTER The variables and the parameters have 16 bits format, i. e., from -32767 to +32768 for signed variables or from 0 to 65535 for unsigned variables.
CHAPTER 8 - CFW-08 OPTIONS AND ACCESSORIES Reading message: for inquiring of the inverter variable content; Writing message: to change the inverter variable content or to send comands to the inverters. Note: No transmission between two inverters is possible. The master has the bus access control. Reading message: This message allows the master to receive from the inverter the content corresponding to the inquiry code.
CHAPTER 8 - CFW-08 OPTIONS AND ACCESSORIES ADR NAK Refer to the item 8.24.3.5. Writing message This message sends data to the inverter variables. The inverter will answer by indicating if the data have been accepted or not.
CHAPTER 8 - CFW-08 OPTIONS AND ACCESSORIES 8.24.3.5 Execution and Message Test The inverter and the master test the message syntax. The answers for the respective verified conditions are defined as follows: Reading message: No answer: with wrong message structure, control characters received incorrectly or wrong inverter address; NAK: Code corresponding to a non existing variable or there is only a writing variable; TEXT: with valid messages.
CHAPTER 8 - CFW-08 OPTIONS AND ACCESSORIES 8.24.4 Message Examples Change of the minimum frequency (P133) to 6.00 Hz in the inverter 7. 1) Master: EOT G STX 0 2 7 3 3 = Fmin 0H 2H 5H 8H ETX BCC Fmin = 258H = 600 = 6.00/0.01 addr. 7 2) Inverter: G ACK 3) Master: EOT Reading of the output current from the inverter 10 (supposing that the same was at 7.8 A at the moment of the enquiry). 1) Master: EOT J 0 1 7 0 3 ENQ 3 = P003 Code addr.
CHAPTER 8 - CFW-08 OPTIONS AND ACCESSORIES Where: Logical status: EL15 EL14 EL13 EL12 EL11 EL10 EL9 EL8 EL8: 0 = ramp enabling (start/stop) inactive 1 = ramp enabling active EL9: 0 = general enabling inactive 1 = general enabling active EL10: 0 = reverse 1 = forward EL11: 0 = JOG inactive 1 = JOG active EL12 0 = local 1 = remote EL13: 0 = without undervoltage 1 = with undervoltage EL14 : not used EL15: 0 = without error 1 = with error } Inverter enabled EL8 = EL9 = 1 Error code: hexadecimal error
CHAPTER 8 - CFW-08 OPTIONS AND ACCESSORIES BYTE LOW: logical level of the desired action.
CHAPTER 8 - CFW-08 OPTIONS AND ACCESSORIES CHSL0: 1 - serial local reference CHSL1: 1 - serial local forward/reverse selection CHSL2: 1 - serial local On/Off selection CHSL3: 1 - serial local JOG CHSL4: 1 - serial remote reference CHSL5: 1 - serial remote forward/reverse selection CHSL6: 1 - serial remote On/Off selection CHSL7: 1 - serial remote JOG selection CHSH0: 1 - serial local/remote selection. 8.24.5.
CHAPTER 8 - CFW-08 OPTIONS AND ACCESSORIES 1) Master: EOT G STX 0 0 7 0 3 C. L. Code = 0H 8H 0H 8H ETX BCC 8H 0H ETX BCC JOG active = 1 addr. 7 2) Inverter: G ACK 3) Master: EOT Error reset 1) Master: EOT G STX 0 0 7 0 C. L. Code 3 = 8H 0H RESET = 1 addr. 7 2) Inverter: G ACK 3) Master: EOT 8.24.5.
CHAPTER 8 - CFW-08 OPTIONS AND ACCESSORIES 8.24.5.4 Errors Related to the Serial Communication They act as follows: They do not disable the inverter; They do not disable the fault relay; They inform in the word of logical status (V02). Fault types: E22: longitudinal parity fault (BCC); E24: parametrization fault (when some of the situations indicated in table 4.1 occur (incompatibility between parameters) or when there is a parameter change attempt that can not be changed with the motor running).
CHAPTER 8 - CFW-08 OPTIONS AND ACCESSORIES 8.24.7 Physical Connection RS-232 and RS-485 CFW-08 CFW-08 CFW-08 KRS-485-CFW08 Network Master (PC, PLC) RS-485 AB RS-485 XC29 AB Cable Shielding RS-485 XC29 Figure 8.32 - CFW-08 network connection through RS-485 serial interface Notes: Line termination: connect the termination resistors at the ends of the line. Grounding of the cable shield: connect the shielding to the equipment frame (suitable grounding); Recommended cable: for balanced shielding. Ex.
CHAPTER 8 - CFW-08 OPTIONS AND ACCESSORIES 8.25 MODBUS-RTU 8.25.1 Introduction to Modbus-RTU Protocol Modbus protocol has been developed 1979 firstly. Currently it is a wide diffused open protocol, used by several manufacturers in different equipment. The Modbus-RTU communication of the do CFW-08 has been developed by considering two documents: 1. MODBUS Protocol Reference Guide Rev. J, MODICON, June 1996. 2. MODBUS Application Protocol Specification, MODBUS.ORG, may 8th 2002.
CHAPTER 8 - CFW-08 OPTIONS AND ACCESSORIES Address: The master initiates the communication by sending one byte with the address of the slave to which the message is addressed. The slave initiates the message with its own address. The master can also send a message destined to address 0 (zero), which means that the message is destined to all network slaves (broadcast). In this case no slave will answer to the master.
CHAPTER 8 - CFW-08 OPTIONS AND ACCESSORIES 4. Repeat steps 2 and 3 until the eight displacements have been realized. 5. Repeat the steps 1 to 4, by using the next byte message until the whole message have been processed. The end content of the CRC variable is the value of the CRC field that is transmitted at the end of the message. The least significant part is transmitted first (CRC), only then the most significant part (CRC+) is transmitted.
CHAPTER 8 - CFW-08 OPTIONS AND ACCESSORIES 8.25.2 Operation of the CFW-08 in the Modbus-RTU Network The CFW-08 frequency inverters operate as slaves of the Modbus-RTU network. The communication initiates with the master of the Modbus-RTU network requesting a service for a network address. When the inverter is configured to the corresponding address, it processes the question and answers to the master as requested. 8.25.2.
CHAPTER 8 - CFW-08 OPTIONS AND ACCESSORIES Transmission rate and parity: Both configurations are defined by parameter P312. Baud rates: 9600, 19200 or 38400 bits/s. Parity: none, odd parity or even parity. All slaves and even the network master must use the same baud rate and parity. 8.25.2.
CHAPTER 8 - CFW-08 OPTIONS AND ACCESSORIES Write Single Register Description: writing in a single register of holding type. Function code: 06. Broadcast: supported Response time: 10 to 50 ms. Write Multiple Coils Description: writing in internal bit blocks or coils. Function code: 15. Broadcast: supported Response time: 10 to 20 ms. Write Multiple Registers Description: writing in register blocks of holding type. Function code: 16. Broadcast: supported Response time: 10 to 50 ms for each written register.
CHAPTER 8 - CFW-08 OPTIONS AND ACCESSORIES Basic Variables Modbus Address Hexadecimal 1388h 1389h ... V05 Decimal 5000 5001 ... ... Number of the Basic Variable V00 V01 5005 138Dh Table 8.12 - Basic variables addressing Status Bits Bit 0 Bit 1 ... ... Modbus Address Hexadecimal 00h 01h Decimal 00 01 ... Bit Number Bit 7 07 07h Table 8.13 - Status bits addressing Commands Bits Bit 107 Modbus Address Hexadecimal 64h 65h ... ... Bit 100 Bit 101 Decimal 100 101 ...
CHAPTER 8 - CFW-08 OPTIONS AND ACCESSORIES The command bits are available to read and write and they have the same function of the logic command bits 0 to 7 (basic variable 3), however no requiring the use of the mask. The basic variable 3 write influences the status of these bits.
CHAPTER 8 - CFW-08 OPTIONS AND ACCESSORIES Each response bit is placed at a position of the data bytes sent by the slave. The first byte, from the bits 0 to 7, receives the first 8 bits from the initial address indicated by the master. The other bytes (if the number of the read bits is higher than 8) remain in the same sequence. If the number of the read bits is not a multiple of 8, the remaining bits of the last byte should be filled out with 0 (zero).
CHAPTER 8 - CFW-08 OPTIONS AND ACCESSORIES Example: read of the value proportional to the frequency value (P002) and motor current (P003) of the CFW-08 at address 1: Query (Master) Field Slave address Function Initial register (byte high) Initial register (byte low) Number of registers (byte high) Number of registers (byte low) CRCCRC+ Value 01h 03h 00h 02h 00h 02h 65h CBh Response (Slave) Field Slave address Function Byte Count P002 (high) P002 (low) P003 (high) P003 (low) CRCCRC+ Value 01h 03h 04h 09h
CHAPTER 8 - CFW-08 OPTIONS AND ACCESSORIES For this function, the slave response is an identical copy of the query sent by the master. This function is used to write a value to a single register. This function has the following structure (values are always hexadecimal values, and each field represents one byte): 8.25.3.
CHAPTER 8 - CFW-08 OPTIONS AND ACCESSORIES Query (Master) Slave address Function Initial bit address (byte high) Initial bit address (byte low) Number of bits (byte high) Number of bits (byte low) Byte Count Field (number of data bytes) Byte 1 Byte 2 Byte 3 etc to CRCCRC+ Response (Slave) Slave address Function Initial bit address (byte high) Initial bit address (byte low) Number of bits (byte high) Number of bits (byte low) CRCCRC+ Table 8.
CHAPTER 8 - CFW-08 OPTIONS AND ACCESSORIES Query (Master) Slave address Function Initial register address (byte high) Initial register address (byte low) Number of registers (byte high) Number of registers (byte low) Byte Count Field (number of data bytes) Data 1 (high) Data 1 (low) Data 2 (high) Data 2 (low) etc to CRCCRC+ Response (Slave) Slave address Function Initial register address (byte high) Initial register address (byte low) Number of registers (byte high) Number of registers (byte low) CRCCRC+
CHAPTER 8 - CFW-08 OPTIONS AND ACCESSORIES Query (Master) Slave address Function MEI Type Read Code Object Number CRCCRC+ Response (Slave) Slave address Function MEI Type Conformity Level More Follows Next Object Number of Objects Object Code (*) Object Length (*) Object Value (*) CRCCRC+ (*) The fields are repeated according to the number of objects. Table 8.
CHAPTER 8 - CFW-08 OPTIONS AND ACCESSORIES Query (Master) Field Slave address Function MEI Type Read Code Object Number CRCCRC+ Value 01h 2Bh 0Eh 01h 00h 70h 77h Response (Slave) Field Value Slave address 01h Function 2Bh MEI Type 0Eh Read Code 01h Conformity Level 51h More Follows 00h Next Object 00h Number of Objects 03h Object Code 00h Object Length 03h Object Value ‘WEG’ Object Code 01h Object Length 0Ch Object Value ‘CFW-08 7.0A’ Object Code 02h Object Length 05h Object Value ‘V3.
CHAPTER 8 - CFW-08 OPTIONS AND ACCESSORIES 8.25.4.1 Error Messages When any error occurs in the message content (not during the data transfer), the slave must return a message indicating the error type that occurred. The errors that may occur in the CFW-08 during the message processing are errors relating to invalid function (code 01), invalid data address (code 02) and invalid data value (code 03).
CHAPTER 9 TECHNICAL SPECIFICATIONS This chapter describes the technical specifications (electrical and mechanical) of the CFW-08 inverter series. AC Input Specifications: Voltage: + 10 %, -15 % (with loss of motor efficiency) Frequency : 50/60 Hz (± 2 Hz) Phase unbalance: 3 % Overvoltage: Category III (EN 61010/UL 508C) Transient voltages according to Category III. 9.1 POWER DATA Minimum line impedance: variable according to inverter model. Refer to item 8.21.
CHAPTER 9 - TECHNICAL SPECIFICATIONS Model: Current (A) / Voltage (V) Power (kVA) (1) Rated output current (A) (2) Max. output current (A) (3) Power supply Rated input current (A) Switching frequency (kHz) Maximum motor power (5) Dynamic braking Internal Category C2 RFI filter (optional) 7.3/ 10/ 16/ 200-240 200-240 200-240 2.8 3.8 6.1 7.3 10 16 11 15 24 Single-phase or three-phase 8.6/16 (4) 12/22 (4) 19 5 5 5 2 HP/ 3 HP/ 5 HP/ 1.5 kW 2.2 kW 3.
CHAPTER 9 - TECHNICAL SPECIFICATIONS Model: Current (A) / Voltage (V) Power (kVA) (1) Rated output current (A) (2) Maximum output current (A) (3) Power supply Rated input current (A) Switching frequency (kHz) Maximum motor power (5) Dynamic braking Internal Category C2 RFI filter (optional) External Category C1 RFI filter (optional) Watt loss (W) Dimensions in mm [in] (Height x Width x Depth) 13/ 380-480 9.9 13 19.5 15 5 7.5 HP / 5.6 kW Yes 24/ 16/ 380-480 380-480 18.3 12.2 24 16 36 24 Three- phase 28.
CHAPTER 9 - TECHNICAL SPECIFICATIONS (4) Rated input current for single-phase operation. Note: the models CFW080016B2024..., CFW080026B2024..., CFW080040B2024..., CFW080073B2024 ... and CFW080100B2024 ... can be operated both with single-phase voltage and three-phase voltage without output current derating. (5) The indicated motor power ratings are only orientative values for IV-pole motors and normal duty loads. The precise inverter sizing must consider the actual motor nameplate and application data.
CHAPTER 9 - TECHNICAL SPECIFICATIONS 9.2 ELECTRONICS/GENERAL DATA METHOD CONTROL PERFORMANCE INPUTS (Control Board ECC3) OUTPUT FREQUENCY V/F CONTROL VECTOR CONTROL ANALOG DIGITAL ANALOG OUPUTS (Control Board ECC3) RELAY SAFETY PROTECTION KEYPAD (HMI) STANDARD (HMI-CFW-08-P) DEGREE OF PROTECTION STANDARDS NEMA1 / IP20 PROTECTED CHASSIS/ IP20 IEC 146 UL 508 C EN 50178 EN 61010 EN 61800-3 Voltage Source Inverter V/F Control or Sensorless Vector Control (V.V.C.
CHAPTER 9 - TECHNICAL SPECIFICATIONS 9.3 WEG STANDARD IV-POLE MOTOR DATA Power [P404] Frame (HP) 0.16 0.25 0.33 0.5 0.75 1.0 1.5 2.0 3.0 4.0 5.0 6.0 7.5 10 12.5 0.16 0.25 0.33 0.5 0.75 1.0 1.5 2.0 3.0 4.0 5.0 6.0 7.5 10 12.5 15 20 63 63 63 71 71 80 80 90S 90L 100L 100L 112M 112M 132S 132M 63 63 63 71 71 80 80 90S 90L 100L 100L 112M 112M 132S 132M 132M 160M (kW) 0.12 0.18 0.25 0.37 0.55 0.75 1.10 1.50 2.20 3.00 3.70 4.50 5.50 7.50 9.20 0.12 0.18 0.25 0.37 0.55 0.75 1.10 1.50 2.20 3.00 3.70 4.50 5.50 7.
CHAPTER 9 - TECHNICAL SPECIFICATIONS Power [P404] Frame Freq. Voltage Current [P403] [P400] [P401] (Hz) (V) (A) Speed [P402] (rpm) (HP) 0.16 0.25 0.33 0.5 0.75 1 1.5 2 3 4 5.5 7.5 10 0.16 0.25 0.33 0.5 0.75 1 1.5 2 3 4 5.5 7.5 10 15 20 63 63 71 71 80 80 90S 90L 100L 100L 112M 132S 132M 63 63 71 71 80 80 90S 90L 100L 100L 112M 132S 132M 160M 160L 0.73 1.05 1.4 1.97 2.48 3.23 4.54 5.81 8.26 11.3 14.2 19.1 25.7 0.42 0.6 0.8 1.13 1.42 1.86 2.61 3.34 4.75 6.47 8.18 11 14.8 22.1 29.