
Use and Care Guide


(Continued) Section 9
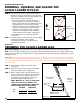
POSITIONING THE ACCESS LADDER
13
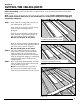
STEP 5. After predrilling using 1⁄8" drill bit, nail the hinged end to the header by driving two 16d nails
through the hole in each metal bracket on the headboard (location A at Figure 22).
STEP 6. Open the access ladder door by slowly pulling the cord straight down.
Pulling the cord at angles other than straight down may shift the access ladder off the temporary
support boards and cause it to fall.
Do not push the access ladder open from within the overhead space. The spring tension changes
suddenly—you are likely to lose your balance and fall.
Do not try to force the door open or adjust the temporary support boards while the access ladder is
on them. If the access ladder door is blocked by the temporary support boards, remove the access
ladder and adjust the temporary support boards as needed.
WARNING:
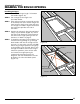
Do not unfold the access ladder legs at this time.
The access ladder is not yet safe to use. Do not
stand on the access ladder or leave it unattended until it is permanently nailed to the frame AND the legs
are properly trimmed. Using the access ladder before the legs are properly trimmed will damage the access
ladder and may cause it to break unexpectedly resulting in serious injury.
Section 10
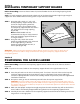
SHIMMING, SQUARING AND NAILING THE
ACCESS LADDER IN PLACE
Before Proceeding: The access ladder should be positioned on the temporary support boards in the right
direction for use. The access ladder door should be open, but the legs should not be extended.
Goal: To shim the access ladder squarely into the frame you built and then nail it at the proper locations.
WARNING:
The access ladder is not yet safe to use. Do not stand on the access
ladder or leave it unattended until it is permanently nailed to the frame AND
the legs are properly trimmed. Using the access ladder before the legs are
properly trimmed will damage the access ladder and may cause it to break
unexpectedly resulting in serious injury.
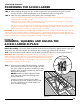
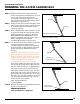
STEP 1. Shim the access ladder with wood blocks or tapered
shim stock at the locations shown in Figure 21 until
the access ladder fits squarely in the frame you built.
Tapered shims should be inserted from above and
below (where possible).
NOTICE: Failure to properly square the ladder
frame may result in premature damage to the
closing mechanism.
Check the frame for squareness from above
by measuring across the diagonals (See Fig. 22).
The two measurements should be within 1/8"
to be considered square.
Typical Placement
of Shims
Joist
Frame
Shims
Shims
Stop
Block
Figure 21