Manual Model 1268 Electronic Motor Controller Curtis Instruments, Inc. 200 Kisco Avenue Mt. Kisco, NY 10549 www.curtisinstruments.com Read Instructions Carefully! Specifications are subject to change without notice. © 2012 Curtis Instruments, Inc. ® Curtis is a registered trademark of Curtis Instruments, Inc. © The design and appearance of the products depicted herein are the copyright of Curtis Instruments, Inc.
CONTENTS CONTENTS 1. OVERVIEW ..............................................................................1 2. INSTALLATION AND WIRING.............................................4 Mounting the Controller .....................................................4 Connections: Low Current..................................................6 Connections: High Current ................................................7 Wiring: Controller ..............................................................
CONTENTS Field Max Negative Field Maximum Field Map Start / Negative Field Map Start Field Map End / Negative Field Map End Field Ramp / Negative Field Ramp Field Direction Swap Fault Parameters .................................................................26 KSI SRO Enable Mode After KSI Overvoltage Low Voltage Warning Option Output Driver Parameters ..................................................
FIGURES FIGURES fig. 1: Curtis 1268 electronic motor controller.............................. 1 fig. 2: Mounting dimensions, Curtis 1268 controller ................... 4 fig. 3a: Standard wiring configuration — with aux driver used for an EM brake ................................. 8 fig. 3b: Standard wiring configuration — with aux driver used for a WalkAway™ relay ....................... 9 fig. 4: Wiring for 3-wire potentiometer throttle ......................... 10 fig. 5: Wiring for 0–5V throttle ........
1 — OVERVIEW 1 OVERVIEW Curtis 1268 controllers are separately excited motor speed controllers designed for use in a variety of transport vehicles. These programmable controllers are simple to install, efficient, and cost effective. Typical applications include heavy-duty golf carts, personnel transports, burden carriers, and other utility vehicles. The 1268 controller offers smooth, silent, cost effective control of motor speed and torque.
1 — OVERVIEW Like all Curtis motor controllers, the 1268 offers superior operator control of the vehicle’s motor drive speed.
1 — OVERVIEW ✓ Driver outputs are short circuit protected and provide built-in coil spike protection ✓ Warning buzzer sounds steady in reverse, intermittent during WalkAway™ braking ✓ Complete diagnostics through any of the optional programmers and through the built-in Status LED ✓ Driver for remote Status LED enables status information to be available at a dashboard ✓ Sealed package is rated at IP64 and IP67 ✓ Meets or exceeds EEC fault detect requirements.
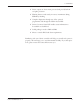
2 — INSTALLATION & WIRING: Controller 2 Fig. 2 Mounting dimensions, Curtis 1268 controller. INSTALLATION AND WIRING MOUNTING THE CONTROLLER The outline and mounting hole dimensions for the 1268 controller are shown in Figure 2. The controller can be oriented in any position, and meets the IP64/IP67 ratings for environmental protection against dust and water. However, the location should be carefully chosen to keep the controller as clean and dry as possible.
2 — INSTALLATION & WIRING: Controller To ensure full rated power, the controller should be fastened to a clean, flat metal surface with four M6 (1/4") diameter screws, using the holes provided. Although not required, a thermal joint compound can be used to improve heat conduction from the controller heatsink to the mounting surface.
2 — INSTALLATION & WIRING: Controller CONNECTIONS Low Current Connections Three low current connectors are built into the 1268 controller. They are located in a row on the top of the controller: J1 J2 J1 Logic connector J2 Speed Sensor connector J3 Programmer connector J3 The 24-pin connector provides the logic control connections. The mating connector is a 24-pin Molex Mini-Fit Jr. connector p/n 39-01-2245 using type 5556 terminals. The appropriate wire gauge is 18–24 AWG.
2 — INSTALLATION & WIRING: Controller A 6-pin low power Molex connector is provided for the interface with the Hall speed sensor. The mating connector is a Molex Mini-Fit Jr. p/n 39-01-2065 using type 5556 terminals. 6 5 4 3 2 1 J2-1,2,3 (not used) J2-4 J2-5 J2-6 ground input +15V J2 The +15V supply should only be used with the speed sensor and not to power any other external systems.
2 — INSTALLATION & WIRING: Controller WIRING: Standard Configuration Figures 3a and 3b show typical wiring. The system can include an electromagnetic brake or a WalkAway™ relay, but not both. Figure 3a shows a system with an EM brake; Figure 3b shows a system with a WalkAway™ relay. Standard Power Wiring Motor armature winding is straightforward, with the armature’s A1 connection going to the controller’s B+ bus bar and the armature’s A2 connection going to the controller’s M- bus bar.
2 — INSTALLATION & WIRING: Controller Standard Control Wiring Wiring is shown in Figures 3a and 3b for the most commonly used components. Wiring for alternative throttles is shown in the following pages. The main contactor coil must be wired directly to the controller as shown in Figures 3a and 3b. The controller uses the main contactor coil driver output to remove power from the controller and motor in the event of various faults.
2 — INSTALLATION & WIRING: Throttle WIRING: Throttle Various throttles can be used with the 1268 controller, including 5kΩ 3-wire potentiometers and 0–5V throttles. Some 1268 controller models are specifically designed to be compatible with ITS throttles. The controller looks for a voltage signal at the wiper input (Pin 15), with vehicle speed increasing with increased throttle voltage. All throttle fault protection is accomplished by monitoring the wiper input.
2 — INSTALLATION & WIRING: Throttle ITS Throttle The ITS throttle is a 2-wire electronic throttle that connects between the Pot High and Pot Wiper pins (Pins 13 and 15), as shown in Figure 6. The Hall sensor circuit within the throttle creates an output current between 0.7mA and 1.6mA from min to max throttle. The two wires are interchangeable. Fig. 6 Wiring for ITS throttle.
2 — INSTALLATION & WIRING: Throttle WIRING: Drivers The 1268 controller provides four drivers (at Pins 17, 18, 19, 23) for the main contactor, brake light relay, reverse alarm, and aux contactor/relay. These four outputs are low-side drivers, designed to energize inductive coils or a piezoelectric reverse alarm. The brake light relay, reverse alarm, and aux are optional functions.
2 — INSTALLATION & WIRING: Throttle Reverse Alarm Driver The reverse alarm driver (Pin 19) pulls low when the reverse direction switch is applied. This driver is designed to drive a reverse signal beeper or piezoelectric buzzer that operates when the vehicle is traveling in reverse or during WalkAway™ operation. It can also be programmed to give a warning during anti-rollback and/or to warn of an overvoltage condition (see Warning Option parameter).
2 — INSTALLATION & WIRING: Switches, etc. CONTACTOR, SWITCHES, and OTHER HARDWARE Main Contactor A main contactor is required for use with any 1268 controller. The main contactor allows the controller and motor to be disconnected from the battery. This provides a significant safety feature in that the battery power can be removed from the drive system if a controller or wiring fault is detected.
3 — PROGRAMMABLE PARAMETERS 3 PROGRAMMABLE PARAMETERS The 1268 controller’s programmable parameters allow the vehicle’s performance characteristics to be customized to fit the needs of individual vehicles or vehicle operators. Programming can be done with a 1313 handheld programmer or a 1314 PC Programming Station. The 1311 handheld programmer and the discontinued 1307 handheld programmer are also fully compatible with the 1268 controller. See Appendix B for more information about the programmers.
3 — PROGRAMMABLE PARAMETERS The parameter names are listed here in the abbreviated forms that appear on the handheld programmer’s 14-character LCD screen. Not all of these parameters are available on all controllers; the parameters for any given controller are dependent on its specifications. For a list of the parameters in the order in which they are displayed in the Program menu, see Appendix B. For an alphabetical list and index of the parameters, see Appendix C.
3 — PROGRAMMABLE PARAMETERS: Acceleration Parameters Acceleration Parameters M1/M2/REV ACCEL RATE The acceleration rate defines the time, in seconds, for the controller to accelerate from 0% output to 100% output. A larger value represents a longer acceleration time and a gentler start. Fast starts can be achieved by reducing the acceleration time, i.e., by adjusting the accel rate to a smaller value.
3 — PROGRAMMABLE PARAMETERS: Acceleration Parameters FLD BRAKE MAX The field brake max parameter sets the maximum value of field current permitted during field braking when FLD BRAKE is On. The field current defined by FLD BRAKE MAX overrides the standard field map current below the speed defined by FLD BRAKE SPD. When an EM brake is used, the amount of field current programmed by FLD BRAKE MAX is applied for the max amount of time specified by EMB DELAY (see Output Driver parameters) prior to locking the EM brake.
3 — PROGRAMMABLE PARAMETERS: Speed Parameters Speed Parameters M1/M2 FWD SPEED The forward speed parameter defines the maximum speed limit in the forward direction. It is adjustable from 4.0 to 40.0, in units of mph or km/h (depending on RPM TO SPEED the setting). REV SPEED The reverse speed parameter defines the maximum speed limit in the reverse direction. It is adjustable from 4.0 to 16.0, in units of mph or km/h (depending on RPM TO SPEED the setting).
3 — PROGRAMMABLE PARAMETERS: Throttle Parameters Throttle Parameters THROTTLE 0% The throttle 0% parameter defines the throttle input voltage at which a throttle command begins. Voltages lower than the programmed value (but higher than THRTL FAULT LO) are interpreted to be in a 0% deadband. THROTTLE 100% The throttle 100% parameter defines the throttle input voltage that gives a full throttle command. Input voltages above this value (but lower than THRTL FAULT HI) are interpreted as 100% throttle command.
3 — PROGRAMMABLE PARAMETERS: Current Limit Parameters THROT FAULT LO The throttle fault low parameter sets the lower throttle fault threshold; throttle input voltages below this threshold will signal a throttle fault. THROT FAULT HI The throttle fault high parameter sets the upper throttle fault threshold; throttle input voltages above this threshold will signal a throttle fault.
3 — PROGRAMMABLE PARAMETERS: Brake Mapping Parameters slopes. The warning buzzer is pulsed to create an audible indication that the vehicle is rolling. Brake Mapping Parameters The brake mapping parameters determine the maximum braking power that can be applied at a given vehicle speed. BRAKE MAX should be set higher than BRAKE MIN, and BRAKE END higher than BRAKE START.
3 — PROGRAMMABLE PARAMETERS: Brake Mapping Parameters M1/M2/REV BRAKE MAP The brake map parameter defines the shape of the brake map curve. The value set for this parameter is a percentage of the regen current between the BRAKE MIN and BRAKE MAX values, at the point that is halfway between the BRAKE END and BRAKE START speeds (the “Brake Map Midpoint”), as shown in Figure 8. The BRAKE MAP curve is the max allowed regen current, and the shaded gray area below it is the operating range. Fig.
3 — PROGRAMMABLE PARAMETERS: Field Mapping Parameters Field Mapping Parameters The field mapping parameters determine how much field current is applied for a given armature current. M1/M2 FWD FIELD MIN The forward minimum field current limit parameter defines the minimum allowed current in the motor’s field winding when the vehicle is traveling in the forward direction.
3 — PROGRAMMABLE PARAMETERS: Field Mapping Parameters FIELD MAP END / NEG FLD MAP EN The field map end parameter defines the armature current at which the field map clamps to the FIELD MAX value (see current limit parameters). Care should be taken to ensure that high FIELD MAP END values do not move the motor’s operating characteristics outside its safe commutation region. FIELD RAMP / NEG FLD RAMP The field ramp parameter defines the shape of the field map curve.
3 — PROGRAMMABLE PARAMETERS: Fault Parameters Fault Parameters KSI SRO ENABLE The keyswitch static return to off (SRO) feature prevents the vehicle from being started when “in gear.” When this parameter is enabled, the controller must initially sense the KSI input in the Off position (upon vehicle power-up) prior to it being switched to the On position. This feature is used to prevent vehicle motion due to a KSI short circuit or due to the keyswitch being permanently locked in the On position.
3 — PROGRAMMABLE PARAMETERS: Fault Parameters WARNING OPTION The warning option parameter sets the output pattern—flash or solid—of the external LED (Pin 22) and the warning beep conditions during anti-rollback and overvoltage (Pin 19). WARNING OPTION is programmable from 0 to 7: Curtis 1268 Manual, Rev.
3 — PROGRAMMABLE PARAMETERS: Output Driver Parameters Output Driver Parameters AUX DRVR MODE The auxiliary driver mode parameter determines whether the auxiliary function will be an electromagnetic brake or a WalkAway™ relay or neither (no auxiliary function).
3 — PROGRAMMABLE PARAMETERS: Output Driver Parameters resulting voltage must be set high enough to hold the relay closed under all shock and vibration conditions the vehicle will be subjected to. Low settings minimize the current required to power the coil, thereby reducing coil heating and increasing battery life. Values for AUX HOLDING should be determined with specifications or advice from the relay or brake manufacturer. Example: To use a 24V brake in a 48V vehicle, try AUX PULL IN = 2 (28.
3 — PROGRAMMABLE PARAMETERS: Output Driver Parameters DRV OVRCUR DIS The driver overcurrent detection disable parameter disables the controller’s driver overcurrent detection. The overcurrent detection mechanism acts to protect the main contactor and auxiliary drivers in the event they are connected to a load with too little resistance. This can occur due to miswiring or a defective peripheral device.
4 — INSTALLATION CHECKOUT 4 INSTALLATION CHECKOUT Before operating the vehicle, carefully complete the following checkout procedure. If you find a problem during the checkout, refer to the diagnostics and troubleshooting section (Section 6) for further information. The installation checkout can be conducted with or without a programmer. The checkout procedure is easier with a programmer. Otherwise, observe the Status LED (located in the controller’s label area) for diagnostic codes.
4 — INSTALLATION CHECKOUT disconnect the battery, and exchange the motor’s field connections (F1 and F2) on the controller. The motor should now turn in the proper direction. If you are using a programmer, you can use the parameter FIELD DIR SWAP to change the motor field output without physically changing the wiring (see page 25). The motor should run proportionally faster with increasing throttle. If it does not, refer to Section 6. 5. If you are using a programmer, go to the Monitor menu.
5 — TUNING GUIDE 5 TUNING GUIDE The 1268 controller is a very powerful vehicle control system. Its wide variety of adjustable parameters allow many aspects of vehicle performance to be optimized. This section provides explanations of what the major tuning parameters do and instructions on how to use these parameters to optimize the performance of your vehicle. Once a vehicle/motor/controller combination has been tuned, the parameter values can be made standard for that system or vehicle model.
5 — TUNING GUIDE step 1. Jack the vehicle wheels up off the ground so that they spin freely. Note: Most of the throttle tuning can be done without driving the motor, but it is advisable to check that the throttle range is still fully active when motor currents are being produced. step 2. Plug the 1311 programmer into the controller and turn on the controller with the run/store switch. step 3. Using the programmer’s Program menu, initially set the THROTTLE MAP parameter to 50%.
5 — TUNING GUIDE 2 Calibrating the Controller Speed Measurement to the Vehicle The RPM TO SPEED parameter is a conversion factor used to generate a vehicle speed estimate from the speed sensor input (motor RPM signal). This conversion factor allows the vehicle to be configured for various gear ratios and tire sizes. It can also be used to convert the displayed vehicle speed values (in the Program and Monitor menus) between English and metric units.
5 — TUNING GUIDE the winding is reduced. Reductions in the field current over the motor’s typical operating temperature range can be 10% to 50%. Since the maximum available field current determines the maximum torque that can be produced by the motor, the vehicle’s performance under load and up inclines will change as the motor heats up. The change in performance can be limited by tuning the motor when it is hot rather than cold. We therefore recommend that this procedure be performed with a hot motor.
5 — TUNING GUIDE step 6. Set NEG FIELD MAX at or below the FIELD MAX setting. If the controller is tuned such that the system is operating outside the motor’s safe commutation region, there will be audible and visual indications. Under normal operation, the motor will emit a whine with a pitch that increases with increasing rotation speed. If a “scratchy” sound is also heard, this is usually an indication that pin arcing is occurring in the motor and it is operating outside its safe commutation region.
5 — TUNING GUIDE 4 Equalizing the Loaded/Unloaded Vehicle Top Speed on Flat Ground The controller and vehicle should be configured as follows prior to setting the maximum vehicle speed: • DRIVE C/L as established in tuning procedure 3 • FIELD RAMP • FLD MAP START • FIELD MIN = 50% = 20% of the specified drive current limit = manufacturer’s specified minimum or 3 amps • The vehicle can be loaded or loaded If full closed loop speed control is required in both loaded and unloaded operation, conduct th
5 — TUNING GUIDE step 4. In this case, the vehicle’s top speed is being limited by the field mapping parameters. Observe the Arm Current in the Monitor menu, and set the FIELD MAP START to a value above the Arm Current reading. Reduce the M1 FWD FLD MIN until the Speed Input shows the programmed maximum speed (i.e., the speed set by M1 FWD SPEED) and the Arm PWM reading drops below 100%, indicating that the controller is in closed loop speed control.
5 — TUNING GUIDE FINE TUNING Seven additional vehicle performance characteristics can be adjusted: 6 7 8 9 bk bl bm Response to Increased Throttle Response to Full Throttle Release (Compression Braking) Transitioning from Flat Ground to Downhill Hill Climbing WalkAway™ Braking Low-Speed Field Braking Applying the EM Brake. These characteristics are related to the “feel” of the vehicle and will be different for various applications.
5 — TUNING GUIDE 7 Response to Full Throttle Release (Compression Braking) The way the vehicle responds when the throttle is completely released can be modified using the DECEL, REGEN C/L, brake mapping, and negative field mapping parameters. Braking parameters should be set for M1 and M2 forward speeds and for reverse speed.
5 — TUNING GUIDE Note: BRAKE MIN and BRAKE MAX are percentages of REGEN C/L. BRAKE MAP is a percentage of the range between BRAKE MIN and BRAKE MAX. 42 Curtis 1268 Manual, Rev.
5 — TUNING GUIDE 8 Transitioning from Flat Ground to Downhill To ensure smoothness on transitions from positive drive current to negative regen current, set the NEG FLD MAP ST (negative field map start) greater than zero to provide a constant value of field current as the motor transitions between drive and regen braking.
5 — TUNING GUIDE bk WalkAway™ Braking If the WalkAway™ option is configured, WalkAway™ braking will occur whenever vehicle movement is detected while the main contactor is open. In general this is used to prevent uncontrolled vehicle rolling after the vehicle has reached rest. It also is used to slow the vehicle if it is rolling when the keyswitch is turned off or in certain fault conditions that cause the main contactor to open.
5 — TUNING GUIDE step 1. Set the following parameters: = On • FLD BRAKE • FLD BRAKE MAX = FIELD MIN • FLD BRAKE SPD = a low value (e.g., 3 mph) • FLD BRAKE RATE = 2. step 2. Drive the vehicle up a grade. step 3. Release the throttle. The vehicle will slow down and then roll back down the hill under gravity. Depending on the setting of the WARNING OPTION parameter, you may hear beeping. If the vehicle is rolling too fast, increase the FLD BRAKE MAX setting.
5 — TUNING GUIDE detects that the vehicle has reached rest, or is starting to roll back, the EM brake will be applied immediately to prevent further vehicle movement. step 1. Set the following parameters: • FLD BRAKE = On • EMB DELAY = a low value (e.g., 3 seconds) • FLD BRAKE MAX = FIELD MIN, or higher • FLD BRAKE RATE = a low value (e.g., 2). step 2. Drive up a hill and release the throttle.
6 — DIAGNOSTICS & TROUBLESHOOTING 6 DIAGNOSTICS AND TROUBLESHOOTING The 1268 controller provides diagnostics information to assist technicians in troubleshooting drive system problems. This information is displayed on the handheld programmer (or PC Programming Station), and it is also available in the form of fault codes issued by the controller’s built-in Status LED and the optional remote LED driven by the controller’s external LED output.
6 — DIAGNOSTICS & TROUBLESHOOTING TROUBLESHOOTING CHART LED CODE PROGRAMMER LCD DISPLAY EXPLANATION POSSIBLE CAUSE 1,1 HW FAILSAFE Self-test or watchdog fault. 1. Controller defective. 1,2 THROTTLE FAULT 1 Wiper signal out of range (pot low fault). 1. Throttle input wire open. 2. Throttle input wire shorted to B+ or B-. 3. Throttle pot defective. 1,3 SPEED SENSOR FAULT No pulses from sensor. 1. Speed sensor not connected. 2. Speed sensor defective. 1,4 HPD High Pedal Disable fault. 1.
6 — DIAGNOSTICS & TROUBLESHOOTING TROUBLESHOOTING CHART, cont’d LED CODE PROGRAMMER LCD DISPLAY EXPLANATION POSSIBLE CAUSE 4,5 WELDED AUX RELAY Welded aux relay. 1. Aux relay stuck closed. 2. Aux relay shorted. 5,1 KEY SWITCH SRO SRO fault. 1. Keywswitch not off at power-up. 2. Keyswitch shorted. 5,2 MAIN COIL OPEN Missing main contactor. 1. Main contactor coil open or not connected. 5,3 AUX DRIVER ON Aux (EM brake or WalkAway™ relay) driver coil held low. 1. Aux output short to ground.
7 — MAINTENANCE 7 MAINTENANCE There are no user serviceable parts in the Curtis 1268 controller. No attempt should be made to open, repair, or otherwise modify the controller. Doing so may damage the controller and will void the warranty. It is recommended that the controller be kept clean and dry and that its diagnostics history file be checked and cleared periodically.
APPENDIX A: EMC & ESD DESIGN CONSIDERATIONS APPENDIX A VEHICLE DESIGN CONSIDERATIONS REGARDING ELECTROMAGNETIC COMPATIBILITY (EMC) AND ELECTROSTATIC DISCHARGE (ESD) ELECTROMAGNETIC COMPATIBILITY (EMC) Electromagnetic compatibility (EMC) encompasses two areas: emissions and immunity. Emissions are radio frequency (RF) energy generated by a product. This energy has the potential to interfere with communications systems such as radio, television, cellular phones, dispatching, aircraft, etc.
APPENDIX A: EMC & ESD DESIGN CONSIDERATIONS Conducted paths are created by the wires connected to the controller. These wires act as antennas and the amount of RF energy coupled into them is generally proportional to their length. The RF voltages and currents induced in each wire are applied to the controller pin to which the wire is connected. Curtis controllers include bypass capacitors on the printed circuit board’s throttle wires to reduce the impact of this RF energy on the internal circuitry.
APPENDIX A: EMC & ESD DESIGN CONSIDERATIONS Given the safety considerations involved in connecting electrical components to the chassis or frame in battery powered vehicles, such filtering will usually consist of a series inductor (or ferrite bead) rather than a shunt capacitor. If a capacitor is used, it must have a voltage rating and leakage characteristics that will allow the end product to meet applicable safety regulations.
APPENDIX B: A: PROGRAMMING EMC & ESD DESIGN DEVICES CONSIDERATIONS & MENUS APPENDIX B PROGRAMMING DEVICES & MENUS Curtis programmers provide programming, diagnostic, and test capabilities for the 1268 controller. The power for operating the programmer is supplied by the host controller via a 4-pin connector. When the programmer powers up, it gathers information from the controller. Two types of programming devices are available: the 1314 PC Programming Station and the 1313 handheld programmer.
APPENDIX A: B: EMC & ESD DESIGNDEVICES CONSIDERATIONS APPENDIX PROGRAMMING & MENUS The Program Menu and Monitor Menu are presented here. For Faults, see the Troubleshooting Chart in Section 6. The other programmer menus are self-explanatory. Program Menu (not all items available on all controllers) The 1268’s programmable parameters are listed here in the order in which they are displayed by the programming device.
A: PROGRAMMING EMC & ESD DESIGN CONSIDERATIONS APPENDIX B: DEVICES & MENUS Program Menu, cont’d REV BRAKE MAP % of Main C/L at midpoint of reverse brake map. REV BRK START Vehicle speed at start of reverse brake map. REV BRAKE END Vehicle speed at end of reverse brake map. M2 FWD SPEED Maximum forward speed in Mode 2. M2 ACCEL Forward acceleration rate in Mode 2. M2 DECEL Forward deceleration rate in Mode 2. M2 BRAKE MIN % of Main C/L at start of brake map, Mode 2.
APPENDIX A: B: EMC & ESD DESIGNDEVICES CONSIDERATIONS APPENDIX PROGRAMMING & MENUS Monitor Menu Items are listed here in the order in which they appear in the Monitor Menu displayed by the programmer. SPEED INPUT THROTTLE BATTERY VOLTS HEATSINK TEMP MODE ARM CURRENT FIELD CURRENT ARM PWM FIELD PWM FOOT INPUT KEY INPUT FORWARD INPUT REVERSE INPUT MODE SWITCH AUX CONTACTOR MAIN DRIVER Curtis 1268 Manual, Rev. D Speed reading. Throttle reading, as % of full throttle. Voltage at Logic Power (pin 4).
A: EMC & ESD DESIGN APPENDIX C: PARAMETER INDEX CONSIDERATIONS APPENDIX C PROGRAMMABLE PARAMETER INDEX The 1268 controller’s programmable parameters are listed below in alphabetical order (by programmer display name), with references provided to the parameter descriptions and to the appropriate Tuning Guide procedures. The parameters are described individually in Section 3. It is important also to read the tuning procedures in Section 5, as many parameters are highly interdependent with other parameters.
APPENDIX A: EMC & ESD APPENDIX DESIGND:CONSIDERATIONS SPECIFICATIONS APPENDIX D SPECIFICATIONS SPECIFICATIONS: 1268 CONTROLLER Nominal input voltage PWM operating frequency Electrical isolation to heatsink 36 V or 48V 16 kHz 500 V ac (minimum) Logic enable and logic power input voltage (minimum) Logic enable and logic power input current (no contactors engaged) 16.8 V 160 mA without programmer; 200 mA with programmer Logic input voltage Logic input current >20.0 V High; <7.