Model No. WLCCEX69571 Serial No. USER'S MANUAL Write the serial number in the space above for future reference. Serial Number Decal QUESTIONS? As a manufacturer, we are committed to providing complete customer satisfaction. If you have questions, or if there are missing or damaged parts, we will guarantee complete satisfaction through direct assistance from our factory. TO AVOID DELAYS, PLEASE CALL DIRECT TO OUR TOLLFREE CUSTOMER HOT LINE.
TABLE OF CONTENTS IMPORTANT PRECAUTIONS . . . . . . . . . . . . . . . . . . . . . . . . . . . . . . . . . . . . . . . . . . . . . . . . . . . . . . . . . . . . . . . . .3 BEFORE YOU BEGIN . . . . . . . . . . . . . . . . . . . . . . . . . . . . . . . . . . . . . . . . . . . . . . . . . . . . . . . . . . . . . . . . . . . . . . .4 PART IDENTIFICATION CHART . . . . . . . . . . . . . . . . . . . . . . . . . . . . . . . . . . . . . . . . . . . . . . . . . . . . . . . . . . . . . . .5 ASSEMBLY . . . . . . . . . .
IMPORTANT PRECAUTIONS WARNING: To reduce the risk of serious injury, read the following important precautions before using the exercise cycle. caught on the exercise cycle. Always wear athletic shoes for foot protection. 1. Read all instructions in this manual before using the exercise cycle. Use the exercise cycle only as described. 8. When adjusting the seat, insert the seat knob through one of the holes in the seat post (see the drawing on page 4). Do not insert the seat knob under the seat post. 2.
BEFORE YOU BEGIN Thank you for selecting the new WESLO® PURSUIT 795i exercise cycle. The PURSUIT 795i blends advanced engineering with contemporary styling to provide you with a low-impact workout in the convenience and privacy of your own home. (excluding holidays). To help us assist you, please mention the product model number and serial number when calling. The model number is WLCCEX69571.
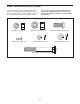
PART IDENTIFICATION CHART assembly. Note: Some parts may have been preattached for shipping purposes. If a part is not found in the parts bag, check to see if it has been pre-attached. Use the chart below for help identifying the small parts used in assembly. The number in parenthesis below each part refers to the key number of the part.
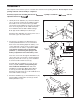
ASSEMBLY Place all parts of the exercise cycle in a cleared area and remove the packing materials. Do not dispose of the packing materials until assembly is completed. Assembly requires the included allen wrench adjustable wrenches . , a phillips screwdriver 1. Identify the Front Stabilizer (17), which has Wheels (25) on the ends. Hold the Front Stabilizer against the saddle on the front of the Frame (15). Make sure that the Front Stabilizer is turned so the square holes are facing away from the saddle.
4. Tighten the two Side Shield Screws (4) in the Left Side Shield (1). Next, tighten the two Side Shield Screws in the Right Side Shield (2). 4 40 Press the Side Shield Cover (40) onto the Left and Right Side Shields (1, 2). 2 1 4 5. Insert the Seat Post (20) into the Frame (15). Align one of the holes in the Seat Post with the hole in the Frame. Insert the Seat Knob (29) into the Frame and the Seat Post, and tighten the Seat Knob into the Frame.
HOW TO USE THE PURSUIT 795i HOW TO ADJUST THE SEAT HOW TO APPLY AN INFORMATION DECAL TO THE CONSOLE For effective exercise, the Seat (19) should be at the proper height. As you pedal, there 19 should be a slight bend in your knees when the pedals are in the lowest 20 position. To 29 adjust the Seat, first hold the 15 Seat and unscrew the Seat Knob (29). Align one of the holes in the Seat Post (20) with the hole in the Frame (15).
DIAGRAM OF THE CONSOLE 2. When the power is turned on, the Arrow console will begin displaying all modes in a repeating cycle (except for the pulse mode). Flashing arrows will show which mode is currently displayed. 3. To measure your pulse, stop pedalling and place your thumb on the pulse sensor as shown. The pulse sensor is pressure-activated—fully press down the pulse sensor. Do not press too hard, or the circulation in your thumb will be restricted, and your pulse will not be detected.
CONDITIONING GUIDELINES Aerobic Exercise The following general guidelines will help you to plan your exercise program. Remember that proper nutrition and adequate rest are essential for successful results. If your goal is to strengthen your cardiovascular system, your exercise must be “aerobic.” Aerobic exercise is activity that requires large amounts of oxygen for prolonged periods of time. This increases the demand on the heart to pump blood to the muscles, and on the lungs to oxygenate the blood.
MAINTENANCE AND TROUBLE-SHOOTING HOW TO ADJUST THE REED SWITCH Inspect and tighten all parts of the exercise cycle regularly. Replace any worn parts immediately. If the console does not display correct feedback, the reed switch should be adjusted. In order to adjust the reed switch, the Left Side Shield (1) must be removed. Using an adjustable wrench, turn the Left Pedal (28) The exercise cycle can be cleaned with a soft, damp cloth. Avoid spilling liquid on the console.
HOW TO ADJUST THE RESISTANCE STRAP Next, use an adjustable wrench to turn 16 the right pedal counterclockwise and remove it. Remove the right side shield. Press down on the centre of the Belt (16) between the front and rear pulleys. There should be from 1/4” to 3/4” (6 to 19mm) of vertical movement in the centerre of the Belt. If there is not enough pedalling resistance when the resistance knob is turned to the highest setting, the Resistance Strap (47) may need to be adjusted.
PART LIST—Model No. WLCCEX69571 Key No. Qty. 1 2 3 4 5 6 7 8 9 10 11 12 13 14 15 16 17 18 19 20 21 22 23 24 25 26 27 28 29 30 31 1 1 2 4 1 2 1 5 7 1 1 1 1 1 1 1 1 1 1 1 3 1 1 2 2 2 2 1 1 4 4 Description Key No. Qty.
EXPLODED DRAWING—Model No.
HOW TO ORDER REPLACEMENT PARTS To order replacement parts, simply call our Customer Service Department toll-free at 1-888-936-4266, Monday– Friday, 8:00 am–6:30 pm EST (excluding holidays).
LIMITED WARRANTY ICON OF/DU CANADA INC., (ICON), warrants this product to be free from defects in workmanship and material, under normal use and service conditions, for a period of ninety (90) days from the date of purchase. This warranty extends only to the original purchaser. ICON's obligation under this warranty is limited to replacing or repairing, at ICON's option, the product at one of its authorised service centres.