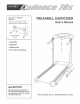
Modet No. 831.295020 SeriaJ No. User's Manual Write the seriaU number in the space above for future reference, SeriaUNumber DecaU Assembly Operation Maintenance Part List and Drawing Read aH precautions and instrueo tions in this manual before using this equipment. Save this rnanuaJ for future reference. Sears, Roebuck and Co.
TABLE OF CONTENTS iMPORTANT PRECAUTIONS ................................................................ BEFORE YOU BEGIN ...................................................................... ASSEMBLY .............................................................................. OPERATION AND ADJUSTMENT ............................................................. HOW TO FOLD AND MOVE THE TREADMILL ................................................. MAINTENANCE AND TROUBLESHOOTING ...........................
16. The treadmill is capable of high speeds. Adjust the speed in srnaH increments to avoid sudden jumps in speed. 17. Never leave the treadmill 21. inspect and properly treadmill regularly. aH parts of the 22. Never drop or insert any object into any opening. unattended while it is running. Always remove the key and unplug the power cord when the treadmill is not in gee. r'_ _ mr"_ _ n, 23. tLJ_ J_,_ _M, cord immediately the treadmill, and maintenance and described in this 18.
BEFORE YOU BFGmN Thank you for selecting the WESLO _ CADENCE 78S treadmill, The CADENCE 78S treadmill combines ing this manual, call 1-800-4-MY-HOME _ (1-800-4694663),To help us assist you, please note the product model number and serial number before calling, The model number of the treadmill is 831,295020, The serial number can be found on a decal attached to the advanced technology with innovative design to let you enjoy an excellent form of cardiovascular exercise in the convenience and privacy of you
ASSEMBLY Assembly requires two persons.
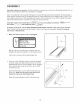
3, ff there are pUastic ties in the brackets on the Handrails (4), remove the plastic ties, HoUdone of the Handrails near the right Upright (38) as shown, [nsert the Wire Harness (53) up through the bracket on the Handrail and out of the round hoUein the side of the Handrail, ff neces- 4\ Connectors \ sary, use needUenose pliers to pull the Wire Harness out of the hoUe, Be carefu[ not to damage the Wire Harness.
6, Set the Console (11) in the Console Base (87), Make sure that no wires are pinched, insert as much of the Wire Harness (53) as possible down into the hole in the right Handrail (4), Securely tighten the plastic tie nearest to the right Handrail.
OPERATION THE PERFORMANT AND ADJUSTMENT LUBE TM WALKING BELT of electric shock, This product is equipped with a cord having an equipment-grounding conductor and a grounding plug. Plug the power cord into a surge suppressor, and plug the surge suppressor into an appropriate outlet that is properly installed and grounded in accordance with aH JocaJ codes and ordinances, important: The treadmill is not compatible with GFCm-equipped outlets.
DIAGRAM OF THE CONSOLE Displays Ijq:s8 H_ARY RATE TRAINING ZONES 20 125 145 165 30 120 138 155 40 115 130 145 50 110 125 140 60 105 118 130 TIME 3m_ DISTANCE CALORIES _p_ WARNING: SPEED To r_duce risk al sedoas ri_,,y, s_ndon f_o_rails befure cad otis, beFo Keep 70 95 110 125 80 90 103 115 POWER INCLINE z s_ar_ing al/d treadmill understand the user's ,r,ar,ual, all ms_ruc- children away DIGITALSPEED N z a_d he wanli,_gs e use V T incline ControU Speed Co
As you exercise, change the speed of the walking beR as desired by pressing the Speed buttons. Each time a button is pressed, the speed setting wifl change by 0.1 mph; if a button is held down, the speed setting wifl change in increments of 0.5 mph. Note: The console can display speed and distance in either miles or kiJometers (see CALORIES/SPEED DISPLAY at the right}. For simpJicity, all instructions in this section refer to mites.
HOW TO FOLD AND MOVE THE TREADMILL HOW TO FOLD THE TREADMmLL FOR STORAGE Before foUding the treadmHU,unpUug the power cord. CAUTION: You must be able to safety lift 45 pounds (20 kg} to raise, tower or move the treadmill. 1. HoUdthe treadmHUwith your hands in the Uocations shown at the right. To decrease the possibility of injury, bend your legs and keep your back straight. As you raise the treadmil!, make sure to lift with your tegs rather than your back.
MAINTENANCE AND TROUBLESHOOTmNG Most treadmill problems can be solved by following the simple steps below. Find the symptom that applies, and follow the steps tisted, mffurther assistance is needed, call toil-free 1-800-4-MY-HOME _; (1-800-469-4663}.
PROBLEM: The walking SOLUTION: a. Use only a single-outlet surge suppressor that meets all of the specifications described on page 8. b, belt stows when walked on if the walking belt is overtightened, treadmill performance may decrease and the walking belt may become damaged. Remove the key and UNPLUG THE POWER CORD. Using the allen wrench, turn both rear roUleradjustment bolts counterclockwise, 1/4 of a turn.
CONDmONmNG GUIDEUNES Aerobic Exercise WARNING: Before beg ,,oi,,g if your goal is to strengthen your cardiovascular system, your exercise must be "aerobic," Aerobic exercise is activity that requires large amounts of oxygen for prolonged periods of time, This increases the demand on the heart to pump blood to the muscles, and on the lungs to oxygenate the blood, For aerobic exercise, adjust the speed and incline of the treadmill until your heart rate is near the highest number in your training zone, it
Training Zone Exercise to cool down, This wiii increase the flexibility of your muscles and will help to prevent post-exercise problems, After warming up, increase the intensity of your exercise until your pulse is in your training zone for 20 to 60 minutes, (During the first few weeks of your exercise program, do not keep your pulse in your training zone for longer than 20 minutes,) Breathe regularly and deeply as you exercise--never hold your breath, EXERCISE FREQUENCY To maintain or improve your cond
PART iDENTiFiCATiON CHART Remove this chart and use it to identify stoat[ parts during assembly. Save this chart and the EXPLODED DRAWiNG/PART LiST for future reference.
PART UST Model Key No. 1 2 3 4 5 6 7 8 9 10 11 12 13 14 15 16 17 18 19 20 21 22 23 24 25 26 27 28 29 3O 31 32 33 34 35 36 37 38 39 4O 41 42 43 44* 45 46 47 48 49* 5O 51 52 53 Qty. 4 6 2 2 24 1 1 1 2 1 1 1 1 2 2 4 4 1 2 1 1 1 1 1 1 1 5 17 1 1 2 2 4 1 1 2 2 1 4 8 2 2 6 2 1 1 1 1 1 1 4 1 1 No. 831.
m x "o 0 _- ii m , 66 18 7 30 29 "_" 28 I ' 31 ",_i ', i 36 ',I : 37 0 76• _.-33 91 47 45 43 & 28 0 2_ _ :14 t 73 67 10 70 Z 9 5O 14 57 • 37 36 ! \95 9_ 6O ............... " 33 51 ,///" 83 64 ¢0 O_ 0 , /// /// / 0 "" 54 55 81 56 55 54 :30 o .
Your Home For repair- in your home - of all major brand appliances, lawn and garden equipment, or heating and cooling systems, no matter who made it, no matter who sold it! For the replacement parts, accessories, and user's manuals that you need to do-it-yourself. For Sears professional installation of home appliances and items like garage door openers and water heaters. 1-800-4-MY-HOME ® Anytime, day or night (U.S.A. and Canada) www.sears.ca (1-800-469-4663) www.sears.