Model No. IMTL15905.0 Serial No. Find the serial number in the location shown below. Write the serial number in the space above for reference. USER'S MANUAL Serial Number Decal QUESTIONS? As a manufacturer, we are committed to providing complete customer satisfaction. Visit If you our website at have questions, or if parts are damaged or missing, PLEASE www.proform.com CONTACT OUR CUSTOMER new products, prizes, SERVICE DEPARTMENT fitness tips, and much more! DIRECTLY. Visit our website at www.weslo.
TABLE OF CONTENTS IMPORTANT PRECAUTIONS . . . . . . . . . . . . . . . . . . . . . . . . . . . . . . . . . . . . . . . . . . . . . . . . . . . . . . . . . . . . . . . . .3 BEFORE YOU BEGIN . . . . . . . . . . . . . . . . . . . . . . . . . . . . . . . . . . . . . . . . . . . . . . . . . . . . . . . . . . . . . . . . . . . . . . .5 ASSEMBLY . . . . . . . . . . . . . . . . . . . . . . . . . . . . . . . . . . . . . . . . . . . . . . . . . . . . . . . . . . . . . . . . . . . . . . . . . . . . . . .
IMPORTANT PRECAUTIONS WARNING: To reduce the risk of burns, fire, electric shock, or injury to persons, read the following important precautions and information before operating the Incline Trainer. this manual and order part number 146148, or see your local electronics store. 1. It is the responsibility of the owner to ensure that all users of this incline trainer are adequately informed of all warnings and precautions. 12.
21. Do not change the incline of the Incline Trainer by placing objects under the Incline Trainer. buttons. However, when the next “chirp” is heard, the speed and/or incline will change to the next settings of the CD or video program. 26. Always remove iFIT.com CDs and videos from your CD player or VCR when you are not using them. 22. Use the upper body handles only at walking speeds. Using the handles and not holding the handrails may compromise your ability to maintain your balance.
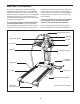
BEFORE YOU BEGIN Thank you for selecting the revolutionary IMAGE® ADVANCED 3000 Incline Trainer. The ADVANCED 3000 Incline Trainer offers a selection of features designed to make your workouts at home more enjoyable and effective. And when you’re not exercising, the unique ADVANCED 3000 Incline Trainer can be folded up, requiring less floor space. model number and serial number before calling. The model number of the incline trainer is IMTL15905.0.
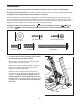
w (123)–2 3/4” Tek Screw (58)–4 1/2” Silver Screw (48)–1 Spacer Screw (60)–2 ASSEMBLY To hire an authorized service technician to assemble the Incline Trainer, call toll-free 1-800-445-2480. Assembly requires two persons. Set the Incline Trainer in a cleared area and remove all packing materials. Do not dispose of the packing materials until assembly is completed. Note: The underside of the Incline Trainer walking belt is coated with high-performance lubricant.
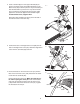
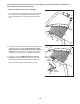
2. Insert a Handrail (67) into the Upper Handrail (68) as shown. The lower end of the Handrail should sit on the Base Hood (105) as shown. (Note: It may be necessary to twist the Handrail as you insert it. It may also be necessary to loosen the two Screws [3] several turns.) Next, tighten two 3/4” Screws (66) into the Handrail. If you loosened the Screws, retighten them. 2 68 3 66 67 Attach the other Handrail (not shown) to the left side of the Incline Trainer in the same way. 105 3.
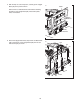
5. With the help of a second person, carefully tip the Upright Base (96) to the position shown. 5 Pallet Remove the four indicated bolts and washers attaching the pallet to the Upright Base (96). Discard the pallet, bolts, and washers. Bolts, Washers 96 Bolts, Washers 6. Attach the Upright Base Pad (103) and the six Base Pads (93) to the bottom of the Upright Base (96) with ten 3/4” Tek Screws (94) as shown.
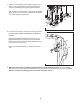
7. Tighten two 3” Bolts (98) with two Washers (97) into the bottom of the Upright Base (96) and the Handrails (67) (only one Handrail is shown). Firmly tighten the Bolts. 7 With the help of a second person, carefully tip the Upright Base (96) so it is flat on the floor. Remove the cardboard from underneath the Upright Base. 98 97 96 67 98 97 8. Fold the Incline Trainer to the storage position (see HOW TO FOLD THE INCLINE TRAINER FOR STORAGE on page 28).
If you purchase the optional chest pulse sensor (see page 27), follow the steps below to install the receiver included with the chest pulse sensor. 1. Make sure that the power cord is unplugged. 1 Look under the Console Back (69) and locate the Access Door (112) on the indicated side of the Incline Trainer. Remove the Access Door Screw (72) and the Access Door. 112 72 2. Connect the wire on the receiver (A) to the indicated wire extending from the console.
OPERATION AND ADJUSTMENT THE PRE-LUBRICATED WALKING BELT tric shock. This product is equipped with a cord having an equipment-grounding conductor and a grounding plug. Plug the power cord into a surge suppressor, and plug the surge suppressor into an appropriate outlet that is properly installed and grounded in accordance with all local codes and ordinances. Important: The incline trainer is not compatible with GFCI-equipped outlets.
CONSOLE DIAGRAM Note: If there are sheets of clear plastic on the console, remove the plastic. Clip Key FEATURES OF THE CONSOLE stereo, portable stereo, computer, or VCR and play special iFIT.com CD and video programs (iFIT.com CDs and videocassettes are available separately). IFIT.com CD and video programs automatically control the speed and incline of the Incline Trainer as a personal trainer coaches you through every step of your workout. High-energy music provides added motivation.
HOW TO USE THE MANUAL MODE CAUTION: Before operating the console, read the following precautions. 1 • Do not stand on the walking belt when turning on the power. See HOW TO TURN ON THE POWER at the left. • Always wear the clip (see the drawing on page 12) while operating the Incline Trainer. 2 • The pulse sensor is not a medical device. Various factors, including the user’s movement, may affect the accuracy of heart rate readings.
4 Change the incline of the Incline Trainer as desired. Fat Calories/Calories/ Pulse display—This display shows the approximate numbers of fat calories and calories you have burned (see FAT BURNING on page 33). The display will alternate between one value and the other every few seconds, as shown by the indicators below the display. The display will also show your heart rate when you use the handgrip pulse sensor or the optional chest pulse sensor.
To reset the displays, press the Stop button, remove the key, and then reinsert the key. 6 8 CAUTION: Do not use the upper body handles until you are comfortable using the Incline Trainer without the upper body handles. Measure your heart rate if desired. To use the opMetal Contacts tional chest pulse sensor, see the instructions included with the chest pulse sensor. To use the handgrip pulse sensor, see the instructions below.
3 HOW TO USE A SPEED PROGRAM OR AN INCLINE PROGRAM A moment after the button is pressed, the Incline Trainer will automatically adjust to the first speed and incline settings for the program. Hold the handrails and begin walking. The console offers 5 speed programs and 10 incline programs. All 15 programs automatically control the speed and the incline of the Incline Trainer as they guide you through effective workouts.
The program will continue until the setting for the last segment is shown in the Current Segment column and the last segment ends. The walking belt will then slow to a stop. 6 See step 7 on page 15. 7 If the speed or incline setting is too high or too low at any time during the program, you can manually override the setting by pressing the Speed or Incline buttons.
Segment column of the matrix. (The incline settings will not be shown in the matrix.) To program a speed setting and an incline setting for the first segment, simply adjust the speed and incline of the Incline Trainer as desired by pressing the Speed and Incline buttons. Every few times a Speed button is pressed, an additional indicator will light or darken in the Current Segment column.
next several segments will be shown in the columns to the right. HOW TO USE A CUSTOM PROGRAM Follow the steps below to use a custom program. 1 When only three seconds remain in the first segment of the program, both the Current Segment column and the column to the right will flash and a tone will sound. If the speed and/or incline of the Incline Trainer is about to change, the Speed/Pace display and/or the Incline/Elevation display will flash to alert you, and three tones will sound.
6 Turn on the fans if desired. HOW TO USE A PULSE PROGRAM See step 7 on page 15. 7 CAUTION: Use the upper body handles if desired. If you have heart problems, or if you are over 60 years of age and have been inactive, do not use the pulse programs. If you are taking medication regularly, consult your physician to find whether the medication will affect your exercise heart rate. See step 8 on page 15. 8 When you are finished exercising, remove the key. See step 8 on page 17.
5 Enter a maximum speed setting. matically increase or decrease to bring your heart rate closer to the target heart rate. If the speed reaches the maximum speed setting of the program (see step 5 on this page) and your heart rate is still too far below the current target heart rate, the incline of the Incline Trainer will also increase to bring your heart rate closer to the target heart rate.
HOW TO CONNECT THE INCLINE TRAINER TO YOUR CD PLAYER, VCR, OR COMPUTER To use iFIT.com CDs, the Incline Trainer must be connected to your portable CD player, portable stereo, home stereo, or computer with CD player. See pages 22 and 23 for connecting instructions. To use iFIT.com videocassettes, the Incline Trainer must be connected to your VCR. See page 24 for connecting instructions. To use iFIT.com programs directly from our Web site, the Incline Trainer must be connected to your computer. See page 23.
HOW TO CONNECT YOUR HOME STEREO HOW TO CONNECT YOUR COMPUTER Note: If your stereo has an unused LINE OUT jack, see instruction A below. If the LINE OUT jack is being used, see instruction B. Note: If your computer has a 3.5mm LINE OUT jack, see instruction A. If your computer has only a PHONES jack, see instruction B. A. Plug one end of the audio cable into the jack on the front of the Incline Trainer near the power cord. Plug the other end of the cable into the included adapter.
HOW TO CONNECT YOUR VCR HOW TO USE AN IFIT.COM CD OR VIDEO PROGRAM Note: If your VCR has an unused AUDIO OUT jack, see instruction A below. If the AUDIO OUT jack is being used, see instruction B. If you have a TV with a built-in VCR, see instruction B. If your VCR is connected to your home stereo, see HOW TO CONNECT YOUR HOME STEREO on page 23. To use iFIT.
• Adjust the volume of your CD player or VCR. If the volume is too high or too low, the console may not detect the program signals. During the CD or video program, an electronic “chirping” sound will alert you when the speed and/or incline of the Incline Trainer is about to change. CAUTION: Always listen for the “chirp” and be prepared for speed and/or incline changes. In some instances, the speed and/or incline may change before the personal trainer describes the change.
“chirping” sound will alert you when the speed and/or incline of the Incline Trainer is about to change. CAUTION: Always listen for the “chirp” and be prepared for speed and/or incline changes. HOW TO USE A PROGRAM DIRECTLY FROM OUR WEB SITE To use programs from our Web site, the Incline Trainer must be connected to your home computer. See HOW TO CONNECT YOUR COMPUTER on page 23. In addition, you must have an internet connection and an internet service provider.
THE INFORMATION MODE/DEMO MODE THE OPTIONAL CHEST PULSE SENSOR The console features an information mode that keeps track of the total number of miles that the walking belt has moved and the total number of hours that the Incline Trainer has been operated. The information mode also allows you to switch the console from miles to kilometers. In addition, the information mode allows you to turn on and turn off the demo mode. An optional chest pulse sensor adds even more features to the console.
HOW TO FOLD AND MOVE THE INCLINE TRAINER HOW TO FOLD THE INCLINE TRAINER FOR STORAGE Before folding the Incline Trainer, adjust the incline to the lowest position. If this is not done, the Incline Trainer may be permanently damaged. Remove the key and unplug the power cord. CAUTION: You must be able to safely lift 45 pounds (20 kg) to raise, lower, or move the Incline Trainer. 1. Hold the Incline Trainer with your hands in the location shown by the arrow at the right.
HOW TO LOWER THE INCLINE TRAINER FOR USE 1. Hold the upper end of the Incline Trainer with your right hand as shown. Using your left hand, pull the latch knob to the left and hold it. Pivot the Incline Trainer down until the frame is past the pin on the latch knob. Knob 2. Hold the Incline Trainer firmly with both hands, and lower the Incline Trainer to the floor. To decrease the possibility of injury, bend your legs and keep your back straight.
TROUBLESHOOTING Most Incline Trainer problems can be solved by following the steps below. Find the symptom that applies, and follow the steps listed. If further assistance is needed, see the front cover of this manual. PROBLEM: The power does not turn on SOLUTION: a. Make sure that the power cord is plugged into a surge suppressor, and that the surge suppressor is plugged into a properly grounded outlet (see page 11).
Locate the Reed Switch (20) and the Magnet (8) on the left side of the Pulley (7). Turn the Pulley until the Magnet is aligned with the Reed Switch. Make sure that the gap between the Magnet and the Reed Switch is about 1/8”. If necessary, loosen the Screw (21), move the Reed Switch slightly, and then retighten the Screw. Reattach the Hood (37), making sure that the Screws (3, 70) are inserted into the same holes from which they were removed.
PROBLEM: The incline of the Incline Trainer does not change correctly or does not change when iFIT.com CDs and videocassettes are used SOLUTION: a. With the key in the console, press one of the Incline buttons. While the incline is changing, remove the key. After a few seconds, reinsert the key. The Incline Trainer will automatically rise to the maximum incline level and then return to the minimum level. This will recalibrate the incline system.
CONDITIONING GUIDELINES WARNING: Before beginning this or any exercise program, consult your physician. This is especially important for individuals over the age of 35 or individuals with preexisting health problems. The pulse sensor is not a medical device. Various factors, including the user’s movement, may affect the accuracy of heart rate readings. The pulse sensor is intended only as an exercise aid in determining heart rate trends in general.
PART LIST—Model No. IMTL15905.0 R0905A To locate the parts listed below, see the EXPLODED DRAWING attached in the center of this manual. Key No. Qty. 1 2 3 4 5 6 7 8 9 10 11 12 13 14 15 16 17 18 19 20 21 22 23 24 25 26 27 28 29 30 31 32 33 34 35 36 37 38 39 40 41 42 43 44 45 46 47 48 49 50 51 2 1 23 2 2 1 1 1 2 2 2 2 9 1 1 1 1 1 1 1 5 1 1 1 2 2 2 1 2 2 1 14 1 4 1 1 1 1 2 1 2 4 1 4 4 4 1 18 2 1 2 Description Key No. Qty.
Key No. Qty.
51 131 52 120 52 53 13 5 50 54 49 42 55 51 53 5 48 131 47 120 57 56 46 45 53 49 128 1 54 58 52 42 42 55 44 39 41 2 121 46 45 15 16 59 52 13 43 12 120 11 18 42 4 14 122 17 53 1 7 13 10 11 19 76 9 123 46 45 20 8 21 22 6 44 23 3 41 39 125 32 124 70 40 24 31 70 12 46 45 9 120 25 26 3 27 77 4 13 13 91 3 10 26 27 32 70 34 35 33 28 29 34 32 134 133 70 32 66 32 135 38 129 32 32 86 3 3 3 36 126
54 97 93 98 60 3 94 93 99 67 61 96 94 3 3 62 93 13 3 94 3 99 93 95 94 3 54 67 3 93 3 87 94 90 3 97 3 3 98 100 65 64 94 90 87 13 93 94 103 116 89 88 3 68 116 117 48 94 94 101 48 85 60 94 63 102 13 82 69 30 84 104 83 71 82 71 30 105 71 83 81 106 71 71 107 108 109 78 71 71 112 72 71 71 132 3 78 92 78 114 80 119 111 110 73 48 74 79 113 81 118 80 78 74 75 115 71 21 71 21 66 130 71 EXPLODED DRAWING—Mod
ORDERING REPLACEMENT PARTS To order replacement parts, see the front cover of this manual. When ordering parts, please be prepared to give the following information: • the MODEL NUMBER OF THE PRODUCT (IMTL15905.