Model No. WETL17105.0 Serial No. Serial Number Decal QUESTIONS? As a manufacturer, we are committed to providing complete customer satisfaction. If you have questions, or if there are missing or damaged parts, please contact the establishment where you purchased this product. CAUTION Read all precautions and instructions in this manual before using this equipment. Save this manual for future reference.
TABLE OF CONTENTS IMPORTANT PRECAUTIONS . . . . . . . . . . . . . . . . . . . . . . . . . . . . . . . . . . . . . . . . . . . . . . . . . . . . . . . . . . . . . . . . .3 BEFORE YOU BEGIN . . . . . . . . . . . . . . . . . . . . . . . . . . . . . . . . . . . . . . . . . . . . . . . . . . . . . . . . . . . . . . . . . . . . . . .5 ASSEMBLY . . . . . . . . . . . . . . . . . . . . . . . . . . . . . . . . . . . . . . . . . . . . . . . . . . . . . . . . . . . . . . . . . . . . . . . . . . . . . . .
IMPORTANT PRECAUTIONS WARNING: To reduce the risk of burns, fire, electric shock, or injury to persons, read the following important precautions and information before operating the treadmill. 1. It is the responsibility of the owner to ensure that all users of this treadmill are adequately informed of all warnings and precautions. 11. If an extension cord is needed, use only a 3conductor, 1mm2 (14-gauge) cord that is no longer than 1.5 m (5 ft.). 2. Use the treadmill only as described. 12.
21. Inspect and properly tighten all parts of the treadmill regularly. scribed in this manual. Never remove the motor hood unless instructed to do so by an authorized service representative. Servicing other than the procedures in this manual should be performed by an authorized service representative only. 22. Never drop or insert any object into any opening. 23. DANGER: Always unplug the power 24. This treadmill is intended for in-home use only.
BEFORE YOU BEGIN using the treadmill. If you have questions after reading this manual, please see the front cover of this manual. To help us assist you, note the product model number and serial number before calling. The model number of the treadmill is WETL17105.0. The serial number can be found on a decal attached to the treadmill (see the front cover of this manual for the location). Thank you for selecting the WESLO® CADENCE A45 treadmill.
ASSEMBLY Assembly requires two persons. Set the treadmill in a cleared area and remove all packing materials. Do not remove the long wire inside of the right handrail yet. In addition, do not dispose of the packing materials until assembly is completed. Note: The underside of the treadmill walking belt is coated with high-performance lubricant. During shipping, a small amount of lubricant may be transferred to the top of the walking belt or the shipping carton. This does not affect treadmill performance.
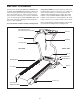
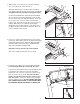
3. With the help of a second person, raise the Handrails (6, 7) so the Base (71) is flat on the floor. 3 7 6 Attach the Wheels (15) to the inner sides of the Base (71) with two Wheel Bolts (14) and two Nuts (17). Do not overtighten the Nuts; the Wheels should turn freely. 14 15 55 Position the treadmill Frame (55) between the Handrails (6, 7) as shown. See the inset drawing. Locate the wire tie in the lower end of the Right Handrail (6).
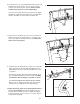
6. Set the Console (1) on the Right Handrail (6) and the Left Handrail (not shown). Start four Console Screws (70) (only two are shown) into the Console. After you have started all four Console Screws, tighten them. 6 1 Insert the excess Wire Harness (22) down into the Right Handrail (6). Tighten the three plastic ties around the Wire Harness, and then cut off the ends of the plastic ties. 22 Plastic Ties 70 6 7. Attach the Console Back (4) to the Console (1) with four 16mm Screws (87).
OPERATION AND ADJUSTMENT THE PRE-LUBRICATED WALKING BELT Your treadmill features a walking belt coated with high-performance lubricant. IMPORTANT: Never apply silicone spray or other substances to the walking belt or the walking platform. Such substances will deteriorate the walking belt and cause excessive wear. HOW TO PLUG IN THE POWER CORD This product must be earthed.
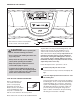
DIAGRAM OF THE CONSOLE Note: If there is a sheet of clear plastic on the console, remove the plastic. Clip Key CAUTION: Before operating the console, read the following precautions. • Do not stand on the walking belt when turning on the power. • Always wear the clip (see the drawing above) while operating the treadmill. • Adjust the speed in small increments to avoid sudden jumps in speed. clip attached to the key (see the drawing above), and slide the clip securely onto the waistband of your clothes.
hold down the Stop button for a few seconds. An “E” for English miles or an “M” for metric kilometers will appear in the priority display. Press the Digital Speed increase button to change the unit of measurement if desired. When the desired unit of measurement is selected, remove the key and then reinsert it. To stop the walking belt, press the Stop button. The time will begin to flash in the display.
HOW TO FOLD AND MOVE THE TREADMILL HOW TO FOLD THE TREADMILL FOR STORAGE 1 Unplug the power cord. CAUTION: You must be able to safely lift 20 kg (45 lbs.) to raise, lower, or move the treadmill. 1. Hold the metal frame firmly in the location shown by the arrow at the right. CAUTION: To decrease the possibility of injury, do not lift the frame by the plastic foot rails. Make sure to bend your legs and keep your back straight. As you raise the frame, make sure to lift with your legs rather than your back.
MAINTENANCE AND TROUBLESHOOTING Most treadmill problems can be solved by following the steps below. Find the symptom that applies, and follow the steps listed. If further assistance is needed, please see the front cover of this manual. PROBLEM: The power does not turn on SOLUTION: a. Make sure that the power cord is plugged into a properly earthed outlet. (See page 9.) If an extension cord is needed, use only a 3-conductor, 1 mm2 (14-gauge) cord that is no longer than 1.5 m (5 ft.).
PROBLEM: The walking belt slows when walked on SOLUTION: a. If an extension cord is needed, use only a 3-conductor, 1mm2 (14-gauge) cord that is no longer than 1.5 m (5 ft.). b. If the walking belt is overtightened, treadmill performance may decrease and the walking belt may become damaged. Remove the key and UNPLUG THE POWER CORD. Using the hex key, turn both rear roller bolts counterclockwise, 1/4 of a turn.
CONDITIONING GUIDELINES is activity that requires large amounts of oxygen for prolonged periods of time. This increases the demand on the heart to pump blood to the muscles, and on the lungs to oxygenate the blood. For aerobic exercise, adjust the speed and incline of the treadmill until your heart rate is near the highest number in your training zone. WARNING: Before beginning this or any exercise program, consult your physician.
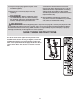
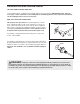
2 3/4” Bolt (47)–4 Star Washer (81)–4 Washer (29)–4 PART IDENTIFICATION CHART Handrail Washer (11)–2 4” Bolt (120)–2 Remove this chart and use it to identify small parts during assembly. Save this chart and the EXPLODED DRAWING/PART LIST for future reference.
PART LIST—Model No. WETL17105.0 Key No. Qty.
51 51 64 63 20 85 83 75 21 85 67 11 93 45 24 86 47 52 37 67 29 86 75 93 45 72 78 52 28 75 26 27 63 11 47 75 16 85 52 76 69 52 64 85 57 83 52 20 54 31 77 52 52 49 48 55 56 46 81 84 76 62 94 69 68 50 53 94 43 58 31 33 26 59 9 36 38 68 52 34 61 27 79 39 77 20 9 20 8 32 35 80 91 5 20 92 74 25 23 82 45 93 74 8 74 91 93 82 45 5 20 74 8 8 18 20 40 73 91 65 91 8 66 3 88 73 40 90 89 91 44 30 10 87 42
ORDERING REPLACEMENT PARTS To order replacement parts, please contact the establishment where you purchased this product. To help us assist you, be prepared to provide the following information: • the MODEL NUMBER of the product (WETL17105.0) • the NAME of the product (WESLO CADENCE A45 treadmill) • the SERIAL NUMBER of the product (see the front cover of this manual) • the KEY NUMBER and DESCRIPTION of the part(s) (see the PART LIST and EXPLODED DRAWING in the center of this manual) Part No.