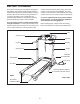
Model No. WLTL39806.0 Serial No. USER'S MANUAL Serial Number Decal QUESTIONS? As a manufacturer, we are committed to providing complete customer satisfaction. If you have questions, or if parts are damaged or missing, PLEASE CONTACT OUR CUSTOMER SERVICE DEPARTMENT DIRECTLY. CALL TOLL-FREE: 1-866-699-3756 Mon.–Fri., 6 a.m.–6 p.m. MST ON THE WEB: www.wesloservice.com CAUTION Read all precautions and instructions in this manual before using this equipment. Save this manual for future reference.
TABLE OF CONTENTS IMPORTANT PRECAUTIONS . . . . . . . . . . . . . . . . . . . . . . . . . . . . . . . . . . . . . . . . . . . . . . . . . . . . . . . . . . . . . . . .3 BEFORE YOU BEGIN . . . . . . . . . . . . . . . . . . . . . . . . . . . . . . . . . . . . . . . . . . . . . . . . . . . . . . . . . . . . . . . . . . . . . .5 ASSEMBLY . . . . . . . . . . . . . . . . . . . . . . . . . . . . . . . . . . . . . . . . . . . . . . . . . . . . . . . . . . . . . . . . . . . . . . . . . . . . . . .
IMPORTANT PRECAUTIONS WARNING: To reduce the risk of burns, fire, electric shock, or injury to persons, read the following important precautions and information before operating the treadmill. manual and order part number 146148, or see your local electronics store. 1. It is the responsibility of the owner to ensure that all users of this treadmill are adequately informed of all warnings and precautions. 12.
21. When folding or moving the treadmill, make sure that the storage latch is fully closed. tenance and adjustment procedures described in this manual. Never remove the motor hood unless instructed to do so by an authorized service representative. Servicing other than the procedures in this manual should be performed by an authorized service representative only. 22. Inspect and properly tighten all parts of the treadmill regularly. 23. Never insert any object into any opening. 24.
BEFORE YOU BEGIN Thank you for selecting the new WESLO® Cadence 50 SE treadmill. The Cadence 50 SE treadmill combines advanced technology with innovative design to help you get the most from your exercise in the convenience of your home. And when you’re not exercising, the Cadence 50 SE treadmill can be folded up, requiring less than half the floor space of other treadmills. number and serial number before calling. The model number of the treadmill is WLTL39806.0.
ASSEMBLY To hire an authorized service technician to assemble the treadmill, call toll-free 1-800-445-2480. Assembly requires two persons. Set the treadmill in a cleared area and remove all packing materials; do not dispose of the packing materials until assembly is completed. Note: The underside of the treadmill walking belt is coated with high-performance lubricant. During shipping, a small amount of lubricant may be transferred to the top of the walking belt or the shipping carton.
2. Attach two Round Base Pads (57) and an Extension Leg Pad (61) to the Upright Base (69) and Extension Leg (63) with four 1" Tek Screws (39) as shown. 2 57 69 63 39 39 61 3. Attach a Wheel (66) to the Upright Base (69) with a Wheel Bolt (64) and a Nut (13) as shown. Do not overtighten the Wheel Bolt; the Wheel should turn freely. 39 3 64 66 69 With the help of a second person, carefully tip the treadmill onto its other side. 13 4. Partially fold the Frame (86) so the treadmill is more stable.
5. Attach two Round Base Pads (57) and an Extension Leg Pad (61) to the Upright Base (69) and Extension Leg (63) with four 1" Tek Screws (39) as shown. 5 69 57 63 39 39 39 6. Attach a Wheel (66) to the Upright Base (69) with a Wheel Bolt (64) and a Nut (13) as shown. Do not overtighten the Wheel Bolt; the Wheel should turn freely. 61 6 64 66 69 With the help of a second person, carefully tip the treadmill up so the Round Base Pads (57) are on the floor. 57 13 7.
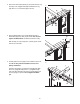
8. With the help of a second person, hold the Console Base (47) near the Left Handrail (71). Attach the end of the ground wire to the indicated small hole in the Left Handrail with the Silver Ground Screw (75). 8 Ground Wire 47 Small Hole 75 71 9. Touch the Right Handrail (72) to discharge any static. Slide the sleeve off the connector on the Upright Wire (42) as shown in the inset drawing. Next, press the end of the Upright Wire into the socket in the bottom of the Console Base (47).
11.Cover the Upright Wire (42) with the Right Grip Plate (36). Be careful not to pinch the Upright Wire. Tighten two 1/2" Screws (48) and a 3/4" Screw (2) into the Right Grip Plate and the Console Base (47). 11 47 42 36 2 48 12.Carefully lower the Left and Right Handrails (71, 72) until they are touching the floor. 12 107, 108 See the lower drawing. Position the Uprights (107, 108) so that the treadmill Frame (86) is centered between the Uprights.
OPERATION AND ADJUSTMENT THE PRE-LUBRICATED WALKING BELT Your treadmill features a walking belt coated with highperformance lubricant. IMPORTANT: Never apply silicone spray or other substances to the walking belt or the walking platform. Such substances will deteriorate the walking belt and cause excessive wear. HOW TO PLUG IN THE POWER CORD DANGER: Improper connection of the equipment-grounding conductor can result in an increased risk of electric shock.
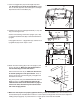
CONSOLE DIAGRAM Note: If there is a sheet of clear plastic on the console, peel off the plastic. Clip Key FEATURES OF THE CONSOLE In addition, the console features four preset programs. Each program automatically controls the speed and incline of the treadmill as it guides you through an effective workout. The treadmill console offers several features designed to make each workout more effective and enjoyable. To use the manual mode of the console, follow the steps beginning on page 13.
HOW TO TURN ON THE POWER Plug in the power cord (see page 11). Next, locate the reset/off circuit breaker on the treadmill frame near the power cord. Make sure that the circuit breaker is in the “reset” position. If the Start button or the Speed + button is pressed, the walking belt will begin to move at 1 mph. As you exercise, change the speed of the walking belt as desired by pressing the Speed + and – buttons. Each time a button is pressed, the speed setting will change by 0.
To measure your heart rate, stand on the foot rails and hold the metal contacts on the handrail—avoid moving your hands. When your pulse is detected, the heart symbol in the display will flash each time your heart beats, one or two dashes will appear, and then your heart rate will be shown. For the most accurate heart rate reading, continue to hold the contacts for about 15 seconds.
When the first period is completed, all speed settings will move one column to the left. The speed setting for the second period will then be shown in the flashing Current Period column and the treadmill will automatically adjust to the speed and incline settings for the second period. Note: If all five of the indicators in the Current Period column are lit, the speed settings may move downward so that only the highest indicators appear in the matrix.
THE INFORMATION MODE from the console, and the display will remain lit; the buttons will not operate. If a “d” appears when the information mode is selected, press the Speed decrease button so the “d” disappears. The console features an information mode that keeps track of treadmill usage information and allows you to select a system of measurement. The upper left corner of the display will show the total number of hours that the treadmill has been used.
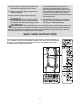
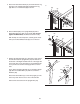
HOW TO FOLD AND MOVE THE TREADMILL HOW TO FOLD THE TREADMILL FOR STORAGE Before folding the treadmill, adjust the incline to the lowest position. If this is not done, the treadmill may become permanently damaged. Next, unplug the power cord. CAUTION: You must be able to safely lift 45 pounds (20 kg) to raise, lower, or move the treadmill. 1. Hold the metal frame firmly in the location shown by the arrow at the right.
HOW TO LOWER THE TREADMILL FOR USE 1. Hold the treadmill with your right hand as shown. Pull the latch knob to the left and hold it. Pivot the frame down until it is past the latch pin. Latch Knob Frame 2. Hold the metal frame firmly with both hands, and lower it to the floor. CAUTION: To decrease the possibility of injury, do not lower the frame by gripping only the plastic foot rails. Do not drop the frame to the floor. Make sure to bend your legs and keep your back straight.
TROUBLESHOOTING Most treadmill problems can be solved by following the steps below. Find the symptom that applies, and follow the steps listed. If further assistance is needed, please see the front cover of this manual. PROBLEM: The power does not turn on SOLUTION: a. Make sure that the power cord is plugged into a surge suppressor, and that the surge suppressor is plugged into a properly grounded outlet (see page 11).
PROBLEM: The walking belt slows when walked on SOLUTION: a. Use only a single-outlet surge suppressor that meets all of the specifications described on page 11. b. If the walking belt is overtightened, treadmill performance may decrease and the walking belt may become damaged. Remove the key and UNPLUG THE POWER CORD. Using the allen wrench, turn both rear roller bolts counterclockwise, 1/4 of a turn.
CONDITIONING GUIDELINES to use stored fat calories for energy. If your goal is to burn fat, adjust the speed and incline of the treadmill until your heart rate is near the lowest number in your training zone. WARNING: Before beginning this or any exercise program, consult your physician. This is especially important for individuals over the age of 35 or individuals with preexisting health problems.
SUGGESTED STRETCHES The correct form for several basic stretches is shown at the right. Move slowly as you stretch—never bounce. 1. Toe Touch Stretch Stand with your knees bent slightly and slowly bend forward from your hips. Allow your back and shoulders to relax as you reach down toward your toes as far as possible. Hold for 15 counts, then relax. Repeat 3 times. Stretches: Hamstrings, back of knees and back. 1 2. Hamstring Stretch Sit with one leg extended.
PART LIST—Model No. WLTL39806.0 Key No. Qty.
25 24 73 41 80 52 44 67 74 2 25 33 23 11 31 94 32 58 73 30 25 41 52 33 5 80 44 100 25 96 85 84 9 2 98 25 83 82 25 23 32 25 67 67 86 15 97 25 14 40 92 9 25 84 17 18 87 85 25 89 92 84 83 49 82 67 15 14 68 EXPLODED DRAWING A—Model No. WLTL39806.
EXPLODED DRAWING B—Model No. WLTL39806.
EXPLODED DRAWING C—Model No. WLTL39806.
EXPLODED DRAWING D—Model No. WLTL39806.
ORDERING REPLACEMENT PARTS To order replacement parts, see the front cover of this manual. To help us assist you, please be prepared to give the following information: • the MODEL NUMBER of the product (WLTL39806.0) • the NAME of the product (WESLO Cadence 50 SE treadmill) • the SERIAL NUMBER of the product (see the front cover of this manual) • the KEY NUMBER AND DESCRIPTION OF THE PART(S) (see the PART LIST and EXPLODED DRAWING on pages 23 to 27) LIMITED WARRANTY ICON Health & Fitness, Inc.