Model No. WLTL21130 Serial No. Write the serial number in the space above for future reference. Serial Number Decal QUESTIONS? If you have questions, or if there are missing parts, we will guarantee complete satisfaction through direct assistance from our factory. TO AVOID DELAYS, PLEASE CALL DIRECT TO OUR TOLLFREE CUSTOMER HOT LINE. The trained technicians on our Customer Hot Line will provide immediate assistance, free of charge to you. CUSTOMER HOT LINE: 1-800-999-3756 Mon.–Fri., 6 a.m.–6 p.m.
TABLE OF CONTENTS IMPORTANT PRECAUTIONS . . . . . . . . . . . . . . . . . . . . . . . . . . . . . . . . . . . . . . . . . . . . . . . . . . . . . . . . . . . . . 3 BEFORE YOU BEGIN . . . . . . . . . . . . . . . . . . . . . . . . . . . . . . . . . . . . . . . . . . . . . . . . . . . . . . . . . . . . . . . . . . . 5 ASSEMBLY . . . . . . . . . . . . . . . . . . . . . . . . . . . . . . . . . . . . . . . . . . . . . . . . . . . . . . . . . . . . . . . . . . . . . . . . . . . 6 OPERATION AND ADJUSTMENT . . . . .
IMPORTANT PRECAUTIONS WARNING: To reduce the risk of burns, fire, electric shock, or injury to persons, read the following important precautions and information before operating the treadmill. 1. It is the responsibility of the owner to ensure that all users of this treadmill are adequately informed of all warnings and precautions. page 10. To purchase a surge suppressor, see your local WESLO dealer or call 1-800-8063651 and order part number 146148. 2. Use the treadmill only as described. 12.
authorized service representative. Servicing other than the procedures in this manual should be performed by an authorized service representative only. 22. Never drop or insert any object into any opening. 23. DANGER: Always unplug the power cord immediately after use, before cleaning the treadmill, and before performing the maintenance and adjustment procedures described in this manual. Never remove the motor hood unless instructed to do so by an 24. This treadmill is intended for in-home use only.
BEFORE YOU BEGIN Thank you for selecting the WESLO CADENCE® CR12 treadmill. The CADENCE CR12 treadmill combines advanced technology with innovative design to let you enjoy an excellent form of cardiovascular exercise in the convenience and privacy of your home. And when you’re not exercising, the unique CADENCE CR12 treadmill can be folded up, requiring less than half the floor space of other treadmills. Department toll-free at 1-800-999-3756, Monday through Friday, 6 a.m. until 6 p.m.
ASSEMBLY Assembly requires two persons. Set the treadmill in a cleared area and remove all packing materials. Do not dispose of the packing materials until assembly is completed. Note: The underside of the treadmill walking belt is coated with high-performance lubricant. During shipping, a small amount of lubricant may be transferred to the top of the walking belt or the shipping carton. This is a normal condition and does not affect treadmill performance.
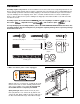
2. Open part bag B. See drawing 2a. Make sure that there are U-nuts (10) in the bottom of each Upright (14, 15). Clip two U-nuts (10) over the two round holes in the top of each Upright (14, 15) as shown. Identify the Right Upright (15), which has a large round hole and a slot near the lower end. While a second person holds the Right Upright near the Wire Harness (53), insert the end of the Wire Harness into the round hole and out of the upper end of the Right Upright.
4. Open part bag C. Set the Console Base (87) on the Handrails (4). Thread four 3/4” Screws (5) into the Handrails and the Console Base. After you have started all four Screws, tighten the Screws until they are snug; do not overtighten the Screws. 4 87 Insert the Wire Harness (53) through the two indicated plastic ties on the Console Base (87) and then through the hole in the bottom of the Console Base. Ties 5 5.
7. Set the Console (11) in the Console Base (87). Make sure that no wires are pinched or obstructing the area under the Battery Cover (12). Insert as much of the Wire Harness (53) as possible down into the hole in the right Handrail (4). Securely tighten the plastic tie nearest to the right Handrail. Pull any excess Wire Harness from between the plastic ties, and then tighten the second plastic tie. Cut off the ends of both plastic ties.
OPERATION AND ADJUSTMENT THE PERFORMANT LUBETM WALKING BELT having an equipment-grounding conductor and a grounding plug. Plug the power cord into a surge suppressor, and plug the surge suppressor into an appropriate outlet that is properly installed and grounded in accordance with all local codes and ordinances. Important: The treadmill is not compatible with GFCI-equipped outlets. Your treadmill features a walking belt coated with PERFORMANT LUBETM, a high-performance lubricant.
DIAGRAM OF THE CONSOLE Displays Speed Control Note: If there is a sheet of clear plastic on the face of the console, remove it before operating the console. removed from the console, the walking belt will stop. CAUTION: Before operating the console, read the following precautions. • Adjust the speed in small increments. • Do not stand on the walking belt when turning on the power. • To reduce the possibility of electric shock, keep the console dry. Avoid spilling liquids on the console.
Follow the steps below to operate the console. 1 seconds, the display will change from one number to the next, as shown the the arrows in the display. Insert the key fully into the console. Inserting the key will not turn on the displays. The displays will turn on when the ON/RESET button is pressed or when the walking belt is started. Note: If you just installed batteries, the displays will already be on. 2 Reset the speed control and start the walking belt.
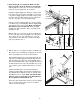
HOW TO FOLD AND MOVE THE TREADMILL HOW TO FOLD THE TREADMILL FOR STORAGE Before folding the treadmill, unplug the power cord. CAUTION: You must be able to safely lift 45 pounds (20 kg) in order to raise, lower or move the treadmill. 1. Hold the treadmill with your hands in the locations shown at the right. CAUTION: To decrease the possibility of injury, bend your legs and keep your back straight. As you raise the treadmill, make sure to lift with your legs rather than your back.
HOW TO LOWER THE TREADMILL FOR USE 1. Hold the upper end of the treadmill with your right hand as shown. Using your left hand, pull the latch knob to the left and hold it. Pivot the treadmill down until the frame is past the latch pin. Slowly release the latch knob. Open Latch Knob Frame 2. Hold the treadmill firmly with both hands, and lower the treadmill to the floor. Do not drop the treadmill frame to the floor. To decrease the possibility of injury, bend your legs and keep your back straight.
MAINTENANCE AND TROUBLESHOOTING Most treadmill problems can be solved by following the steps below. Find the symptom that applies, and follow the steps listed. If further assistance is needed, please call our Customer Service Department tollfree at 1-800-999-3756, Monday through Friday, 6 a.m. until 6 p.m. Mountain Time (excluding holidays). PROBLEM: The power does not turn on SOLUTION: a.
PROBLEM: The walking belt slows when walked on SOLUTION: a. Use only a single-outlet surge suppressor that meets all of the specifications described on page 10. b. If the walking belt is overtightened, treadmill performance may decrease and the walking belt may become damaged. Remove the key and UNPLUG THE POWER CORD. Using the allen wrench, turn both rear roller adjustment bolts counterclockwise, 1/4 of a turn.
CONDITIONING GUIDELINES Aerobic Exercise WARNING: Before beginning this or any exercise program, consult your physician. This is especially important for individuals over the age of 35 or individuals with pre-existing health problems. If your goal is to strengthen your cardiovascular system, your exercise must be “aerobic.” Aerobic exercise is activity that requires large amounts of oxygen for prolonged periods of time.
Training Zone Exercise to cool down. This will increase the flexibility of your muscles and will help to prevent post-exercise problems. After warming up, increase the intensity of your exercise until your pulse is in your training zone for 20 to 60 minutes. (During the first few weeks of your exercise program, do not keep your pulse in your training zone for longer than 20 minutes.) Breathe regularly and deeply as you exercise—never hold your breath.
NOTES 19
PART LIST—Model No. WLTL21130 Key No. Qty.
78 28 28 40 79 95 47 28 84 64 51 8 45 78 65 46 94 30 40 72 71 28 29 83 77 76 82 28 90 51 32 65 60 39 5 58 28 72 8 50 37 64 51 91 19 28 67 70 43 54 97 81 7 16 63 13 10 86* 75 51 74 60 89 10 14 32 5 27 92 41 55 73 49 39 68 17 17 69 76 58 22 43 44 70 52 66 40 42 59 56 18 28 57 9 33 34 57 33 19 19 17 1 61 2 20 21 76 48 22 25 44 22 76 76 24 42 38 33 80 17 41 28 53 26 23* 88 17 1 61 17 2
ORDERING REPLACEMENT PARTS To order replacement parts, call our Customer Service Department toll-free at 1-800-999-3756, Monday through Friday, 6 a.m. until 6 p.m. Mountain Time (excluding holidays).