
User`s manual

13
85
6
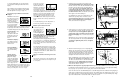
6. Press the Book Rack (85) onto the Console Base (100) in
the location shown.
100
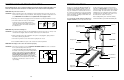
5. Open part bag D. Place the Console Base (100) on the
Right Handrail (6) and the Left Handrail (not shown).
Attach the Console Base with four 3/4” Screws (90) (only
two Screws are shown). Do not tighten the Screws yet.
Insert the Wire Harness (22) through the two indicated
plastic ties on the Console Base (100). Next, insert the
Wire Harness up through the opening beside the Wire
Cover (86). Make sure that the Wire Cover is securely at-
tached to the Console Base.
See drawing 5a. Look at the top of the Console Base
(100). Insert the Wire Harness (22) through the plastic tie
on top of the Console Base.
5
8
100
86
Ties
6
22
Tie
100
90
22
75
22
4
69
69
7
6
87
Small Bracket
Small Bracket
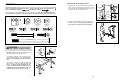
4. See the inset drawings and identify the two Crossbar
Screws (69); be careful not to confuse the Crossbar
Screws with the 3/4” Screws (90).
Hold the Crossbar (75) on the small brackets on the
Handrails (6, 7). Attach the Crossbar to the small brack-
ets with the two Crossbar Screws (69). Do not tighten
the Crossbar Screws yet.
Attach the end of the ground wire to the small hole in the
side of the Right Handrail (6) with a Silver Ground Screw
(87).
69
90
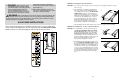
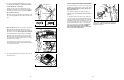
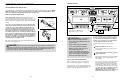
HOW TO CHANGE THE INCLINE OF THE TREADMILL
To vary the intensity of your exercise, the incline of the
treadmill can be changed. There are four incline levels.
Before changing the incline, remove the key and
unplug the power cord.
Next, fold the treadmill to the storage position (see
HOW TO FOLD THE TREADMILL FOR STORAGE on
page 14).
To change the incline, first pull one of the incline legs
out of its housing as shown at the right. Rotate the in-
cline leg to a different position and press in on the indi-
cated button as you reinsert the incline leg. An arrow
on the housing will point to one of four numbers on the
bottom of the incline leg. Position 1 is the lowest in-
cline level, and position 4 is the highest. Adjust the
other incline leg in the same way. CAUTION:
Before using the treadmill, make sure that both in-
cline legs are in the same position.
After you have adjusted the incline legs, lower the
treadmill (see HOW TO LOWER THE TREADMILL
FOR USE on page 15).
Incline Leg
Arrow
Housing
5a
Button