
User`s manual

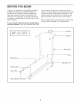

ASSEMBLY
Assembly requires only the included he_ and wrench _ . To avoid damaging parts, do not
use power tools for assembly. Assembly requires two persons. Set the treadmill in a cleared area and
remove all packing materials. Do not dispose of the packing materials until assembly is completed. In the
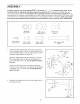
drawing below, the numbers in parentheses are the key numbers of the parts, from the PART LIST near the end
of this manual. The numbers after the parentheses are the quantities needed for assembly. Note: Some small
parts may be pre-assembled. Extra hardware may be included. If a part is missing, call 1-866-699-3756.
M8 Nylon
Nut (13)-4
M8 Curved M8 Washer
Washer (37)-4 (34)-4
M4 x 12mm
Screw (3)-2 M5 x 10mm M8 x 15mm
Screw (10)-2 Screw (33)-4
M8 x 50mm Bolt
(38)-4
,
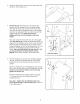
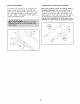
Identify the Right Upright (36), which has a single hole
in the indicated location. Orient the Right Upright so that
the two indicated holes are on the side shown, and hold
the Right Upright against the Base (14).
Attach the Right Upright (36) to the Base (14) with two
M8 x 50mm Bolts (38), two M8 Curved Washers (37),
and two M8 Nylon Nuts (13). Do not tighten the Nylon
Nuts yet.
Orient the Left Upright (35) so that the two indicated
holes are on the side shown, and attach the Left Upright
to the Base (14) in the same way. Do not tighten the
Nylon Nuts yet.
14
37
36
38_
Holes
37
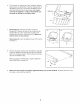
2. Raise the Left Upright (35) and the Right Upright (36) to
the position shown.
2