iii_iiiii_iiii_!i_ii_i_ _!___!i_ _ _Ni ii_ii_i HEART-RATE SENSOR DX I;_ .......................................................................................................................................................................................................... Model No. WLTL31091 Serial No. USER'S MANUAL Serial Number % QUESTIONS? As a manufacturer, we are committed to providing complete customer satisfaction.
TABLE OF CONTENTS IMPORTANT PRECAUTIONS ................................................................. BEFORE YOU BEGIN ....................................................................... ASSEMBLY ............................................................................... OPERATION AND ADJUSTMENT ............................................................. HOW TO FOLD AND MOVE THE TREADMILL .................................................. MAINTENANCE AND TROUBLE-SHOOTING ......................
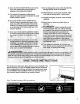
14. Never start the treadmill while you are standing on the walking belt. Always hold the handrails while using the treadmill. 15. The treadmill is capable of high speeds, Adjust the speed in small increments to avoid sudden jumps in speed, 16. The pulse sensor is not a medical device.
BEFORE YOU BEGIN Thank you for selecting the WESLO ® CADENCE DX12 treadmill. The CADENCE DX12 treadmill combines advanced technology with innovative design to let you enjoy an excellent form of cardiovascular exercise in the convenience and privacy of your home. And when you're not exercising, the unique CADENCE DX12 can be folded up, requiring less than half the floor space of other treadmills. please call our Customer Service Department toll-free at 1-800-999-3756, Monday through Friday, 6 a.m.
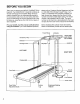
ASSEMBLY Assembly requires two people. Set the treadmill in a cleared area and remove all packing materials. Do not dispose of the packing materials until assembly is completed. Refer to the drawings below to identify the small parts used in assembly. Assembly requires the included allen wrench {] and your own phillips screwdriver (__, two adjustable wrenches _, an-'_'cissors _ . Note: The underside of the treadmill walking belt is coated with high-performance lubricant.
, Cut the plastic tie holding the cage nut in the upper end of Left Handrail (2). Position the Left Handrail (2) on the left Upright (14). The lower end of the Left Handrail should be on the outside of the Extension Leg (41) as shown. Thread a Handrail Bolt (15) with a Handrail Washer (16) into the left Upright and the Left Handrail. Do not tighten the Handrail Bolt yet.
OPERATION AND ADJUSTMENT THE PERFORMANT LUBE TM WALKING BELT electric shock. This product is equipped with a cord having an equipment-grounding conductor and a grounding plug. Plug the power cord into a surge protector, and plug the surge protector into an appropriate outlet that is properly installed and grounded in accordance with all local codes and ordinances. Your treadmill features a walking belt coated with PERFORMANT LUBE TM, a high-performance lubricant.
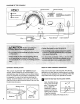
DIAGRAM OF THE CONSOLE WESLO Speed Control / Monitor Display u ON _.WARNING: OFF Pulse Clip-- Incline Control BATTERY INSTALLATION STEP BY STEP CONSOLE OPERATION The console requires two "AA" batteries (not included). Alkaline batteries are recommended. To install batteries, open the battery cover as shown below. Press two batteries into the battery compartment, with the negative (-) ends of the batteries touching the springs.
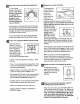
B Reset the console and start the walking belt. Pulse Sensor place your thumb on the pulse sensor as shown. The Next, slowly turn the speed control until the walking belt begins to move at slow speed. Carefully step onto the walking belt and begin exercising. Change the speed of the walking belt as desired by turning the speed control. To stop the walking belt, step onto the foot rails and turn the speed control to the RESET position.
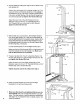
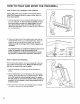
HOW TO FOLD AND MOVE THE TREADMILL HOW TO FOLD THE TREADMILL FOR STORAGE Unplug the power cord. Caution: You must be able to safely lift 45 pounds (20 kg) in order to raise, lower, or move the treadmill. 1. Hold the treadmill with your hands in the locations shown at the right. Caution: To decrease the possibility of injury, bend your legs and keep your back straight. As you raise the treadmill, make sure to lift with your legs rather than your back.
HOW TO LOWER THE TREADMILL FOR USE 1. Hold the upper end of the treadmill with your right hand as shown. Using your left thumb, press the storage latch and hold it. Pivot the treadmill until the frame and foot rail are past the storage latch. Opened Storage 2. Hold the treadmill firmly with both hands, and lower the treadmill to the floor. Caution: To decrease the possibility of injury, bend your legs and keep your back straight.
MAINTENANCE AND TROUBLE-SHOOTING Most treadmill problems can be solved by following the steps below. Find the symptom that applies, and follow the steps listed. If further assistance is needed, please call our Customer Service Department tollfree at 1-600-999-3756, Monday through Friday, 6 a.m. until 6 p.m. Mountain Time (excluding holidays). PROBLEM: The power does not turn on SOLUTION: a.
PROBLEM: The walking belt slows when walked on SOLUTION: a. Use only a UL-listed surge protector, rated at 15 amps, with a 14-gauge cord of five feet or less in length. b. If the walking belt is overtightened, treadmill performance may decrease and the walking belt may be permanently damaged. Remove the key and UNPLUG THE POWER CORD. Using the allen wrench, turn both rear roller adjustment bolts counterclockwise, 1/4 of a turn.
CONDITIONING GUIDELINES Fat Burning ,_/'_111_11|_1_" Before beginning this orany exercise program, consult your physician. This is especially important for individuals over the age of 35 or individuals with preexisting health problems. The pulse sensor is not a medical device. Various factors, including your movement, may affect the accuracy of heart rate readings.
Exercise Frequency To maintain or improve your condition, complete three workouts each week, with at least one day of rest be- tween workouts. After a few months, you may complete up to five workouts each week if desired. The key to success is to make exercise a regular and enjoyable part of your everyday life. SUGGESTED STRETCHES The correct form for several basic stretches is shown in the drawings at the right. Move slowly as you stretch--never bounce. 1.
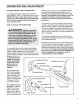
EXPLODED DRAWING--Model No. WLTL31091 R1199A 5 16 30 30 26 12 15 30 29 28 41 16 89 39 44 39 87 86 13 83 47 75 77 33 16 39 38 80 \ 74 79 62 13 78 31 71 37 13 30 69 65 32 64
PART LIST--Model Key No. Qty. 1 2 3 4 5 6 7 8 9 10 11" 12 13 14 15 16 17 18 19" 20 21 22 23 24 25 26 27 28 29 30 31 32 33 34 35 36 37 38 39 40 41 42 43 44 45 46 47 48 49 5O 1 1 2 1 4 1 1 1 2 1 1 1 10 1 2 7 1 1 1 1 1 4 1 1 1 1 2 1 1 16 1 4 2 2 10 6 2 2 7 1 2 1 1 1 1 4 2 1 1 2 No. WLTL31091 Description R1199A Key No. Qty.
ORDERING REPLACEMENT PARTS To order replacement parts, call our Customer Service Department toll-free at 1-800-999-3756, Monday through Friday, 6 a.m. until 6 p.m. Mountain Time (excluding holidays). When ordering parts, please be prepared to give the following information: • The MODEL NUMBER of the product (WLTL31091). • The NAME of the product (WESLO ®CADENCE DX12 treadmill). • The SERIAL NUMBER of the product (see the front cover of this manual).