
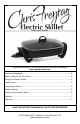
Owner's Manual

4
U
SING
Y
OUR
E
LECTRIC
S
KILLET
1. Place appliance on dry, level, heat-resistant surface, away from any edge. NOTE:
Do not block airflow under the skillet. If you wish to aid grease draining, open the tilt
leg into position before preheating, to allow grease to flow to one side of the skillet.
2. With the temperature control dial set in the "OFF" position, attach it to the skillet.
Plug the cord into a 120 volt, AC electric outlet only. Do not use any temperature
control other than that which came with your skillet.
3. Preheat the skillet, uncovered, for 2 to 4 minutes or until the desired temperature is
reached, unless the recipe states not to preheat. The signal light on temperature
control will be illuminated while the skillet is heating.
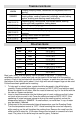
4. Refer to the “Temperature Guide” in this booklet for selecting the correct heat
setting. If the food is frozen, use the heat setting indicated, but allow for longer
cooking times.
5. When the cooking temperature has been reached, the signal light will go out. Add
food. The temperature may be increased or decreased depending upon personal
preference and the type or amount of food being prepared. The signal light will
cycle on and off during cooking to indicate that the proper temperature is being
maintained.
6. At the end of the cooking period, set the temperature control at “WARM” for
serving, or “OFF” if the food will be removed immediately from the skillet. After the
dial is set at “OFF,” unplug the cord from the wall outlet.
• A small amount of smoke and/or odor may occur upon heating due to the
release of manufacturing oils – this is normal.
• Some minor expansion/contraction sounds may occur during heating and
cooling – this is normal.
H
ELPFUL
H
INTS
Foods may be prepared with or without butter, shortening or oil. When frying, using a
small amount of fat will improve the flavor, color and/or crispness of meat, fish, poultry
and eggs. This skillet is not designed to deep fry. Never use more than one cup of
vegetable or peanut oil for shallow pan-frying. Meat may be cooked in its own juices if
the skillet is covered and the temperature control is set at “SIMMER.”
Plastic, rubber and wooden cooking tools are recommended for use on the non-stick
surface. Smooth-edged metal cooking tools may be used with care. However, do not
use sharp-edged metal (forks, knives, mashers, beaters or food choppers) as scratching
may occur. Never cut foods directly in the skillet, this will scratch the nonstick finish.
Minor scratching will affect only the appearance of the surface; it will not harm its non-
stick property or the food prepared in the skillet.
Periodically check the handles to ensure that they are completely tightened; they should
feel secure and not wobble. DO NOT OVERTIGHTEN, AS STRIPPING OF THE
SCREWS AND BREAKAGE OF THE HANDLES CAN OCCUR.