MICROWAVE OVEN Instruction Manual Precautions To Avoid Possible Exposure To Excessive Microwave Energy........................2 Important Safeguards..................................................................................................................3 Setting Up Your Oven..................................................................................................................7 Operation......................................................................................................
PRECAUTIONS TO AVOID POSSIBLE EXPOSURE TO EXCESSIVE MICROWAVE ENERGY (a) Do not attempt to operate this oven with the door open as this can result in harmful exposure to microwave energy. It is important not to tamper with the safety interlocks. (b) Do not place any object between the oven front face and the door or allow soil or cleaner residue to accumulate on sealing surfaces. (c) Do not operate the oven if it is damaged.
IMPORTANT SAFEGUARDS CAUTION WARNING To reduce the risk of burns, electric shock, fire,injury to persons or exposure to excessive microwave oven energy when using your appliance, follow basic safety precautions, including the following: • Read all instructions before using the may explode and should not be heated appliance. in the oven. • Read and follow the specific: "PRECAU• Use this appliance only for its intended TIONS TO AVOID POSSIBLE EXPOSURE uses as described in this manual.
• Liquids, such as water, coffee, or tea may overheat beyond the boiling point without appearing to be boiling. Visible bubbling or boiling when the container is removed from the microwave oven is not always present. THIS COULD RESULT IN VERY HOT LIQUIDS SUDDENLY BOILING OVER WHEN THE CONTAINER IS DISTURBED, OR A SPOON OR OTHER UTENSIL IS INSERTED INTO THE LIQUID. i) Do not overheat the liquid. ii) Stir the liquid both before and halfway through heating it.
1. A short power-supply cord is provided to reduce the risks resulting from becoming entangled in or tripping over a longer cord. 2. Longer cord sets or extension cords are available and may be used if care is exercised in their use. 3. If a long cord set or extension cord is used: 1) The marked electrical rating of the cord set or extension cord should be at least as great as the electrical rating of the appliance. 2) The extension cord must be a grounding-type 3-wire cord.
Materials you can use in microwave oven Utensils Comments Aluminum foil Shielding only. Small smooth pieces can be used to cover thin parts of meat or poultry to prevent overcooking. Arcing can occur if foil is too close to oven walls. The foil should be at least 1 inch (2.5cm) away from oven walls. Follow manufacturer's instructions. The bottom of browning dish must be at least 3/16 inch (5mm) above the turntable. Incorrect usage may cause the turntable to break. Microwave-safe only.
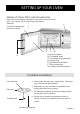
SETTING UP YOUR OVEN Names of Oven Parts and Accessories Remove the oven and all materials from the carton and oven cavity. Your oven comes with the following accessories: Glass tray 1 Turntable ring assembly 1 Instruction manual 1 F E D C A B A) Control panel B) Turntable shaft C) Turntable ring assembly D) Glass tray E) Observation window F) Door assembly G) Safety interlock system G Turntable Installation Hub (underside) a. Never place the glass tray upside down.
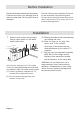
Before Installation Remove all packing material and accessories. Examine the oven for any damage such as dents or broken door. Do not install if oven is damaged. Cabinet: Remove any protective film found on the microwave oven cabinet surface. Do not remove the light brown Mica cover that is attached to the oven cavity to protect the magnetron. Installation 1. Select a level surface that provides enough open space for the intake and/or outlet vents. 12 inch(30cm) 3.0 inch(7.5cm) OPEN 3.0 inch(7.
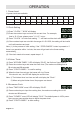
OPERATION Control Panel and Features (1) (2) (3) (4) (7) (8) (5) (6) (9) (1) (2) (3) (4) (5) (11) Time Cook (10) Time Defrost Power Clock Auto menu: Popcorn, Potato, Pizza, Frozen Vegetable, Beverage, Dinner Plate (6) Number Buttons: 0-9 (7) Weight Defrost (8) Kitchen Timer function (9) Stop/Cancel: clears all previous setting pressed before cooking starts. During cooking: press once to stop oven; twice to stop and clear all entries. (10) Memory function (11) Start/+30Sec.
OPERATION 1. Power Level 11 power levels are available. Level 10 9 8 7 6 5 4 3 2 1 0 Power 100% 90% 80% 70% 60% 50% 40% 30% 20% 10% 0% Display PL10 PL9 PL8 PL7 PL6 PL5 PL4 PL3 PL2 PL1 PL0 2. Clock Setting (1) Press " CLOCK ," "00:00" will display. (2) Press the number keys and enter the current time. For example, time is 10:12 now, please press "1,0,1,2" in turn. (3) Press " CLOCK " to finish clock setting. ":" will flash and the clock will be lighted.
Example: to cook the food with 50% microwave power for 15 minutes. a. Press "TIME COOK" once. "00:00" displays. b.Press "1","5","0","0" in order. c.Press "POWER"once, then press "5" to select 50% microwave power. d.Press "START/+30SEC." to start cooking. Note:1) In the process of setting, if the " STOP/CANCEL" button is pressed or if there is no operation within 1 minute, the oven will go back to the former setting automatically. 2) If "PL0" selected, the oven will work with fan for no power.
8. POPCORN a)Press " POPCORN " repeatedly until the number you wish appears in the display, "1.75","3.0","3.5" will display in order. For example, press "POPCORN" once, "1.75" appears. b) Press " START/+30 SEC. " to cook, buzzer sounds once. When cooking finish, buzzer will sound five times and then turn back to waiting state. 9. POTATO a) Press " POTATO " repeatedly until the number you wish appears in the display, "1","2","3" will display in order.
12. DINNER PLATE a) Press " DINNER PLATE " repeatedly until the number you wish appears in the display, "9.0","12.0","18.0" oz will display in order. For example, press "DINNER PLATE" once, "9.0" appears. b) Press " START/+30 SEC. " to cook, buzzer sounds once. When cooking finish, buzzer sounds five times and then turn back to waiting state. 13. PIZZA a) Press " PIZZA " repeatedly until the number you wish appears in the display, "4.0","8.0","14.0" oz will display in order.
15. Multi-stage Cooking At most, 2 stages can be set for cooking. In multi-stage cooking, if one stage is defrosting, then defrosting shall be placed at the first stage automatically. Note: Auto cooking cannot work in the multi-stage cooking. Example: if you want to cook with 80% microwave power for 5 minutes + 60% microwave power for 10 minutes.
Troubleshooting Check your problem by using the chart below and try the solutions for each problem. If the microwave oven still does not work properly, contact the nearest authorized service center. TROUBLE POSSIBLE CAUSE Oven will not start a. Electrical cord for oven is not plugged in. b. Door is open. c. Wrong operation is set. a. Plug into the outlet. b. Close the door and try again. c. Check instructions. Arcing or sparking a. Materials to be avoided in microwave oven were used. b.
ONE YEAR LIMITED WARRANTY This product carries a warranty that it will be free from defects in material and workmanship for a period of one year from the date of purchase. This warranty is valid for the original retail purchaser from the date of initial retail purchase and is not transferable. Keep your original sales receipt.
HORNO MICROONDAS Manual de Instrucciones Precauciones Para Evitar Posible Exposición A La Excesiva Energía De Microondas........2 Precauciones Importantes....................................................................................................3 Preparando Su Horno Microondas Para Uso......................................................................7 Funcionamiento.....................................................................................................................
PRECAUCIONES PARA EVITAR POSIBLE EXPOSICIÓN A EXCESIVA ENERGÍA DE MICROONDAS (a) No intente operar este horno con la puerta abierta ya que esto puede causar una exposición dañina a energía de microondas. Es importante no quebrar u obstruir los cierres de seguridad. (b) No ubicar ningún objeto entre la pared frontal del horno y la puerta ni permitir que residuos de suciedad o limpiadores se acumulen en los bordes. (c) No operar el horno si está dañado.
INSTRUCCIONES DE SEGURIDAD IMPORTANTES PRECAUCIÓN Con el fin de reducir el riesgo de que se produ can queADVERTENCIA maduras, una descarga eléctrica, un incendio, lesiones z o exposiciones a la energía microondas excesiva al momento de usar este electrodoméstico, siga las siguientes precauciones de seguridad básicas: • Lea todas las instrucciones antes de ros y envases cerrados herméticamente,y frascos de vidrio, podrían utilizar el electrodoméstico.
• Los líquidos, tales como el agua, café o té pueden sobrecalentarse más allá del punto de ebullición sin parecer haber hervido. El burbujeo o hervido visible de un recipiente al momento de sacarlo del horno de microondas no siempre está presente. ESTO PODRÍA OCASIONAR QUE UN LÍQUIDO CALIENTE REPENTINAMENTE ROMPA EL HERVOR AL MOMENTO DE ACCIONAR ALGÚN MOVIMIENTO O METER UNA CUCHARA U OTRO UTENSILIO DENTRO DEL LÍQUIDO. i) No sobrecaliente los líquidos.
1. Un cable de abastecimiento corto reduce los riesgos derivados de enredarse o tropezarse con un cable mas largo. 2. Cordones más largos o cables de más extensión están disponibles y pueden ser ser utilizados si se ejerce el cuidado en su uso. 3.
Materiales que se pueden usar en el horno microondas Utensilos Observaciones Solamente como protección. Pequeñas piezas lisas pueden ser usadas para cubrir partes delgadas de carne o pollo para prevenir sobre cocción. Puede ocurrir que se formen arcos si el film está muy cerca de las paredes del horno. El film debe estar por lo menos a 1 pulg(2,5 cm) de distancia de las paredes del horno. Bandeja doradora Siga las instrucciones del fabricante.
PREPARANDO SU HORNO MICROONDAS PARA USO Nombres de las Partes y Accesorios Retire el horno y todos los materiales de su caja y de la cavidad del horno.
Previo a la Instalación Retire todo el material de embalaje y los accesorios. Examine el horno para descubrir si este tiene algún daño como ser abolladuras o la puerta desviada o rota. Gabinete: Quite todo el film protector que encuentre en la superficie del gabinete. No quite la tapa de Mica color marrón claro adherida dentro de la cavidad del horno, ya que esta sirve para proteger la válvula magnetrón. Instalación 1.
FUNCIONAMIENTO Panel de Control y Funciones (1) (2) (3) (4) (7) (8) (5) (6) (9) (11) (1) (2) (3) (4) (5) Tiempo de Coccion Descong por Tiempo (10) Potencla Reloj Auto menus: Popcorn, Papas, Pizza, Vegetales Congelados, Bebida, Plato de Comida (6) Botones de Nu meros: 0-9 (7) Descongelar por peso (8) Funcion Temporizador (9) Detener/Borrar: Borra todo lo programado anteriormente antes de iniciarse la cocción.
OPERACIÓN 1. N i v e l d e Potencla 11 Niveles de potencia disponibles. 9 8 7 6 5 4 3 2 1 0 Potencia 100% 90% 80% 70% 60% 50% 40% 30% 20% 10% 0% PL10 PL9 PL8 PL7 PL6 PL5 PL4 PL3 PL2 PL1 PL0 Nivel Pontalla de l Aparato 10 2. Ajuste de Reloj (1) Presione "CLOCK"(RELOJ) , se mostrará "00:00". (2) Presione las teclas de número e introduzca la hora actual. Por ejemplo, la hora actual es 1 0 :1 2 , ahora, por favor presione "1, 0 ,1, 2 " a su vez.
Ejemplo: para cocinar los alimentos con 50% de potencia de microondas por quince minutos. a. Presione "TIME COOK"(TIEMPO DE COCCION) una vez, aparecerá "00:00". b. Presione " 1", "5", "0", "0" en orden. c. Presione "POWER"(POTENCIA) una vez, luego presione "5" para seleccionar el 50% de potencia de microonda. d. Presione "START/+30SEC."(INICAR/+30SEG.) para empezar a cocinar.
8 . Popcorn a) Presione " POPCORN " repetidas veces hasta que el número que desea aparezca en la pantalla, "1.75 ", "3.0", " 3.5" oz aparecerá en orden. Por ejemplo, presione " POPCORN " una vez y aparecerá "1.75 ". b) Presione "START/+30SEC."(INICAR/+30SEG.) para cocinar, el timbre sonará una vez. Cuando termine de cocinar, el timbre sonará cinco veces y luego volverá al estado de espera. 9 .
12. Plato de Comida a) Presione "DINNER PLATE"(PLATO DE COMIDA) repetidas veces hasta que el número que desea aparezca en la pantalla, "9.0", "12.0", "18.0" oz aparecerá en orden. Por ejemplo, presione"DINNER PLATE"(PLATO DE COMIDA) una vez y aparecerá "9.0" . b) Presione "START/+30SEC."(INICAR/+30SEG.) para cocinar, el timbre sonará una vez . Cuando termine de cocinar, el timbre sonará cinco veces y luego volverá al estado de espera. 13.
15. Fase de Cocción Múltiple Solo 2 etapas pueden ser programadas como máximo. En la fase cocción múltiple, si una etapa es el descongelamiento, entonces el descongelamiento deberá ubicarse en la primera etapa automáticamente. Nota: La auto-cocción no puede funcionar en una fase de cocción múltiple.
GUÍA DE SOLUCIÓN DE PROBLEMAS Esta guía de mantenimiento y problemas ha sido desarrollada para que el usuario pueda referirse a ella en caso de que algún problema se presente con el aparato. Usted debe revisar esta guía antes de llamar a servicio técnico y determinar que lo que esta presentado el horno no sea posible resolverlo por medio de estas instrucciones.
GARANTÍA LIMITADA POR UN AÑO Este producto cuenta con una garantía por defectos de materiales y fabricación por el período de un año a partir de la fecha de compra. Esta garantía es válida para el comprador minorista original desde la fecha de compra inicial y no es transferible. Guarde su comprobante de venta original.